Integrating the Trento MCP Server with SUSE AI
This guide explains how to integrate the Trento MCP Server with SUSE AI, including configuration and deployment instructions.
Getting Started with SUSE AI
SUSE AI is a platform that allows you to deploy and manage AI models and applications in a Kubernetes environment. It provides tools for model management, deployment, and integration with various AI frameworks.
Refer to the official SUSE AI documentation for detailed information. This guide focuses on deploying the Trento MCP Server with SUSE AI, specifically using Ollama and Open Web UI. Always refer to the latest instructions in the SUSE AI deployment guide for the most accurate and up-to-date information.
Prerequisites
This guide assumes:
-
A Kubernetes cluster set up and running (with an ingress controller and cert-manager installed).
-
Access to the SUSE Application Collection.
When running Ollama models, this guide assumes you have one of the following:
-
A Kubernetes cluster with sufficient resources (GPU, memory, etc.).
-
A cloud provider and enough permissions to deploy Ollama models remotely.
Limitations
Deploying the entire SUSE AI stack requires significant resources, especially for running Ollama models. Alternatively, you can deploy only Open Web UI and connect it to an Ollama instance running elsewhere. This guide uses this approach: on-premises Open Web UI with Ollama running on a remote server (e.g., Google Cloud).
Getting the Artifacts from SUSE Application Collection
You need access to the SUSE Application Collection and proper entitlements to download the required artifacts. Always refer to the SUSE Application Collection documentation for the latest instructions on authentication and access. This guide assumes you have the necessary credentials and permissions.
|
To run the entire stack, you can also use the SUSE AI Deployer Helm Chart. |
-
Log in to the SUSE Application Collection:
# Replace placeholders with your actual credentials helm registry login dp.apps.rancher.io/charts -u <REPLACE_WITH_YOUR_USERNAME@apps.rancher.io> -p <REPLACE_WITH_YOUR_PASSWORD> -
Create a namespace for SUSE AI:
kubectl create namespace suse-ai -
Create a Kubernetes Pull Secret (
application-collection) for the SUSE Application Collection:# Replace placeholders with your actual credentials kubectl create -n suse-ai secret docker-registry application-collection \ --docker-server=dp.apps.rancher.io \ --docker-username=<REPLACE_WITH_YOUR_USERNAME@apps.rancher.io> \ --docker-password=<REPLACE_WITH_YOUR_PASSWORD>
Install Open Web UI
This section describes how to install the Open Web UI, which provides a user-friendly interface for interacting with AI models.
-
Create a values.openwebui.yaml file with the values for Open Web UI.
-
Install Open Web UI using Helm with the values file (
values.openwebui.yaml) created above:You must have
cert-managerproperly installed, and an ingress controller is required. If you don’t have an ingress controller, you may need to adjust the Kubernetes services configuration.helm -n suse-ai upgrade --install open-webui oci://dp.apps.rancher.io/charts/open-webui -f values.openwebui.yaml
Deploying a Model with Ollama Remotely
If your infrastructure does not have sufficient resources to run Ollama models, you can deploy them on a remote server, such as Google Cloud Run.
This section describes how to deploy the Qwen3:8b model using Ollama on Google Cloud Run. This guide assumes you have a Google Cloud account and the necessary permissions to deploy applications on Google Cloud Run.
|
Always refer to the official Google Cloud documentation for the most accurate and up-to-date information. |
-
Create a Dockerfile for the Ollama model.
-
In the same directory as the
Dockerfile, run the following command to build the Docker image:
gcloud run deploy qwen3-8b --source . --concurrency 4 --cpu 8 --set-env-vars OLLAMA_NUM_PARALLEL=4 --gpu 1 --gpu-type nvidia-l4 --max-instances 1 --memory 32Gi --no-allow-unauthenticated --no-cpu-throttling --no-gpu-zonal-redundancy --timeout=600+
|
To make requests, you need to either allow unauthenticated requests or use a service account with the necessary permissions. Refer to the Google Cloud Run documentation for information on setting up service accounts and permissions. |
+
After deployment, you will have a Google Cloud Run service running the Qwen3:8b model, accessible via a URL provided by Google Cloud Run (e.g., https://qwen3-8b-<project-id>.<region>.run.app).
Adding the Remote Model to Open Web UI
Once you have the Ollama model running on Google Cloud Run, you can add it to Open Web UI for easy access.
-
Navigate to the Open Web UI settings page (e.g.,
suse-ai.example.com/admin/settings) and go to the Connections section. -
Add a new Ollama connection with the URL of your deployed model (e.g.,
https://qwen3-8b-<project-id>.<region>.run.app). -
Navigate to the Models section, click Manage Models, select the Ollama connection you just created, and pull the
Qwen3:8bmodel.
Deploying the Trento MCP Server
To deploy the Trento MCP Server in your SUSE AI cluster, install it via the Trento Server Helm chart. Follow the step-by-step instructions in Installing MCP Server with Trento Server. The Trento MCP Server is packaged as a sub-chart and can be enabled during the Trento Server installation.
For chart sources and values, see the Trento helm-charts repository.
Once Trento is installed, ensure you have created a Trento API token (Personal Access Token):
-
Log in to your Trento web interface with your username and password.
-
Click on your username in the top-right corner and select Profile.
-
Scroll down to the Personal Access Tokens section.
-
Click the Generate Token button.
-
Enter a descriptive name for the token (e.g., "MCP Client").
-
Optionally configure an expiration date for the token, or select Never Expires.
-
Click Generate Token.
-
Important: Copy the generated token immediately and store it securely - it will not be shown again.

Adding the Trento MCP Server to Open Web UI
Open Web UI includes native support for the Model Context Protocol (MCP). With this integration, Open Web UI connects to MCP servers from the backend, allowing you to safely use an internal Kubernetes Service DNS name without exposing the service publicly.
Refer to the official Open Web UI MCP feature guide for screenshots and advanced options: Open Web UI with MCP.
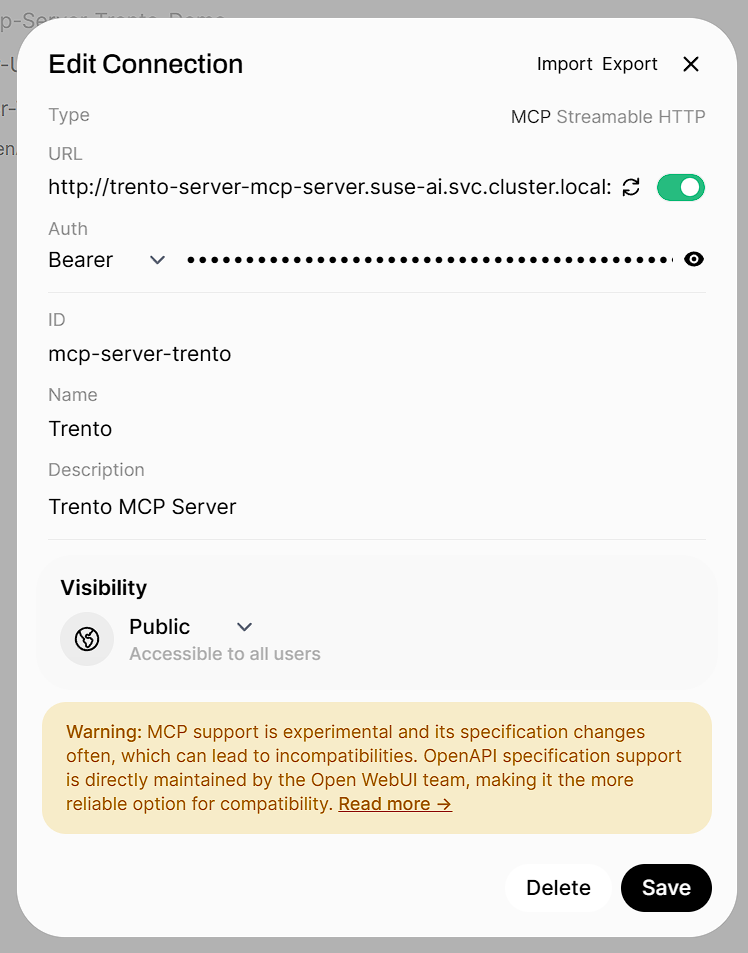
Add the Trento MCP Server in Open Web UI
-
Open Admin Settings and go to External Tools.
-
Click Add Server.
-
Set Type to
MCP (Streamable HTTP). -
Enter your Server URL and authentication details:
-
Server URL (example):
http://trento-server-mcp-server.suse-ai.svc.cluster.local:5000/mcp -
Auth:
<TOKEN>(the token you generated in the Trento console)
-
-
Click Save.
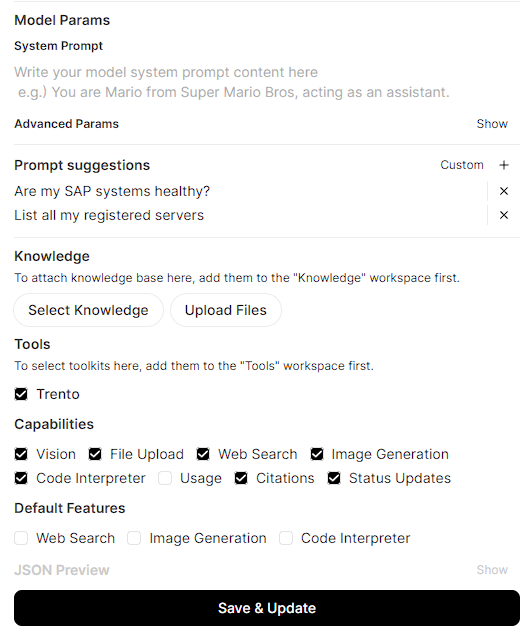
Enable the Trento MCP Server for a Model
-
Go to Models, select Manage Models, and open your target model (e.g.,
Qwen3:8b). -
In the Tools or MCP Servers section, enable/select
Trento MCP Serverfor this model. This makes the Trento tools available to any user of that model in Open Web UI. -
Verify the integration:
-
Start a new chat with the enabled model
-
Confirm that tools from
Trento MCP Serverare available and can be invoked (for example, try listing SAP systems)
-
Using the Trento MCP Server
Once the Trento MCP Server is configured and enabled for your model, you can start using it to interact with your SAP systems through natural language conversations.
Start a Chat and Use Trento Tools
-
Navigate to the Open Web UI main screen and select your configured model (e.g.,
Qwen3:8b) from the model selector. -
Start a new chat session with the model.
-
Ask questions about your SAP landscape using natural language:
-
"List all SAP systems in my environment"
-
"Show me the health status of my HANA clusters"
-
"Are there any critical alerts I need to address?"
-
"What SAP systems are currently running?"
-
"Show me all hosts running SAP applications"
-
"Get details about the latest check execution results"
-
The AI model will use the Trento MCP Server tools to query your Trento installation and provide detailed, contextual responses about your SAP infrastructure.

Additional Resources
-
Trento MCP Server Installation Guide - For deploying and configuring the Trento MCP Server.
-
Configuration Options - For detailed Trento MCP Server configuration reference.
-
Model Context Protocol Documentation - For general MCP information and client compatibility.