User Documentation
- 1. What is Trento?
- 2. Lifecycle
- 3. Requirements
- 4. Installation
- 5. Update
- 6. Uninstallation
- 7. Prometheus integration
- 7.1. Metrics collection overview
- 7.2. Requirements for SUSE Linux Enterprise Server for SAP applications 15 hosts (pull mode)
- 7.3. Requirements for SUSE Linux Enterprise Server for SAP applications 16 hosts (push mode)
- 7.4. Kubernetes deployment
- 7.5. systemd deployment
- 7.6. Enabling Prometheus remote write for Grafana Alloy hosts
- 7.7. Configuring Grafana Alloy
- 8. MCP Integration
- 9. Core Features
- 10. Compliance Features
- 11. Using Trento Web
- 12. Integration with SUSE Multi-Linux Manager
- 13. Operations
- 14. Reporting an Issue
- 15. Problem Analysis
- 16. Analytics
- 17. Compatibility matrix between Trento Server and Trento Agents
- 18. Highlights of Trento versions
- 19. More information
1. What is Trento?
Trento is the official version of the Trento community project. It is a comprehensive monitoring solution consisting of two main components: the Trento Server and the Trento Agent. Trento provides the following functionality and features:
-
A user-friendly reactive Web interface for SAP Basis administrators.
-
Automated discovery of Pacemaker clusters using SAPHanaSR classic or angi as well as different fencing mechanisms, including diskless SBD.
-
Automated discovery of SAP systems running on ABAP or JAVA stacks and HANA databases.
-
Awareness of maintenance situations in a Pacemaker cluster at cluster, node, or resource level.
-
Configuration validation for SAP HANA Scale-Up Performance/Cost-optimized, SAP HANA Scale-out and ASCS/ERS clusters deployed on Azure, AWS, GCP or on-premises bare metal platforms, including KVM and Nutanix.
-
Useful information that offers insights about the execution of configuration checks.
-
Delivery of configuration checks decoupled from core functionality.
-
Email alerting for critical events in the monitored landscape.
-
Integration of saptune into the console and specific configuration checks at host and cluster levels.
-
Information about relevant patches and upgradable packages for registered hosts via integration with SUSE Multi-Linux Manager.
-
Monitoring of CPU, memory, filesystem and swap usage at host level through basic integration with Prometheus.
-
API-based architecture to facilitate integration with other monitoring tools.
-
Rotating API key to protect communication from the Trento Agent to the Trento Server.
-
AI assistance via Model Context Protocol (MCP) integration.
-
Housekeeping capabilities.

1.2. Trento Server
The Trento Server is an independent, distributed system designed to run on a Kubernetes cluster or as a regular systemd stack. It provides both a Web front-end for user interaction and backend APIs for automation and integration with components such as the Trento MCP Server. Together with the optional Trento MCP Server, it enables secure, AI-assisted operations by exposing Trento Server APIs for natural-language interactions with tools like MCPHost, Copilot, Claude, and SUSE AI.
The Trento Server consists of the following components:
-
The Web component that acts as a control plane responsible for internal and external communications as well as rendering the UI.
-
The orchestration engine named Wanda that orchestrates the execution of compliance checks and operations.
-
The Trento MCP Server which creates a secure bridge between the infrastructure data collected by Trento and your Large Language Model (LLM) of choice.
-
A PostgreSQL database for data persistence.
-
The RabbitMQ message broker for communication between the orchestration engine and the agents.
-
A Prometheus instance that retrieves the metrics collected by the Prometheus node exporter in the registered hosts. This Prometheus instance is optional in a systemd deployment.
2. Lifecycle
Trento is part of SUSE Linux Enterprise Server for SAP applications. Trento’s two main components have the following product lifecycles:
- Trento Agent
-
- Delivery mechanism
-
RPM package for SUSE Linux Enterprise Server for SAP applications 15 SP4 and newer, and SUSE Linux Enterprise Server for SAP applications 16.0.
- Supported runtime
-
Supported in SUSE Linux Enterprise Server for SAP applications 15 SP4 and newer, and SUSE Linux Enterprise Server for SAP applications 16.0, on x86_64 and ppc64le architectures.
- Trento Server
-
- Delivery mechanisms
-
A set of container images from the SUSE public registry together with a Helm chart that facilitates their installation or a set of RPM packages for SUSE Linux Enterprise Server for SAP applications 15 SP4 and newer, and SUSE Linux Enterprise Server for SAP applications 16.0.
- Kubernetes deployment
-
The Trento Server runs on any current Cloud Native Computing Foundation (CNCF)-certified Kubernetes distribution based on a x86_64 architecture. Depending on your scenario and needs, SUSE supports several usage scenarios:
-
If you already use a CNCF-certified Kubernetes cluster, you can run the Trento Server in it.
-
If you don’t have a Kubernetes cluster, and need enterprise support, SUSE recommends SUSE Rancher Prime Kubernetes Engine (RKE) (RKE) version 2.
-
If you do not have a Kubernetes enterprise solution but you want to try Trento, SUSE Rancher’s K3s provides you with an easy way to get started. But keep in mind that K3s default installation process deploys a single node Kubernetes cluster, which is not a recommended setup for a stable Trento production instance.
-
- systemd deployments
-
Supported in SUSE Linux Enterprise Server for SAP applications 15 SP4 and newer, and SUSE Linux Enterprise Server for SAP applications 16.0 on x86_64 and ppc64le architectures.
3. Requirements
This section describes requirements for the Trento Server and its Trento Agents, as well as the SAP systems and clusters that we want to monitor in the backend environment.
3.1. Trento Server requirements
Running all the Trento Server components requires a minimum of 4 GB of RAM, two CPU cores and 64 GB of storage. When using K3s, such storage should be provided under /var/lib/rancher/k3s.
Trento is based on event-driven technology. Registered events are stored in a PostgreSQL database with a default retention period of 10 days. For each host registered with Trento, you need to allocate at least 1.5GB of space in the PostgreSQL database.
Trento Server supports different deployment scenarios: Kubernetes and systemd. A Kubernetes-based deployment of Trento Server is cloud-native and OS-agnostic. It can be performed on the following services:
-
RKE2
-
a Kubernetes service in a cloud provider
-
any other CNCF-certified Kubernetes running on x86_64 architecture
The Helm chart and the container images required for a Kubernetes-based deployment are available in SUSE public registry.
A production-ready Kubernetes-based deployment of Trento Server requires Kubernetes knowledge. The Helm chart is intended to be used by customers without in-house Kubernetes expertise, or as a way to try Trento with a minimum of effort. However, Helm chart delivers a basic deployment of the Trento Server with all the components running on a single node of the cluster.
The packages required for a systemd deployment are available in the repositories of SUSE Linux Enterprise Server for SAP applications 15 (SP4 or higher) or SUSE Linux Enterprise Server for SAP applications 16.0.
3.2. Trento Agent requirements
The resource footprint of the Trento Agent is designed to not impact the performance of the host it runs on.
The Trento Agent component needs to interact with several low-level system components that are part of the SUSE Linux Enterprise Server for SAP applications distribution.
The hosts must have unique machine identifiers (ids) in order to be registered in Trento. This means that if a host in your environment is built as a clone of another one, make sure to change the machine’s identifier as part of the cloning process before starting the Trento Agent on it.
Similarly, the clusters must have unique authkeys in order to be registered in Trento.
The Trento Agent package is available in the repositories of SUSE Linux Enterprise Server for SAP applications 15 (SP4 or higher) or SUSE Linux Enterprise Server for SAP applications 16.0.
3.3. Network requirements
-
Required inbound connectivity:
-
From any Trento Agent host to Trento Server at port TCP/80 (HTTP), or TCP/443 (HTTPS) if SSL is enabled.
-
From any Trento Agent host to Trento Server at port TCP/5672 (Advanced Message Queuing Protocol or AMQP)
-
From the user network to Trento Server at port TCP/80 (HTTP), or TCP/443 (HTTPS) if SSL is enabled.
-
If the Trento MCP Server is installed and enabled:
-
For a Kubernetes deployment, from the MCP client to the Trento Server ingress at TCP/80 or TCP/443. Internally, the MCP Server Pod uses TCP/5000 and TCP/8080 if the health check is enabled.
-
For a systemd deployment, from the user network to Trento MCP Server at TCP/5000.
-
-
Optionally: From the user network to Trento Server at ports TCP/4000, TCP/4001 and TCP/8080 (health checks for web, wanda and MCP, respectively).
-
From Prometheus server, when it exists, to each Trento Agent host at the port used by the Node Exporter.
-
3.4. SAP requirements
An SAP system must run on a HANA database to be discovered by Trento. In addition, the parameter dbs/hdb/dbname must be set in the DEFAULT profile of the SAP system to the correct database (tenant) name.
The agent must be installed in all the hosts that are part of the SAP system architecture. Particularly:
-
the host where the ASCS instance is running
-
the host where the ERS instance, if it exists, is running
-
all the hosts where an application server instance is running
-
all the database hosts
4. Installation
4.1. Installing Trento Server
Trento Server can be deployed in different ways depending on your infrastructure and requirements.
Supported deployment methods:
4.1.1. Kubernetes deployment
The subsection uses the following placeholders:
-
TRENTO_SERVER_HOSTNAME: the host name used by the end user to access the console. -
ADMIN_PASSWORD: the password of the admin user created during the installation process.The password must meet the following requirements:
-
minimum length of 8 characters
-
the password must not contain 3 identical numbers or letters in a row (for example, 111 or aaa)
-
the password must not contain 4 sequential numbers or letters (for example, 1234, abcd, ABCD)
-
|
By default, the provided Helm chart uses Traefik as ingress class
Search for Traefik specific usage scenarios on GitHub. In case another ingress controller is used, adapt accordingly. |
Installing Trento Server on an existing Kubernetes cluster
Trento Server consists of a several components delivered as container images and intended for deployment on a Kubernetes cluster. A manual production-ready deployment of these components requires Kubernetes knowledge. Customers without in-house Kubernetes expertise and those who want to try Trento with a minimum of effort, can use the Trento Helm chart. This approach automates the deployment of all the required components on a single Kubernetes cluster node. You can use the Trento Helm chart to install Trento Server on a existing Kubernetes cluster as follows:
|
The examples in this section do not specify a Kubernetes namespace for simplicity. By default, Helm installs to the For production deployments, create and use a dedicated namespace. Example: |
|
The examples in this section deliver an installation of Trento Server without Prometheus. If you want to have Prometheus installed and enabled along Trento Server refer to Prometheus integration. |
-
Install Helm:
curl https://raw.githubusercontent.com/helm/helm/master/scripts/get-helm-3 | bash -
Connect Helm to an existing Kubernetes cluster.
-
Use Helm to install Trento Server with the Trento Helm chart:
helm upgrade \ --install trento-server oci://registry.suse.com/trento/trento-server \ --set global.trentoWeb.origin=TRENTO_SERVER_HOSTNAME \ --set trento-web.adminUser.password=ADMIN_PASSWORD \ --set prometheus.enabled=false -
To verify that the Trento Server installation was successful, open the URL of the Trento Web (
http://TRENTO_SERVER_HOSTNAME) from a workstation on the SAP administrator’s LAN.
Installing Trento Server on K3s
If you do not have a Kubernetes cluster, or you have one but you do not want to use it for Trento, you can use SUSE Rancher’s K3s as an alternative. To deploy Trento Server on K3s, you need a server or VM (see Trento Server requirements for minimum requirements) and follow the steps in the following procedure.
|
The following procedure deploys Trento Server on a single-node K3s cluster. Note that this setup is not recommended for production use. |
-
Log in to the Trento Server host.
-
Install K3s either as root or a non-root user.
-
Installing as user root:
curl -sfL https://get.k3s.io | INSTALL_K3S_SKIP_SELINUX_RPM=true sh -
Installing as a non-root user:
curl -sfL https://get.k3s.io | INSTALL_K3S_SKIP_SELINUX_RPM=true sh -s - --write-kubeconfig-mode 644
-
-
Install Helm as root.
curl https://raw.githubusercontent.com/helm/helm/master/scripts/get-helm-3 | bash -
Set the
KUBECONFIGenvironment variable for the same user that installed K3s:export KUBECONFIG=/etc/rancher/k3s/k3s.yaml -
With the same user that installed K3s, install Trento Server using the Helm chart:
helm upgrade \ --install trento-server oci://registry.suse.com/trento/trento-server \ --set global.trentoWeb.origin=TRENTO_SERVER_HOSTNAME \ --set trento-web.adminUser.password=ADMIN_PASSWORD \ --set prometheus.enabled=false -
Monitor the creation and start-up of the Trento Server pods, and wait until they are ready and running:
watch kubectl get podsAll pods must be in the ready and running state.
-
Log out of the Trento Server host.
-
To verify that the Trento Server installation was successful, open the URL of the Trento Web (
http://TRENTO_SERVER_HOSTNAME) from a workstation on the SAP administrator’s LAN.
Deploying Trento Server on selected nodes
If you use a multi-node Kubernetes cluster, it is possible to deploy Trento Server images on selected nodes by specifying the field nodeSelector in the helm upgrade command as follows:
 helm upgrade \
   --install trento-server oci://registry.suse.com/trento/trento-server \
   --set global.trentoWeb.origin=TRENTO_SERVER_HOSTNAME \
   --set trento-web.adminUser.password=ADMIN_PASSWORD \
   --set postgresql.primary.nodeSelector.LABEL=VALUE \
   --set trento-web.nodeSelector.LABEL=VALUE \
   --set prometheus.enabled=false
Configuring event pruning
The event pruning feature allows administrators to manage how long registered events are stored in the database and how often the expired events are removed.
The following configuration options are available:
pruneEventsOlderThan-
The number of days registered events are stored in the database. The default value is 10. Keep in mind that
pruneEventsOlderThancan be set to 0. However, this deletes all events whenever the cron job runs, making it impossible to analyze and troubleshoot issues with the application pruneEventsCronjobSchedule-
The frequency of the cron job that deletes expired events. The default value is "0 0 * * *", which runs daily at midnight.
To modify the default values, execute the following Helm command:
helm ... \
    --set trento-web.pruneEventsOlderThan=<<EXPIRATION_IN_DAYS>> \
    --set trento-web.pruneEventsCronjobSchedule="<<NEW_SCHEDULE>>"
Replace the placeholders with the desired values:
EXPIRATION_IN_DAYS-
Number of days to retain events in the database before pruning.
NEW_SCHEDULE-
The cron rule specifying how frequently the pruning job is performed.
Example command to retain events for 30 days and schedule pruning daily at 3 AM:
helm upgrade \
  --install trento-server oci://registry.suse.com/trento/trento-server \
  --set global.trentoWeb.origin=TRENTO_SERVER_HOSTNAME \
  --set trento-web.adminUser.password=ADMIN_PASSWORD \
  --set prometheus.enabled=false \
  --set trento-web.pruneEventsOlderThan=30 \
  --set trento-web.pruneEventsCronjobSchedule="0 3 * * *"
Enabling email alerts
Email alerting feature notifies the SAP Basis administrator about important changes in the SAP Landscape being monitored by Trento.
The reported events include the following:
-
Host heartbeat failed
-
Cluster health detected critical
-
Database health detected critical
-
SAP System health detected critical
This feature is disabled by default. It can be enabled at installation time or anytime at a later stage. In both cases, the procedure is the same and uses the following placeholders:
SMTP_SERVER-
The SMTP server designated to send email alerts
SMTP_PORT-
Port on the SMTP server
SMTP_USER-
User name to access SMTP server
SMTP_PASSWORD-
Password to access SMTP server
ALERTING_SENDER-
Sender email for alert notifications
ALERTING_RECIPIENT-
Email address to receive alert notifications.
The command to enable email alerts is as follows:
helm upgrade \
   --install trento-server oci://registry.suse.com/trento/trento-server \
   --set global.trentoWeb.origin=TRENTO_SERVER_HOSTNAME \
   --set trento-web.adminUser.password=ADMIN_PASSWORD \
   --set prometheus.enabled=false \
   --set trento-web.alerting.enabled=true \
   --set trento-web.alerting.smtpServer=SMTP_SERVER \
   --set trento-web.alerting.smtpPort=SMTP_PORT \
   --set trento-web.alerting.smtpUser=SMTP_USER \
   --set trento-web.alerting.smtpPassword=SMTP_PASSWORD \
   --set trento-web.alerting.sender=ALERTING_SENDER \
   --set trento-web.alerting.recipient=ALERTING_RECIPIENT
Enabling SSL
Ingress may be used to provide SSL termination for the Web component of Trento Server. This would allow to encrypt the communication from the agent to the server, which is already secured by the corresponding API key. It would also allow HTTPS access to the Web console with trusted certificates.
Configuration must be done in the tls section of the values.yaml file of the chart of the Trento Server Web component.
For details on the required Ingress setup and configuration, refer to: https://kubernetes.io/docs/concepts/services-networking/ingress/. Particularly, refer to section https://kubernetes.io/docs/concepts/services-networking/ingress/#tls for details on the secret format in the YAML configuration file.
Additional steps are required on the Agent side.
4.1.2. systemd deployment
A systemd-based installation of the Trento Server using RPM packages can be performed manually on the latest supported versions of SUSE Linux Enterprise Server for SAP applications, from 15 SP4 up to 16. For installations on service packs other than the current one, make sure to update the repository URL as described in the relevant notes throughout this guide.
Install Trento dependencies
Install PostgreSQL
The current instructions are tested with the following PostgreSQL versions:
| SUSE Linux Enterprise Server for SAP applications | PostgreSQL Version |
|---|---|
15 SP4 |
14.10 |
15 SP5 |
15.5 |
15 SP6 |
16.9 |
15 SP7 |
17.5 |
16.0 |
17.6 |
Using a different version of PostgreSQL may require different steps or configurations, especially when changing the major number. For more details, refer to the official PostgreSQL documentation.
-
Install PostgreSQL server:
zypper in postgresql-server -
Enable and start PostgreSQL server:
systemctl enable --now postgresql
Configure PostgreSQL
-
Start
psqlwith thepostgresuser to open a connection to the database:su - postgres psql -
Initialize the databases in the
psqlconsole:CREATE DATABASE wanda; CREATE DATABASE trento; CREATE DATABASE trento_event_store; -
Create the users:
CREATE USER wanda_user WITH PASSWORD 'wanda_password'; CREATE USER trento_user WITH PASSWORD 'web_password'; -
Grant required privileges to the users and close the connection:
\c wanda
GRANT ALL ON SCHEMA public TO wanda_user;
\c trento
GRANT ALL ON SCHEMA public TO trento_user;
\c trento_event_store;
GRANT ALL ON SCHEMA public TO trento_user;
\q
You can exit from the
psqlconsole andpostgresuser. -
Allow the PostgreSQL database to receive connections to the respective databases and users. To do this, add the following to
/var/lib/pgsql/data/pg_hba.conf:host wanda wanda_user 0.0.0.0/0 scram-sha-256 host trento,trento_event_store trento_user 0.0.0.0/0 scram-sha-256The
pg_hba.conffile works sequentially. This means that the rules on the top have preference over the ones below. The example above shows a permissive address range. So for this to work, the entires must be written at the top of thehostentries. For further information, refer to the pg_hba.conf documentation. -
Allow PostgreSQL to bind on all network interfaces in
/var/lib/pgsql/data/postgresql.confby changing the following line:listen_addresses = '*' -
Restart PostgreSQL to apply the changes:
systemctl restart postgresql
Install RabbitMQ
-
Install RabbitMQ server:
zypper install rabbitmq-server -
Allow connections from external hosts by modifying
/etc/rabbitmq/rabbitmq.conf, so the Trento-agent can reach RabbitMQ:listeners.tcp.default = 5672 -
If firewalld is running, add a rule to firewalld:
firewall-cmd --zone=public --add-port=5672/tcp --permanent; firewall-cmd --reload -
Enable the RabbitMQ service:
systemctl enable --now rabbitmq-server
Configure RabbitMQ
To configure RabbitMQ for a production system, follow the official suggestions in the RabbitMQ guide.
-
Create a new RabbitMQ user:
rabbitmqctl add_user trento_user trento_user_password -
Create a virtual host:
rabbitmqctl add_vhost vhost -
Set permissions for the user on the virtual host:
rabbitmqctl set_permissions -p vhost trento_user ".*" ".*" ".*"
Install Trento using RPM packages
The trento-web and trento-wanda packages are available by default on supported SUSE Linux Enterprise Server for SAP applications distributions.
Install Trento web, wanda and checks:
zypper install trento-web trento-wandaCreate the configuration files
Both services depend on respective configuration files. They must be
placed in /etc/trento/trento-web and /etc/trento/trento-wanda
respectively, and examples of how to modify them are available in
/etc/trento/trento-web.example and /etc/trento/trento-wanda.example.
|
You can create the content of the secret variables such as
Also ensure that a valid hostname, FQDN, or IP address is configured in
|
trento-web configuration
# /etc/trento/trento-web
AMQP_URL=amqp://trento_user:trento_user_password@localhost:5672/vhost
DATABASE_URL=ecto://trento_user:web_password@localhost/trento
EVENTSTORE_URL=ecto://trento_user:web_password@localhost/trento_event_store
ENABLE_ALERTING=false
CHARTS_ENABLED=false
ADMIN_USER=admin
ADMIN_PASSWORD=trentodemo
ENABLE_API_KEY=true
PORT=4000
TRENTO_WEB_ORIGIN=trento.example.com
SECRET_KEY_BASE=some-secret
ACCESS_TOKEN_ENC_SECRET=some-secret
REFRESH_TOKEN_ENC_SECRET=some-secret
CHECKS_SERVICE_BASE_URL=/wanda
OAS_SERVER_URL=https://trento.example.com
The ADMIN_PASSWORD variable must must meet the following requiements:
-
minimum of 8 characters
-
the password not contain 3 consecutive identical numbers or letters (for example, 111 or aaa)
-
the password must not contain 4 consecutive numbers or letters (for example, 1234, abcd, ABCD)
The ENABLE_ALERTING enables the
alerting system to receive email notifications. Set ENABLE_ALERTING to true and add additional variables to the /etc/trento/trento-web, to enable the feature.
# /etc/trento/trento-web
ENABLE_ALERTING=true
ALERT_SENDER=<<SENDER_EMAIL_ADDRESS>>
ALERT_RECIPIENT=<<RECIPIENT_EMAIL_ADDRESS>>
SMTP_SERVER=<<SMTP_SERVER_ADDRESS>>
SMTP_PORT=<<SMTP_PORT>>
SMTP_USER=<<SMTP_USER>>
SMTP_PASSWORD=<<SMTP_PASSWORD>>
trento-wanda configuration
# /etc/trento/trento-wanda
CORS_ORIGIN=http://localhost
AMQP_URL=amqp://trento_user:trento_user_password@localhost:5672/vhost
DATABASE_URL=ecto://wanda_user:wanda_password@localhost/wanda
PORT=4001
SECRET_KEY_BASE=some-secret
OAS_SERVER_URL=https://trento.example.com/wanda
AUTH_SERVER_URL=http://localhost:4000
Start the services
|
In some SUSE Linux Enterprise Server for SAP applications environments, SELinux may be enabled and set to enforcing mode by default. If Trento services fail to start or show permission-related errors, check the SELinux status: If SELinux is set to enforcing, switch it to permissive mode either temporarily or permanently:
|
Enable and start the services:
systemctl enable --now trento-web trento-wandaCheck the health status of Trento Web and Trento Wanda
You can check if Trento Web and Trento Wanda services function correctly by
accessing accessing the healthz and readyz API.
-
Check Trento Web health status using
curl:curl http://localhost:4000/api/readyzcurl http://localhost:4000/api/healthz -
Check Trento wanda health status using
curl:curl http://localhost:4001/api/readyzcurl http://localhost:4001/api/healthz
If Trento web and wanda are ready, and the database connection is set up correctly, the output should be as follows:
{"ready":true}{"database":"pass"}Install and configure NGINX
-
Install NGINX package:
zypper install nginx -
If firewalld is running, add firewalld rules for HTTP and HTTPS:
firewall-cmd --zone=public --add-service=https --permanent firewall-cmd --zone=public --add-service=http --permanent firewall-cmd --reload -
Start and enable NGINX:
systemctl enable --now nginx -
Create a
/etc/nginx/conf.d/trento.confTrento configuration file:map $http_upgrade $connection_upgrade { default upgrade; '' close; } upstream web { server 127.0.0.1:4000 max_fails=5 fail_timeout=60s; } upstream wanda { server 127.0.0.1:4001 max_fails=5 fail_timeout=60s; } server { # Redirect HTTP to HTTPS listen 80; server_name trento.example.com; return 301 https://$host$request_uri; } server { server_name trento.example.com; listen 443 ssl; ssl_certificate /etc/nginx/ssl/certs/trento.crt; ssl_certificate_key /etc/ssl/private/trento.key; ssl_protocols TLSv1.2 TLSv1.3; ssl_ciphers 'ECDHE-ECDSA-AES128-GCM-SHA256:ECDHE-RSA-AES128-GCM-SHA256:ECDHE-ECDSA-AES256-GCM-SHA384:ECDHE-RSA-AES256-GCM-SHA384:DHE-RSA-AES128-GCM-SHA256:DHE-RSA-AES256-GCM-SHA384'; ssl_prefer_server_ciphers on; ssl_session_cache shared:SSL:10m; # Wanda rule location /wanda/ { allow all; # Proxy Headers proxy_http_version 1.1; proxy_set_header X-Forwarded-For $proxy_add_x_forwarded_for; proxy_set_header Host $http_host; proxy_set_header X-Cluster-Client-Ip $remote_addr; # Important Websocket Bits! proxy_set_header Upgrade $http_upgrade; proxy_set_header Connection "upgrade"; # Add final slash to replace the location path value by the value in proxy_pass # https://nginx.org/en/docs/http/ngx_http_proxy_module.html#proxy_pass proxy_pass http://wanda/; } # Web rule location / { # this endpoint should not be accessible publicly # it is internally used by wanda to introspect access tokens and personal access tokens location /api/session/token/introspect { deny all; return 404; } allow all; # Proxy Headers proxy_http_version 1.1; proxy_set_header X-Forwarded-For $proxy_add_x_forwarded_for; proxy_set_header Host $http_host; proxy_set_header X-Cluster-Client-Ip $remote_addr; # The Important Websocket Bits! proxy_set_header Upgrade $http_upgrade; proxy_set_header Connection "upgrade"; proxy_pass http://web; } }
Prepare SSL certificate for NGINX
Create or provide a certificate for NGINX to enable SSL for Trento.
Create a self-signed certificate
-
Generate a self-signed certificate:
Adjust
subjectAltName = DNS:trento.example.comby replacingtrento.example.comwith your domain and change the value5to the number of days for which you need the certificate to be valid. For example,-days 365for one year.openssl req -newkey rsa:2048 --nodes -keyout trento.key -x509 -days 5 -out trento.crt -addext "subjectAltName = DNS:trento.example.com" -
Copy the generated
trento.keyto a location accessible by NGINX:cp trento.key /etc/ssl/private/trento.key -
Create a directory for the generated
trento.crtfile. The directory must be accessible by NGINX:mkdir -p /etc/nginx/ssl/certs/ -
Copy the generated
trento.crtfile to the created directory:cp trento.crt /etc/nginx/ssl/certs/trento.crt -
Check the NGINX configuration:
nginx -tIf the configuration is correct, the output should be as follows:
nginx: the configuration file /etc/nginx/nginx.conf syntax is ok
nginx: configuration file /etc/nginx/nginx.conf test is successful
If there are issues with the configuration, the output indicates what needs to be adjusted.
-
Enable NGINX:
systemctl restart nginx
Create a signed certificate with Let’s Encrypt using PackageHub repository
-
Enable the PackageHub repository (replace
x.xwith your OS version, for example15.7):SUSEConnect --product PackageHub/x.x/x86_64 zypper refresh -
Install Certbot and its NGINX plugin:
Service Packs include version-specific Certbot NGINX plugin packages, for example
python311-certbot-nginx,python313-certbot-nginxorpython3-certbot-nginx. Install the package available in the Service Pack you currently use.zypper install certbot python311-certbot-nginx -
Obtain a certificate and configure NGINX with Certbot:
Replace
example.comwith your domain. For more information, refer to Certbot instructions for NGINXcertbot --nginx -d trento.example.comCertbot certificates are valid for 90 days. Refer to the above link for details on how to renew certificates.
4.2. Installing Trento Agents
Before you can install a Trento Agent, you must obtain the API key of your Trento Server. Proceed as follows:
-
Open the URL of the Trento Web console. It prompts you for a user name and password:
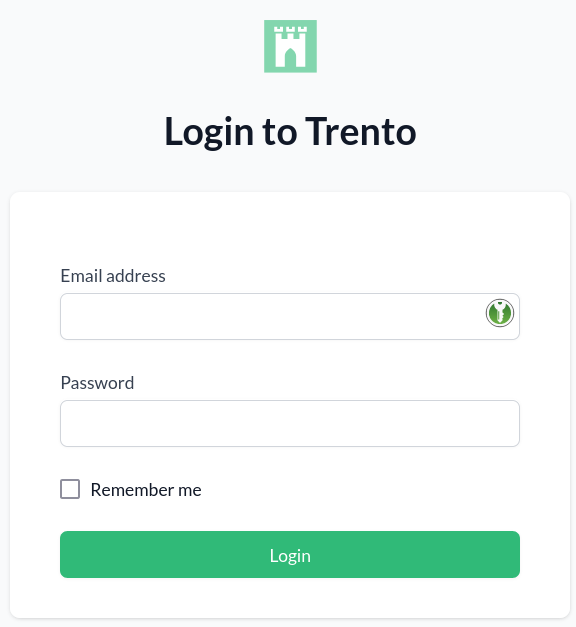
-
Enter the credentials for the
adminuser (specified during installation of Trento Server). -
Click Login.
-
When you are logged in, go to Settings:
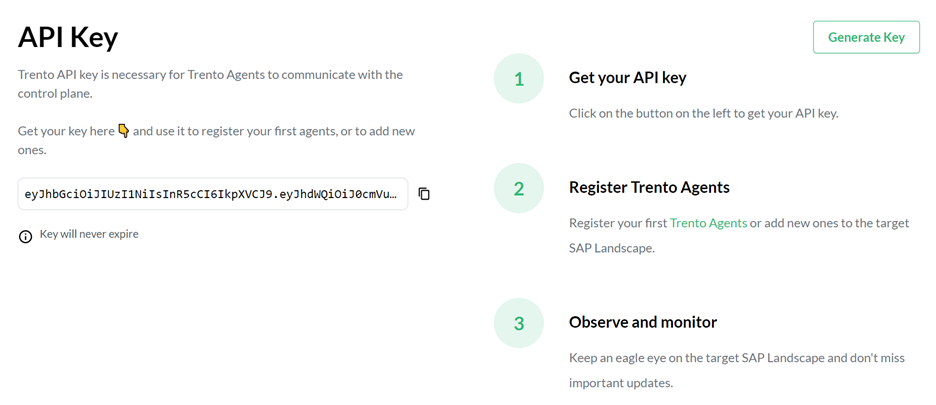
-
Click the Copy button to copy the key to the clipboard.
Install the Trento Agent on an SAP host and register it with the Trento Server as follows:
-
Install the package:
> sudo zypper ref
> sudo zypper install trento-agent
A configuration file named
/agent.yamlis created under/etc/trento/in SUSE Linux Enterprise Server for SAP applications 15 or under/usr/etc/trento/in SUSE Linux Enterprise Server for SAP applications 16. -
Open the configuration file and uncomment (remove the
#character) the entries forfacts-service-url,server-urlandapi-key. Update the values if necessary:-
facts-service-url: the address of the AMQP RabbitMQ service used for communication with the checks engine (wanda). The correct value of this parameter depends on how Trento Server was deployed.In a Kubernetes deployment, it is amqp://trento:trento@TRENTO_SERVER_HOSTNAME:5672/. If the default RabbitMQ username and password (
trento:trento) were updated using Helm, the parameter must use a user-defined value.In a systemd deployment, the correct value is
amqp://TRENTO_USER:TRENTO_USER_PASSWORD@TRENTO_SERVER_HOSTNAME:5672/vhost. IfTRENTO_USERandTRENTO_USER_PASSWORDhave been replaced with custom values, you must use them. -
server-url: URL for the Trento Server (http://TRENTO_SERVER_HOSTNAME) -
api-key: the API key retrieved from the Web console -
prometheus-mode: Determines how metrics are collected. Valid values arepull(default) fornode_exporter-based collection, orpushfor Grafana Alloy-based collection. See Prometheus metrics configuration for details.
-
-
If SSL termination has been enabled on the server side, you can encrypt the communication from the agent to the server as follows:
-
Provide an HTTPS URL instead of an HTTP one.
-
Import the certificate from the Certificate Authority that has issued your Trento Server SSL certificate into the Trento Agent host as follows:
-
Copy the CA certificate in the PEM format to
/etc/pki/trust/anchors/. If the CA certificate is in the CRT format, convert it to PEM using the followingopensslcommand:openssl x509 -in mycert.crt -out mycert.pem -outform PEM -
Run the
update-ca-certificatescommand.
-
-
-
Start the Trento Agent:
> sudo systemctl enable --now trento-agent -
Check the status of the Trento Agent:
> sudo systemctl status trento-agent ● trento-agent.service - Trento Agent service Loaded: loaded (/usr/lib/systemd/system/trento-agent.service; enabled; vendor preset: disabled) Active: active (running) since Wed 2021-11-24 17:37:46 UTC; 4s ago Main PID: 22055 (trento) Tasks: 10 CGroup: /system.slice/trento-agent.service ├─22055 /usr/bin/trento agent start --consul-config-dir=/srv/consul/consul.d └─22220 /usr/bin/ruby.ruby2.5 /usr/sbin/SUSEConnect -s [...] -
Repeat this procedure on all SAP hosts that you want to monitor.
4.2.1. Prometheus metrics configuration
Trento collects system metrics (CPU, memory) using different exporters depending on the operating system version:
-
SUSE Linux Enterprise Server for SAP applications 15: Uses
node_exporterin pull mode by default. -
SUSE Linux Enterprise Server for SAP applications 16: Uses Grafana Alloy in push mode.
| SUSE Linux Enterprise Server for SAP applications 15 SP7 also provides Grafana Alloy as an optional package. Users who prefer to use Alloy on SUSE Linux Enterprise Server for SAP applications 15 SP7 can manually install and configure it following the same procedure described for SUSE Linux Enterprise Server for SAP applications 16. |
When using Grafana Alloy (on SUSE Linux Enterprise Server for SAP applications 16 or optionally on SUSE Linux Enterprise Server for SAP applications 15 SP7), additional configuration is required. See the Prometheus integration documentation for details on configuring Alloy.
The following parameters control the metrics collection behavior:
prometheus-mode-
Determines how metrics are collected. Valid values are
pull(default) fornode_exporter-based collection, orpushfor Grafana Alloy-based collection. prometheus-exporter-name-
The name used to identify the exporter in Prometheus. Defaults to
node_exporterin pull mode orgrafana_alloyin push mode.
Pull mode parameters (SUSE Linux Enterprise Server for SAP applications 15)
These parameters apply when prometheus-mode is set to pull (the default):
prometheus-node-exporter-target-
Specifies IP address and port for the node exporter as
<ip_address>:<port>. In situations where the host has multiple IP addresses and/or the exporter is listening to a port different from the default one, configuring this setting enables Prometheus to connect to the correct IP address and port of the host. If not set, Prometheus uses the lowest IPv4 address discovered in the host with default port 9100.
The legacy parameter name node-exporter-target is still supported for backward compatibility.
|
Push mode parameters (Grafana Alloy)
These parameters apply when prometheus-mode is set to push, which is required for SUSE Linux Enterprise Server for SAP applications 16 and optional for SUSE Linux Enterprise Server for SAP applications 15 SP7. They are used both by the agent and by the trento-agent generate alloy command to produce the Grafana Alloy configuration:
prometheus-url-
The Prometheus remote write endpoint URL where Alloy will push metrics. Required in push mode.
prometheus-scrape-interval-
The interval at which Alloy scrapes local metrics. Defaults to
15s. Used bytrento-agent generate alloyonly. prometheus-auth-
The authentication method for the Prometheus remote write endpoint. Valid values are
none,basic(default),bearer, ormtls. Used bytrento-agent generate alloyonly. prometheus-auth-username-
Username for basic authentication. Required when
prometheus-authis set tobasic. Used bytrento-agent generate alloyonly. prometheus-auth-password-
Password for basic authentication. Required when
prometheus-authis set tobasic. Used bytrento-agent generate alloyonly. prometheus-auth-bearer-token-
Bearer token for authentication. Required when
prometheus-authis set tobearer. Used bytrento-agent generate alloyonly. prometheus-tls-ca-cert-
Path to CA certificate file for TLS verification. Used by
trento-agent generate alloyonly. prometheus-tls-client-cert-
Path to client certificate file for mTLS authentication. Required when
prometheus-authis set tomtls. Used bytrento-agent generate alloyonly. prometheus-tls-client-key-
Path to client private key file for mTLS authentication. Required when
prometheus-authis set tomtls. Used bytrento-agent generate alloyonly.
The trento-agent generate alloy command reads these parameters to generate the Grafana Alloy configuration file. See the Prometheus integration documentation for detailed instructions on deploying the generated configuration.
|
4.3. Automated Installation with Ansible
You can perform an automated installation of Trento using RPM packages with Ansible playbooks provided by the ansible-trento package.
4.3.1. Supported operating systems
Execute the playbooks only on target nodes running SUSE Linux Enterprise Server for SAP applications 15-SP5 and higher, or 16.0 and higher. The supported SUSE Linux Enterprise Server for SAP applications systems for the control node are the same. However, the requirements for the control nodes are less strict. You can use any operating system as long as the installed Ansible version is compatible with the Python interpreter available on the managed target nodes. Refer to the support matrix in the Ansible documentation.
|
Currently, Trento Server cannot be installed with the Ansible playbook on target nodes running SUSE Linux Enterprise Server for SAP applications 15 SP5. |
4.3.2. Requirements
As a prerequisite, enable the following modules on SUSE Linux Enterprise Server for SAP applications 15.
Replace x with your SP version.
Control node module requirements:
-
Enable the Systems Management module (not needed for SP5).
$ SUSEConnect -p sle-module-systems-management/15.x/x86_64This repository contains Ansible.
Target node module requirements:
-
Enable the Python 3 module.
$ SUSEConnect -p sle-module-python3/15.x/x86_64This repository contains essential Python dependencies.
-
Enable SUSE Package Hub.
$ SUSEConnect -p PackageHub/15.x/x86_64This module is optional. Use it when you need to install Prometheus.
Additionally, install the following packages regardless of the operating system version.
Control node package requirements:
-
Install Ansible.
> sudo zypper install ansible
Target node package requirements:
-
Install Python version 3.11 or higher.
> sudo zypper install python311
4.3.3. Installation
For SLES-based operating systems, install the ansible-trento package using Zypper.
> sudo zypper install ansible-trento4.3.4. Components
The playbooks comprise the following components.
Trento Server components:
web-
The main component of the Trento Server, containing the backend and frontend.
wanda-
Checks engine component.
Trento Agent:
agent-
Agent collecting information and processing commands, installed on SAP infrastructure host machines.
Third-party dependencies:
PostgreSQL-
Database server.
RabbitMQ-
Messaging broker.
Prometheus-
Metrics collecting and processing server.
NGINX-
HTTP server used as reverse proxy.
Diagnostics tooling:
supportutils-
Installs the SUSE
supportutilspackage and the Trento-specificsupportutils-plugin-trentoplugin on Trento Server and Trento Agent hosts, so thatsupportconfigcan collect Trento diagnostics.
The ansible-trento package provides an Ansible role for every one of these components.
4.3.5. Playbooks overview
Trento provides the following playbooks:
server-
Installs Trento Server components (Web and Wanda) along with the supporting third-party application dependencies.
agent-
Installs and configures the Trento Agent.
site-
Performs a full Trento installation. It installs both the server components and agents. An additional feature of this playbook is that the API key for the agents is automatically retrieved from the Trento Server and passed to the deployed agents.
cleanup-
Tries to undo operations performed by executing the other playbooks. It only reverts a subset of the operations. Consult the code of that playbook for full details.
4.3.6. Setting up the inventory
Prepare an inventory file for your Ansible deployment.
Create an inventory.yml file defining the IP addresses or domain names of the target nodes for each group expected in the playbooks.
The inventory must have the following structure:
all:
  children:
    trento_server:
      hosts:
        vitellone:
          ansible_host: "your-host"
          ansible_user: "your-user"
          ansible_ssh_private_key_file: "/home/user/.ssh/id_rsa"
    postgres_hosts:
      hosts:
        vitellone:
          ansible_host: "your-host"
          ansible_user: "your-user"
          ansible_password: "your-password"
    rabbitmq_hosts:
      hosts:
        vitellone:
          ansible_host: "your-host"
          ansible_user: "your-user"
          ansible_ssh_private_key_file: "/home/user/.ssh/id_rsa"
    prometheus_hosts:
      hosts:
        vitellone:
          ansible_host: "your-host"
          ansible_user: "your-user"
          ansible_ssh_private_key_file: "/home/user/.ssh/id_rsa"
   agents:
     hosts:
       vitellone:
          ansible_host: "your-host"
          ansible_user: "your-user"
          ansible_password: "your-password"
In this example, every component is installed on the same host, named vitellone.
Adapt this example to your concrete case.
You can skip some of the host groups if you are not provisioning them with ansible-trento.
For example, skip defining postgres_hosts if you use a PostgreSQL installation managed by an external team.
If you only use the agent playbook, define only agents in your inventory.
Refer to the Configuration section to see how to make ansible-trento skip provisioning a given component.
In the example above, a mixture of authentication methods accesses the target nodes.
When using SSH to connect (ansible_ssh_private_key_file), ensure all target nodes contain the public key of the control node.
To copy your public key from the control node to the target node, use the following command:
$ ssh-copy-id <username>@<ip-or-domain-name-of-the-node>4.3.7. Running the playbooks
To run a playbook, use the following command:
$ ansible-playbook -i <path-to-inventory> suse.trento.<playbook-name>Replace <playbook-name> with one of the following: server, agent, or
site.
4.3.8. Configuration
You can configure two types of variables: playbook-level and role-level variables. They differ in how you configure them and the scope of the changes they imply. We try to keep playbook-level variables to a minimum.
Playbook-level configuration
These variables affect how the playbooks execute. The available configuration options are:
provision_postgres-
Whether to install and configure PostgreSQL.
provision_prometheus-
Whether to install and configure Prometheus.
provision_rabbitmq-
Whether to install and configure RabbitMQ.
provision_proxy-
Whether to install and configure a reverse proxy like NGINX.
Supply playbook-level variables using --extra-vars or -e on the command line during every playbook execution:
$ ansible-playbook -i <path-to-inventory> suse.trento.site -e provision_postgres=false -e provision_rabbitmq=false|
When disabling the provisioning of a Trento component, you must manually set the respective |
Role-level configuration
Almost all settings are configured via role-level variables.
Set them in the inventory file under the vars: section:
all:
  children:
    trento_server:
      hosts: ...
    postgres_hosts:
      hosts: ...
    rabbitmq_hosts:
      hosts: ...
    prometheus_hosts:
      hosts: ...
    agents:
      hosts: ...

  vars:
    trento_server_name: "trento-deployment.example.com",
    trento_web_admin_password: "adminpassword",
    trento_web_postgres_password: "postgres",
    trento_wanda_postgres_password: "postgres",
    trento_rabbitmq_password: "guest",
    rproxy_ssl_cert: "<SSL certificate in base64>",
    rproxy_ssl_key: "<SSL certificate key in base64>"
Some role-level variables are mandatory.
For Trento Server, these are:
| Name | Description |
|---|---|
|
Domain name of the Trento web application. |
|
Password of the admin user in Web component. |
|
Password of the PostgreSQL user used in Web component. |
|
Password of the PostgreSQL user used in Wanda component. |
|
Password of the RabbitMQ user configured for the Trento project. |
|
String with the content of the |
|
String with the content of the |
For Trento Agent, they are:
| Name | Description |
|---|---|
|
API key for accessing the Trento Web collection endpoint. |
The rest of the variables are optional. You can find the full listing on the Trento Ansible project page.
4.3.9. Support tooling
The server, agent, and site playbooks install the SUSE supportutils package together with the Trento-specific supportutils-plugin-trento plugin.
This allows supportconfig to collect Trento diagnostics on both Trento Server and Trento Agent hosts.
The installation is performed by the supportutils role and is enabled by default; no additional opt-in is required.
Configuration
Override the following role-level variables in your inventory to change the default behavior:
| Name | Default | Description |
|---|---|---|
|
|
Set to |
|
|
Base SUSE diagnostics package name. |
|
|
Trento plugin package name. |
|
|
Refresh the Zypper cache before installing. |
To disable installation on all hosts, set the variable in the vars: section of your inventory:
all:
  vars:
supportutils_enabled: false4.3.10. Example scenarios
The playbooks in ansible-trento allow for various installation scenarios.
Every component on a dedicated node
The following inventory file installs every Trento component on a different host. It also enables and configures optional e-mail alerting:
all:
  children:
    trento_server:
      hosts:
        vitellone:
          ansible_host: "your-host"
          ansible_user: "your-user"
    postgres_hosts:
      hosts:
        vitellone-pg:
          ansible_host: "your-host"
          ansible_user: "your-user"
    rabbitmq_hosts:
      hosts:
        vitellone-mq:
          ansible_host: "your-host"
          ansible_user: "your-user"
    prometheus_hosts:
      hosts:
        vitellone-metrics:
          ansible_host: "your-host"
          ansible_user: "your-user"
    agents:
      hosts:
        hana01:
          ansible_host: "your-hana01-host"
          ansible_user: root
        hana02:
          ansible_host: "your-hana02-host"
          ansible_user: root

  vars:
    trento_server_name: "yourserver.com"
    trento_web_admin_password: "adminpassword"
    trento_web_postgres_password: "pass"
    trento_wanda_postgres_password: "wanda"
    trento_rabbitmq_password: "trento"
    rproxy_ssl_cert: |-
      -----BEGIN CERTIFICATE-----
      MIIEZDCCA0ygAwIBAgIUAue46Y/9kwT+zvPPW2xfuNv1+Z4wDQYJKoZIhvcNAQEL
      ...
      vzczKRPmQOQbiu02WM2hivWtPBH//A5N
      -----END CERTIFICATE-----
    rproxy_ssl_key: |-
      -----BEGIN PRIVATE KEY-----
      MIIEvQIBADANBgkqhkiG9w0BAQEFAASCBKcwggSjAgEAAoIBAQC1L7Ddc6oYaNPC
      ...
      mpNiKDOPALNTs+Ukdkt5KlE=
      -----END PRIVATE KEY-----

    web_enable_alerting: true
    web_alert_sender: "trento@example.com"
    web_alert_recipient: "trento_maintainers@example.com"
    web_smtp_server: "smtp.example.com"
    web_smtp_port: 587
    web_smtp_user: "smtp_user"
    web_smtp_password: "stmp_pass"
Execute Ansible by running the following command:
$ ansible-playbook -i <path-to-inventory> suse.trento.siteTrento with externally managed PostgreSQL, RabbitMQ and Prometheus
The following inventory file does not provision PostgreSQL, RabbitMQ, or Prometheus.
|
There is no configuration for |
all:
  children:
    trento_server:
      hosts:
        vitellone:
          ansible_host: "your-host"
          ansible_user: "your-user"
    agents:
      hosts:
        hana01:
          ansible_host: "your-hana01-host"
          ansible_user: root
        hana02:
          ansible_host: "your-hana02-host"
          ansible_user: root

  vars:
    trento_postgres_host: "yourexternalpg.com"
    trento_rabbitmq_host: "yourexternalrabbit.com:5671"

    trento_server_name: "your-servername.com"
    trento_web_admin_password: "adminpassword"
    trento_web_postgres_username: "postgres"
    trento_web_postgres_password: "trentoansible1"
    trento_wanda_postgres_username: "postgres"
    trento_wanda_postgres_password: "trentoansible1"
    trento_rabbitmq_username: "trentoansible"
    trento_rabbitmq_password: "trentoansible1"
    rproxy_ssl_cert: |-
      -----BEGIN CERTIFICATE-----
      MIIEZDCCA0ygAwIBAgIUAue46Y/9kwT+zvPPW2xfuNv1+Z4wDQYJKoZIhvcNAQEL
      ...
      vzczKRPmQOQbiu02WM2hivWtPBH//A5N
      -----END CERTIFICATE-----
    rproxy_ssl_key: |-
      -----BEGIN PRIVATE KEY-----
      MIIEvQIBADANBgkqhkiG9w0BAQEFAASCBKcwggSjAgEAAoIBAQC1L7Ddc6oYaNPC
      ...
      mpNiKDOPALNTs+Ukdkt5KlE=
      -----END PRIVATE KEY-----
Execute Ansible using the following command:
$ ansible-playbook -i <path-to-inventory> suse.trento.site -e provision_postgres=false -e provision_rabbitmq=false -e provision_prometheus=falseDeploy only Trento agents
Use the following inventory file to install and configure only the Trento agents.
You must explicitly specify the agent_web_api_key variable.
Acquire this key manually before running the agent playbook alone.
all:
  children:
    agents:
      hosts:
        hana01:
          ansible_host: "your-hana01-host"
          ansible_user: root
        hana02:
          ansible_host: "your-hana02-host"
          ansible_user: root

  vars:
    agent_web_api_key: "yourserver.com"
Execute Ansible by specifying the agent playbook:
$ ansible-playbook -i <path-to-inventory> suse.trento.agent|
Custom-tailored inventories are not a requirement. They are used only to highlight which parameters are needed in specific cases. You can easily use a single, fully populated inventory and run only a subset of the operations, such as installing only the agent or skipping the PostgreSQL installation. The playbook automatically picks up or skips variables in the inventory as appropriate for the desired execution configuration. |
4.3.11. Reference
For more information, refer to the Trento Ansible project page.
5. Update
5.1. Updating Trento Server
The procedure to update Trento Server depends on the chosen deployment option: Kubernetes or systemd.
Consider the following when performing an update:
-
Before updating Trento Server, ensure that all the Trento Agents in the environment are supported by the target version. For more information, see section Compatibility matrix between Trento Server and Trento Agents.
-
When updating Trento to version 2.4 or higher, the admin password may need to be adjusted to follow the rules described in the User Management section.
In a Kubernetes deployment, you can use Helm to update Trento Server:
helm upgrade \
   --install trento-server oci://registry.suse.com/trento/trento-server \
   --set global.trentoWeb.origin=TRENTO_SERVER_HOSTNAME \
   --set trento-web.adminUser.password=ADMIN_PASSWORD \
   ...
If you have configured/enabled options, the Helm command must be adjusted accordingly. In this case, consider the following:
-
If you are using a version of Helm lower than 3.8.0, you need to set
HELM_EXPERIMENTAL_OCI=1in front of thehelmcommand. -
When updating Trento to version 2.0.0 or higher, an additional flag must be set in the Helm command:
helm upgrade \ --install trento-server oci://registry.suse.com/trento/trento-server \ --set global.trentoWeb.origin=TRENTO_SERVER_HOSTNAME \ --set trento-web.adminUser.password=ADMIN_PASSWORD \ --set rabbitmq.auth.erlangCookie=$(openssl rand -hex 16) -
When updating Trento to version 2.3 or higher, a new API key is generated and the configuration of all registered Trento Agents must be updated accordingly.
-
When updating to version 3.1 or higher, Prometheus authentication must be configured.
In a system deployment, you can use zypper to update Trento Server:
 zypper refresh
 zypper update trento-web
 zypper update trento-wanda
 systemctl restart trento-web
 systemctl restart trento-wanda
5.2. Updating Trento Checks
Configuration checks are an integral part of the checks engine, but they are delivered separately. This allows customers to update the checks catalog in their setup whenever updates to existing checks and new checks are released, without waiting for a new version release cycle.
The procedure of updating the configuration checks depends on the Trento Server deployment type: Kubernetes or systemd.
In a Kubernetes deployment, checks are delivered as a container image, and you can use Helm with the following options to pull the latest image:
  helm ... \
 --set trento-wanda.checks.image.tag=latest \
 --set trento-wanda.checks.image.repository=registry.suse.com/trento/trento-checks  \
 --set trento-wanda.checks.image.pullPolicy=Always \
 ...
In a systemd deployment, checks are delivered as an RPM package, and you can use Zypper to update your checks catalog:
> sudo zypper ref
> sudo zypper update trento-checks
5.3. Updating a Trento Agent
To update the Trento Agent, follow the procedure below:
-
Log in to the Trento Agent host.
-
Stop the Trento Agent:
> sudo systemctl stop trento-agent -
Install the new package:
> sudo zypper ref > sudo zypper install trento-agent -
Copy the file
/etc/trento/agent.yaml.rpmsaveto/etc/trento/agent.yaml. Make sure that entriesfacts-service-url,server-url, andapi-keyin/etc/trento/agent.yamlare correct. -
Start the Trento Agent:
> sudo systemctl start trento-agent -
Check the status of the Trento Agent:
sudo systemctl status trento-agent ● trento-agent.service - Trento Agent service Loaded: loaded (/usr/lib/systemd/system/trento-agent.service; enabled; vendor preset: disabled) Active: active (running) since Wed 2021-11-24 17:37:46 UTC; 4s ago Main PID: 22055 (trento) Tasks: 10 CGroup: /system.slice/trento-agent.service ├─22055 /usr/bin/trento agent start --consul-config-dir=/srv/consul/consul.d └─22220 /usr/bin/ruby.ruby2.5 /usr/sbin/SUSEConnect -s [...] -
Check the version in the Hosts overview of the Trento UI (URL
http://TRENTO_SERVER_HOSTNAME). -
Repeat this procedure in all Trento Agent hosts.
6. Uninstallation
6.1. Uninstalling Trento Server
The procedure to uninstall the Trento Server depends on the deployment type: Kubernetes or systemd. The section covers Kubernetes deployments.
If Trento Server was deployed manually, you need to uninstall it manually. If Trento Server was deployed using the Helm chart, you can also use Helm to uninstall it as follows:
helm uninstall trento-server7. Prometheus integration
Prometheus Server is a Trento Server component responsible for retrieving host metrics from the agent hosts and serving them to the web component. The web component renders some of these metrics as graphical charts in the details view of the registered hosts. Particularly: memory, CPU, filesystem and swap utilization. Note that metrics are stored in UTC in Prometheus Server; the web UI converts and renders chart axes and hover timestamps using each user’s preferred timezone.
7.1. Metrics collection overview
Trento supports two methods for collecting system metrics, depending on the operating system version running on your monitored hosts:
-
SUSE Linux Enterprise Server for SAP applications 15: Uses
node_exporterin pull mode by default. Prometheus Server periodically scrapes metrics from each host’snode_exporterendpoint. -
SUSE Linux Enterprise Server for SAP applications 16: Uses Grafana Alloy in push mode. Alloy collects metrics locally and pushes them to the Prometheus remote write endpoint.
| SUSE Linux Enterprise Server for SAP applications 15 SP7 also provides Grafana Alloy as an optional package. Users who prefer to use Alloy on SUSE Linux Enterprise Server for SAP applications 15 SP7 can manually install and configure it following the same procedure described for SUSE Linux Enterprise Server for SAP applications 16. |
| In environments where at least one host uses Grafana Alloy (either SUSE Linux Enterprise Server for SAP applications 16 or SUSE Linux Enterprise Server for SAP applications 15 SP7 with Alloy manually configured), you must enable the Prometheus remote write endpoint. See Enabling Prometheus remote write for Grafana Alloy hosts for details. |
7.2. Requirements for SUSE Linux Enterprise Server for SAP applications 15 hosts (pull mode)
The node_exporter must be installed and running in the agent hosts and Prometheus Server must be able to reach the agent hosts at the IP address and port that the node_exporter is bound to.
The IP address and port that Prometheus Server uses to reach the node_exporter can be changed by setting parameter prometheus-node-exporter-target with value <ip_address>:<port> in the agent configuration file. The legacy parameter name node-exporter-target is still supported for backward compatibility.
If the parameter is not set, Prometheus Server uses the lowest IPv4 address discovered in the host with default port 9100.
7.3. Requirements for SUSE Linux Enterprise Server for SAP applications 16 hosts (push mode)
SUSE Linux Enterprise Server for SAP applications 16 uses Grafana Alloy instead of node_exporter for metrics collection. In this mode:
-
Grafana Alloy must be installed and running on the agent hosts.
-
The Prometheus remote write endpoint must be enabled on Trento Server.
-
The Trento Agent generates the Alloy configuration using the
trento-agent generate alloycommand.
See Configuring Grafana Alloy for detailed setup instructions.
7.4. Kubernetes deployment
To enable Prometheus alongside Trento Server in a Kubernetes cluster, see Enabling Prometheus remote write for Grafana Alloy hosts.
In a Kubernetes cluster with multiple nodes, the user can select on which node to deploy Prometheus Server by adding the following flag to the Helm installation command:
--set prometheus.server.nodeSelector.LABEL=<value>Where <value> is the label assigned to the node where the user wants Prometheus Server to be deployed.
7.5. systemd deployment
In a systemd deployment of Trento Server, you can choose between using an existing installation of Prometheus Server, installing a dedicated Prometheus Server instance, or not using Prometheus Server at all.
7.5.1. Use an existing installation
If you already have an existing Prometheus Server that you want to use with Trento Server, you must set CHARTS_ENABLED=true and PROMETHEUS_URL pointing to the right address and port in the Trento Web configuration file. You must restart restart the Trento Web service to enable the changes.
The lowest required Prometheus Server version is 2.28.0.
Use the section "Install Prometheus on SUSE Linux Enterprise Server for SAP applications" as a reference to adjust the Prometheus Server configuration.
7.5.2. Install Prometheus on SUSE Linux Enterprise Server for SAP applications
-
Create the Prometheus user and group:
groupadd --system prometheus useradd -s /sbin/nologin --system -g prometheus prometheus -
Enable the SUSE Package Hub repository. Replace
VERSIONwith the version of your operating system, for example,15.7or16.0:SUSEConnect --product PackageHub/VERSION/x86_64 zypper refreshSUSE Package Hub packages are tested by SUSE but are not officially supported as part of the SUSE Linux Enterprise Server for SAP applications base product. Users should assess the suitability of these packages based on their own risk tolerance and support needs. -
Install Prometheus using Zypper:
zypper install golang-github-prometheus-prometheus -
Configure Prometheus for Trento by replacing or updating the existing configuration at
/etc/prometheus/prometheus.yml:global: scrape_interval: 30s evaluation_interval: 10s scrape_configs: - job_name: "http_sd_hosts" honor_timestamps: true scrape_interval: 30s scrape_timeout: 30s scheme: http follow_redirects: true http_sd_configs: - follow_redirects: true refresh_interval: 1m url: http://localhost:4000/api/prometheus/targetsthe value of the urlparameter above assumes that the Trento Web service is running in the same host as Prometheus Server. -
Enable and start the Prometheus service:
systemctl enable --now prometheus -
If firewalld is running, allow Prometheus to be accessible and add an exception to firewalld:
firewall-cmd --zone=public --add-port=9090/tcp --permanent firewall-cmd --reload -
Set
CHARTS_ENABLED=trueandPROMETHEUS_URL=http://localhost:9090in the Trento Web configuration file and restart the Trento Web service:systemctl restart trento-webthe value of the PROMETHEUS_URLparameter above assumes that the Trento Web service is running in the same host as Prometheus Server.
7.6. Enabling Prometheus remote write for Grafana Alloy hosts
If your environment includes at least one host using Grafana Alloy for metrics collection (either SUSE Linux Enterprise Server for SAP applications 16 or SUSE Linux Enterprise Server for SAP applications 15 SP7 with Alloy manually configured), you must enable the Prometheus remote write endpoint to receive pushed metrics.
The authentication type must be explicitly configured during installation or upgrade. Both the Helm chart and the Ansible playbook fail if the authentication type is left unconfigured, preventing an unprotected remote write endpoint from being silently exposed.
7.6.1. Kubernetes deployment
The Helm chart enables the Prometheus remote write receiver and deploys an NGINX sidecar container in the Prometheus pod to handle authentication. The Kubernetes Ingress routes traffic to the NGINX sidecar (port 8081) instead of directly to Prometheus (port 9090).
The NGINX sidecar protects the /prometheus/api/v1/write endpoint with HTTP Basic Auth. Other Prometheus routes (UI and query API) remain accessible without authentication.
To enable Prometheus with basic authentication, replace flag --set prometheus.enabled=false in the
Helm installation command with the following:
--set prometheus.enabled=true \
--set prometheus.server.auth.type=basic \
--set prometheus.server.auth.basic.username=<username> \
--set prometheus.server.auth.basic.password=<password>
The auth.type field must be explicitly set to basic or none. An empty value causes the chart to fail validation.
To explicitly disable authentication (not recommended for production):
--set prometheus.server.auth.type=none| Running without authentication allows anyone with network access to push arbitrary metrics to Prometheus. |
7.6.2. Ansible deployment
The Ansible playbook configures basic authentication on the existing NGINX reverse proxy. The reverse proxy terminates TLS and enforces basic auth on the Prometheus write endpoint.
Set the following inventory variables:
all:
  vars:
    trento_prometheus_auth: "basic"
    trento_prometheus_auth_username: <username>
    trento_prometheus_auth_password: <password>
The trento_prometheus_auth variable must be explicitly set to basic or none. The playbook fails if Prometheus is enabled and this variable is not set.
When set to basic, the playbook:
-
Validates that both username and password are provided
-
Generates an
htpasswdfile at/etc/nginx/prometheus.htpasswd -
Configures the NGINX reverse proxy to enforce basic authentication on the
/prometheus/api/v1/writeendpoint
These credentials propagate automatically to the agent role, so agents deployed by the same playbook are configured to authenticate against the Prometheus endpoint without additional setup.
To explicitly disable authentication (not recommended for production):
all:
  vars:
trento_prometheus_auth: "none"| Running without authentication allows anyone with network access to push arbitrary metrics to Prometheus. |
7.6.3. Custom deployments
For custom deployments not using the official Helm chart or Ansible playbook, the Prometheus remote write endpoint must be enabled and exposed manually. The procedure below walks through how to add an authenticated /prometheus/ endpoint to an existing Trento Server installation that already has NGINX running as a TLS-terminating reverse proxy in front of the Trento Web and Trento Wanda services.
Grafana Alloy supports basic authentication, bearer token, and mutual TLS (mTLS) when pushing metrics. Configure your reverse proxy to validate credentials using the method of your choice. The example below uses HTTP basic authentication.
Enable the Prometheus remote write receiver
Prometheus must be started with the --web.enable-remote-write-receiver flag. How to set this flag depends on how Prometheus is managed on your platform (for example, via a sysconfig file, a systemd drop-in, or a command-line argument). In a sysconfig file scenario, add ARGS="--web.enable-remote-write-receiver" to the /etc/sysconfig/prometheus configuration file.
After enabling the flag, restart Prometheus and confirm it is healthy:
systemctl restart prometheus
systemctl status prometheus --no-pager
Create the htpasswd file for basic authentication
Generate the password hash with openssl passwd -apr1:
PROM_USER='prometheus'
PROM_PASS='<choose a strong password>'

printf '%s:%s\n' "$PROM_USER" \
  "$(openssl passwd -apr1 "$PROM_PASS")" \
  > /etc/nginx/prometheus.htpasswd

chown root:nginx /etc/nginx/prometheus.htpasswd
chmod 0640       /etc/nginx/prometheus.htpasswd
Verify that the file contains exactly one line of the form prometheus:$apr1$<salt>$<hash>.
Patch the NGINX vhost
-
Edit
/etc/nginx/conf.d/trento.confand add aprometheusupstream alongside the existingwebandwandaupstreams. Adjust the address and port to match your Prometheus installation:upstream prometheus { server 127.0.0.1:9090 max_fails=5 fail_timeout=60s; } -
Inside the existing
server { listen 443 ssl; … }block, add a/prometheus/location before the catch-alllocation / { … }block:# Prometheus API location /prometheus/ { auth_basic "Prometheus"; auth_basic_user_file /etc/nginx/prometheus.htpasswd; # Sized for remote_write batches and longer queries client_max_body_size 16m; proxy_read_timeout 120s; proxy_send_timeout 60s; proxy_http_version 1.1; proxy_set_header Host $http_host; proxy_set_header X-Forwarded-For $proxy_add_x_forwarded_for; proxy_set_header X-Forwarded-Proto $scheme; proxy_set_header X-Cluster-Client-Ip $remote_addr; # Trailing slash strips the /prometheus/ prefix: # /prometheus/api/v1/write -> /api/v1/write upstream proxy_pass http://prometheus/; } -
Validate and reload NGINX:
nginx -t && systemctl reload nginx
7.7. Configuring Grafana Alloy
On SUSE Linux Enterprise Server for SAP applications 16, Grafana Alloy replaces node_exporter for collecting system metrics. On SUSE Linux Enterprise Server for SAP applications 15 SP7, Alloy is available as an optional package for users who prefer push-based metrics collection.
The Trento Agent provides a command to generate the required Alloy configuration.
7.7.1. Prerequisites
-
Grafana Alloy must be installed on the host:
-
On SUSE Linux Enterprise Server for SAP applications 16, it is available in the default repositories.
-
On SUSE Linux Enterprise Server for SAP applications 15 SP7, it is available as an optional package.
-
-
The Prometheus remote write endpoint must be enabled on Trento Server (see Enabling Prometheus remote write for Grafana Alloy hosts).
7.7.2. Generate and deploy the Alloy configuration
-
Install Grafana Alloy:
zypper install alloy -
Configure the Trento Agent with the required parameters for push mode in
/etc/trento/agent.yaml. At minimum, you must set:prometheus-mode: push prometheus-url: https://<trento-server>/prometheus/api/v1/write prometheus-auth: basic prometheus-auth-username: <username> prometheus-auth-password: <password>Replace
<username>and<password>with the credentials configured on Trento Server.When using the Ansible playbook, the agent configuration is set automatically from the inventory variables. The Trento Agent also supports
bearer,mtls, andnoneauthentication methods. See the Trento Agent configuration documentation for the complete list of available parameters. -
Generate the Alloy configuration and deploy it:
The generated configuration enables the following collectors by default:
Collector Description cpuCPU usage statistics
cpufreqCPU frequency scaling
loadavgSystem load averages
meminfoMemory usage statistics
filesystemFilesystem usage and capacity
netdevNetwork device statistics
unameSystem information (kernel version, architecture)
These collectors cover the metrics used by Trento to render CPU and memory charts in the host detail view. If you need additional system metrics, you can edit the generated Alloy configuration to add more collectors from the full list of available collectors.
Generate the Trento-specific Alloy configuration using the Trento Agent:
trento-agent generate alloy > /etc/alloy/trento.alloy
chown alloy:alloy /etc/alloy/trento.alloy
chmod 640 /etc/alloy/trento.alloy
Grafana Alloy supports loading a single configuration file or multiple files from a directory. SUSE Linux Enterprise Server for SAP applications 16 ships Alloy with a default configuration file at
/etc/alloy/config.alloy. Choose one of the following approaches to integrate the Trento configuration:-
Single configuration file: Append the content of
/etc/alloy/trento.alloyto the existing/etc/alloy/config.alloyfile. -
Import configuration file: Keep
/etc/alloy/trento.alloyas a separate file and include it in the main configuration using theimportdirective. See import.file. -
Configuration directory: Keep
/etc/alloy/trento.alloyas a separate file and configure Alloy to automatically load all*.alloyfiles from the/etc/alloy/directory. This can be set up by overriding theCONFIG_FILEenvironment variable in thealloy.servicesystemd unit using a systemd drop-in file. See systemd.unit.
Regardless of the chosen approach, all components defined in the Trento configuration must have unique names across all configuration files to avoid conflicts. -
-
Enable and start the Alloy service:
systemctl enable --now alloyIf Alloy is already running, reload the configuration:
systemctl reload alloy -
Start or restart the Trento Agent:
systemctl enable --now trento-agent
7.7.3. Verifying the configuration
After completing the setup, verify that metrics are being pushed successfully:
-
Check that Alloy is running without errors:
systemctl status alloy journalctl -u alloy -f -
In the Trento web console, navigate to the host details view. The CPU and memory charts should display data after a short time.
8. MCP Integration
The Trento MCP Server is an optional component that enables AI-assisted infrastructure management for your SAP landscape. It exposes Trento functionality through the Model Context Protocol (MCP), an open standard that facilitates secure communication between data sources and AI agents. While the core Trento Server operates independently, the Trento MCP Server component allows you to integrate Trento into an agentic AI workflow. This enables the use of Large Language Models (LLMs) to perform common monitoring and troubleshooting tasks using natural language, providing a standardized way for AI tools to access real-time system state and best-practice validations.
8.1. Installing Trento MCP Server
The Trento MCP Server can be deployed in different ways depending on your infrastructure and requirements.
Supported installation methods:
8.1.1. Prerequisites Trento MCP Server
The Trento MCP Server is lightweight and stateless. No persistent storage is required; allocate space for logs as per your logging policy. Before installing the Trento MCP Server, both Trento Web and Trento Wanda components must be running and be accessible for the Trento MCP Server to function properly.
-
There must be network connectivity between the Trento MCP Server and Trento Server components.
-
Access to the Trento Server URL (important when deployed behind NGINX, or any other reverse proxy) must be possible.
8.1.2. Kubernetes deployment of Trento MCP Server
The subsection uses the following placeholders:
-
TRENTO_SERVER_HOSTNAME: the host name used by the end user to access the console. -
ADMIN_PASSWORD: the password of the admin user created during the installation process.The password must meet the following requirements:
-
minimum length of 8 characters
-
the password must not contain 3 identical numbers or letters in a row (for example, 111 or aaa)
-
the password must not contain 4 sequential numbers or letters (for example, 1234, abcd, ABCD)
-
Enable the Trento MCP Server
When installing Trento Server following the instructions in Kubernetes deployment, the Trento MCP Server is disabled by default. Enable it by passing --set trento-mcp-server.enabled=true:
helm upgrade --install trento-server oci://registry.suse.com/trento/trento-server \
  --set global.trentoWeb.origin=TRENTO_SERVER_HOSTNAME \
  --set trento-web.adminUser.password=ADMIN_PASSWORD \
  --set trento-mcp-server.enabled=true
The Trento MCP Server will automatically connect to the Trento Web and Trento Wanda internal services within the Kubernetes cluster.
Verify the Trento MCP Server installation
-
Check that the Trento MCP Server Pod is running:
kubectl get pods -l app.kubernetes.io/name=mcp-serverExample output:
NAME READY STATUS RESTARTS AGE trento-server-mcp-server-xxxxxxxxxx-xxxxx 1/1 Running 0 2m -
Check the logs:
kubectl logs -l app.kubernetes.io/name=mcp-server -
Check the Trento MCP Server health endpoints:
# Expose the health check port from the Pod, as it is not exposed as a Kubernetes Service.
kubectl port-forward --namespace default \
  $(kubectl get pods --namespace default -l app.kubernetes.io/name=mcp-server -o jsonpath="{.items[0].metadata.name}") \
  8080:8080
While the previous command is running, perform the following check:
# Liveness endpoint:
curl http://localhost:8080/livez
# Readiness endpoint: curl http://localhost:8080/readyzExample output:
# Liveness:
{"info":{"name":"trento-mcp-server","version":"0.1.0"},"status":"up"}

# Readiness:
{"status":"up","details":{"mcp-server":{"status":"up","timestamp":"2025-10-09T12:11:09.528898849Z"},"wanda-api":{"status":"up","timestamp":"2025-10-09T12:11:09.544855047Z"},"web-api":{"status":"up","timestamp":"2025-10-09T12:11:09.544855047Z"}}}
Trento MCP Server Helm configuration options
The Trento MCP Server Helm chart supports various configuration options:
Customize Ingress Path
By default, ingress is enabled. To customize the ingress configuration in a basic K3s installation, run the command below:
helm upgrade --install trento-server oci://registry.suse.com/trento/trento-server \
  --set global.trentoWeb.origin=TRENTO_SERVER_HOSTNAME \
  --set trento-web.adminUser.password=ADMIN_PASSWORD \
  --set trento-mcp-server.enabled=true \
  --set trento-mcp-server.ingress.hosts[0].host=TRENTO_SERVER_HOSTNAME \
  --set trento-mcp-server.ingress.hosts[0].paths[0].path=/mcp-server-trento \
  --set trento-mcp-server.ingress.hosts[0].paths[0].pathType=ImplementationSpecific
The Trento MCP Server endpoint will be: https://TRENTO_SERVER_HOSTNAME/mcp-server-trento/mcp
Adjust Log Verbosity
The default log level is info. Adjust it for debugging:
helm upgrade --install trento-server oci://registry.suse.com/trento/trento-server \
  --set global.trentoWeb.origin=TRENTO_SERVER_HOSTNAME \
  --set trento-web.adminUser.password=ADMIN_PASSWORD \
  --set trento-mcp-server.enabled=true \
  --set trento-mcp-server.mcpServer.verbosity=debug
Adjust Resource Limits
For production deployments with different resource requirements:
helm upgrade --install trento-server oci://registry.suse.com/trento/trento-server \
  --set global.trentoWeb.origin=TRENTO_SERVER_HOSTNAME \
  --set trento-web.adminUser.password=ADMIN_PASSWORD \
  --set trento-mcp-server.enabled=true \
  --set trento-mcp-server.resources.requests.cpu=100m \
  --set trento-mcp-server.resources.requests.memory=128Mi \
  --set trento-mcp-server.resources.limits.cpu=1000m \
  --set trento-mcp-server.resources.limits.memory=1Gi
Disabling Health Check Probes
Health check probes are enabled by default. To disable them if needed, run the following command:
helm upgrade --install trento-server oci://registry.suse.com/trento/trento-server \
  --set global.trentoWeb.origin=TRENTO_SERVER_HOSTNAME \
  --set trento-web.adminUser.password=ADMIN_PASSWORD \
  --set trento-mcp-server.enabled=true \
  --set trento-mcp-server.livenessProbe.enabled=false \
  --set trento-mcp-server.readinessProbe.enabled=false
Complete configuration example
Below is a complete example that configures external access via a custom ingress path:
helm upgrade --install trento-server oci://registry.suse.com/trento/trento-server \
  --set global.trentoWeb.origin=https://trento.example.com \
  --set trento-web.adminUser.password=SecurePassword123 \
  --set trento-mcp-server.enabled=true \
  --set trento-mcp-server.mcpServer.trentoURL=https://trento.example.com \
  --set trento-mcp-server.ingress.hosts[0].host=trento.example.com \
  --set trento-mcp-server.ingress.hosts[0].paths[0].path=/mcp-server-trento \
  --set trento-mcp-server.ingress.hosts[0].paths[0].pathType=ImplementationSpecific
8.1.3. systemd deployment
A systemd-based installation of the Trento MCP Server using RPM packages can be performed manually on the latest supported versions of SUSE Linux Enterprise Server for SAP applications.
Supported versions:
-
SUSE Linux Enterprise Server for SAP applications 15: SP4–SP7
-
SUSE Linux Enterprise Server for SAP applications 16.0
Installing Trento MCP Server using RPM packages
-
Install the Trento MCP Server package:
zypper install mcp-server-trento
Configure Trento MCP Server
-
Create the Trento MCP Server configuration file
/etc/trento/mcp-server-trentoby copying the example:cp /etc/trento/mcp-server-trento.example /etc/trento/mcp-server-trento -
Edit the configuration file to point to your Trento Server:
vim /etc/trento/mcp-server-trentoExample configuration:
AUTODISCOVERY_PATHS=/api/all/openapi,/wanda/api/all/openapi
ENABLE_HEALTH_CHECK=false
HEADER_NAME=Authorization
HEALTH_API_PATH=/api/healthz
HEALTH_PORT=8080
# OAS_PATH=https://trento.example.com/api/all/openapi,https://trento.example.com/wanda/api/all/openapi
PORT=5000
TAG_FILTER=MCP
TRANSPORT=streamable
TRENTO_URL=https://trento.example.com
VERBOSITY=info
INSECURE_SKIP_TLS_VERIFY=false
Configure the Trento MCP Server using either TRENTO_URL or OAS_PATH.
If OAS_PATH is left empty, the Trento MCP Server automatically discovers the APIs from the Trento Server using TRENTO_URL.
If OAS_PATH is set, it takes precedence and TRENTO_URL is ignored.
Use TRENTO_URL when one or more of the following conditions apply:
-
Trento Server is deployed behind a reverse proxy (NGINX, etc.).
-
The Trento MCP Server runs on a different host or network than Trento Server.
-
You want to use external or public URLs.
-
You prefer automatic API autodiscovery.
Use OAS_PATH when one or more of the following conditions apply:
-
You want to connect directly to internal services without autodiscovery.
-
You need to bypass reverse proxy configurations.
Verify the Trento MCP Server service
-
Verify the service is running:
systemctl status mcp-server-trentoExpected output:
● mcp-server-trento.service - Trento MCP Server service Loaded: loaded (/usr/lib/systemd/system/mcp-server-trento.service; enabled) Active: active (running) since ... -
Check the service logs:
journalctl -u mcp-server-trento -f -
If firewalld is running, allow Trento MCP Server to be accessible and add an exception to firewalld:
firewall-cmd --zone=public --add-port=5000/tcp --permanent firewall-cmd --reload -
If you enabled health checks and want to expose them, also allow the health check port:
firewall-cmd --zone=public --add-port=8080/tcp --permanent firewall-cmd --reload -
If you enabled health checks, verify the endpoints locally:
# Note: Replace localhost with the server's IP/hostname if running these commands from a remote machine,
# and ensure the health port is allowed by your firewall.

# Liveness endpoint:
curl http://localhost:8080/livez

# Example output:
# {"info":{"name":"trento-mcp-server","version":"0.1.0"},"status":"up"}

# Readiness endpoint:
curl http://localhost:8080/readyz

# Example output:
# {"status":"up","details":{"mcp-server":{"status":"up","timestamp":"2025-10-09T12:11:09.528898849Z"},"wanda-api":{"status":"up","timestamp":"2025-10-09T12:11:09.542078327Z"},"web-api":{"status":"up","timestamp":"2025-10-09T12:11:09.544855047Z"}}}
8.2. Configuring Trento MCP Server
This section provides an overview of how to configure the Trento MCP Server depending on the deployment method.
8.2.1. Configuration in a Kubernetes deployment
Configuration Sources
The Trento MCP Server supports multiple configuration sources with the following priority order (highest to lowest):
-
Environment variables - Used for containerized deployments.
-
Built-in defaults - Fallback values.
Configuration Overview
| Environment Variable | Default Value | Description |
|---|---|---|
|
|
Custom paths for API autodiscovery. |
|
|
Enable the health check server. |
|
(empty) |
Configuration file path. |
|
|
Header name used to pass the Trento API key to the Trento MCP Server. |
|
|
API path used for health checks on target servers. |
|
|
Port where the health check server runs. |
|
|
Skip TLS certificate verification when fetching OAS specs from HTTPS. |
|
|
Path(s) to OpenAPI specification file(s). Can be set multiple times. |
|
|
Port where the Trento MCP Server runs. |
|
|
Only include operations that contain one of these tags. |
|
|
Protocol to use: |
|
(empty) |
Target Trento server URL. Required for autodiscovery if OAS path is not set. |
|
|
Log level: |
Kubernetes Deployment Example
apiVersion: apps/v1
kind: Deployment
metadata:
  name: mcp-server-trento
spec:
  template:
    spec:
      containers:
      - name: mcp-server-trento
        image: mcp-server-trento:latest
        env:
        - name: TRENTO_MCP_PORT
          value: "5000"
        - name: TRENTO_MCP_HEALTH_PORT
          value: "8080"
        - name: TRENTO_MCP_ENABLE_HEALTH_CHECK
          value: "true"
        - name: TRENTO_MCP_TRENTO_URL
          value: "https://trento.example.com"
        - name: TRENTO_MCP_VERBOSITY
          value: "info"
        ports:
        - containerPort: 5000
          name: mcp
        - containerPort: 8080
          name: health
8.2.2. Configuration in an systemd deployment
Configuration Sources
The Trento MCP Server supports multiple configuration sources with the following priority order (highest to lowest):
-
Command-line flags - Override config for the current process.
-
Configuration file - Persistent settings configuration.
Configuration Overview
The mcp-server-trento binary accepts several command-line flags to configure its behavior. The following table lists all available configuration options, their corresponding flags, configuration variables, and default values.
| Flag | Config Variable | Default Value | Description |
|---|---|---|---|
|
|
|
Custom paths for API autodiscovery. |
|
(empty) |
(empty) |
Configuration file path. |
|
|
|
Enable the health check server. |
|
|
|
Header name used to pass the Trento API key to the Trento MCP Server. |
|
|
|
API path used for health checks on target servers. |
|
|
|
Port where the health check server runs. |
|
|
|
Skip TLS certificate verification when fetching OAS specs from HTTPS. |
|
|
|
Path(s) to OpenAPI specification file(s). Can be set multiple times. |
|
|
|
Port where the Trento MCP Server runs. |
|
|
|
Only include operations that contain one of these tags. |
|
|
|
Protocol to use: |
|
|
(empty) |
Target Trento server URL. Required for autodiscovery if OAS path is not set. |
|
|
|
Log level: |
Configure Trento MCP Server with Command-Line Flags
Trento MCP Server allows you to override configuration settings using command-line flags for temporary changes. These overrides are not persistent and are lost when the process stops or the system is rebooted. To make configuration changes permanent for the systemd service, update /etc/trento/mcp-server-trento and restart the service.
Basic usage with custom port, verbosity, and target URL:
mcp-server-trento --port 9000 --verbosity debug --trento-url https://trento.example.comUsing multiple OpenAPI specifications:
mcp-server-trento --oas-path https://api1.example.com/openapi.json --oas-path https://api2.example.com/openapi.jsonAutodiscovery with custom paths:
mcp-server-trento --trento-url https://trento.example.com --autodiscovery-paths /api/v1/openapi,/wanda/api/v1/openapiEnable health checks on a custom port:
mcp-server-trento --enable-health-check --health-port 8080 --port 50008.2.3. Health Check Configuration
The Trento MCP Server includes built-in health check endpoints for systemd and Kubernetes integration.
|
Health check functionality is disabled by default and must be explicitly enabled using the |
Health Check Endpoints
The health check server provides the following endpoints:
-
/livez- Liveness probe for Kubernetes pod restart decisions. -
/readyz- Readiness probe for traffic routing decisions.
The readiness endpoint performs comprehensive health checks, including:
-
mcp-server- Validates Trento MCP Server connectivity using an MCP client. -
api-server- Verifies connectivity to the configured Trento API server.
Enable Health Checks with Helm on a Kubernetes deployment
Enable health checks when deploying on Kubernetes with Helm:
helm upgrade \
  --install trento-server oci://registry.suse.com/trento/trento-server \
  --set global.trentoWeb.origin=TRENTO_SERVER_HOSTNAME \
  --set trento-web.adminUser.password=ADMIN_PASSWORD \
  --set trento-mcp-server.enabled=true \
  --set TRENTO_MCP_ENABLE_HEALTH_CHECK=true \
  --set TRENTO_MCP_HEALTH_PORT=8080
The health port is internal to the Kubernetes cluster. To reach it from the host running Kubernetes, forward the Pod port. Replace NAMESPACE with your target namespace (Helm defaults to default).
kubectl port-forward --namespace NAMESPACE \
  $(kubectl get pods --namespace NAMESPACE -l app.kubernetes.io/name=mcp-server -o jsonpath="{.items[0].metadata.name}") \
  8080:8080 &
With the port forward active, test the endpoints in Testing Health Endpoints.
Enable Health Checks with the command-line for systemd deployment
mcp-server-trento --enable-health-checkmcp-server-trento --enable-health-check --health-port 8080Testing Health Endpoints
# Test liveness endpoint
curl http://localhost:8080/livez

# Test readiness endpoint
curl http://localhost:8080/readyz

# Expected readiness response format:
# {"status":"up","checks":{"mcp-server":{"status":"up"},"api-server":{"status":"up"},"api-documentation":{"status":"up"}}}

# Expected liveness response format:
# {"status":"up"}
8.2.4. Troubleshooting
This section provides solutions for common issues when deploying and using the Trento MCP Server.
Connection Issues
-
Trento MCP Server cannot connect to Trento API
-
Verify the
TRENTO_URLorOAS_PATHconfiguration points to accessible endpoints -
Check network connectivity between the Trento MCP Server and Trento components
-
Ensure API authentication is properly configured with valid tokens
-
-
MCP clients cannot connect to Trento MCP Server
-
Verify the Trento MCP Server is running and listening on the correct port (default: 5000)
-
Check firewall rules allow access to the Trento MCP Server port
-
Ensure the Trento MCP Server endpoint URL is correctly configured in client applications
-
Authentication Issues
-
API token authentication fails
-
Verify the Personal Access Token is valid and not expired
-
Ensure the token has the necessary permissions in Trento
-
Check that the
HEADER_NAMEconfiguration matches between server and client
-
-
Token not accepted
-
Confirm the token was generated from the correct Trento instance
-
Verify the token format and ensure it includes the "Bearer " prefix if required
-
Configuration Issues
-
OpenAPI specification not found
-
Check that
TRENTO_URLorOAS_PATHpoint to valid Trento API endpoints -
Verify the Trento Web and Trento Wanda services are running and accessible
-
Ensure autodiscovery paths are correct if using
TRENTO_URL
-
-
Tools not appearing in MCP clients
-
Check the
TAG_FILTERconfiguration - only operations with matching tags are exposed -
Verify the OpenAPI specifications are accessible and valid
-
Ensure the Trento MCP Server can parse the API documentation
-
Performance Issues
-
Slow response times
-
Check network latency between Trento MCP Server and Trento components
-
Review Trento API performance and database query times
-
Consider enabling debug logging to identify bottlenecks
-
-
High resource usage
-
Monitor Trento MCP Server memory and CPU usage
-
Check for memory leaks in long-running processes
-
Consider adjusting logging verbosity to reduce I/O overhead
-
Health Check Issues
-
Health checks failing
-
Verify health check endpoints are accessible
-
Check that all required services (Trento API, Trento MCP Server) are responding
-
Review health check configuration and timeouts
-
Logging and Debugging
-
Enable debug logging
-
Set
VERBOSITY=debugto get detailed logs -
Check Trento MCP Server logs for error messages and connection attempts
-
Review Trento component logs for API-related issues
-
-
Common log messages
-
"Failed to fetch OpenAPI specification" - Check API endpoint accessibility
-
"Authentication failed" - Verify API token configuration
-
"No tools available" - Check tag filtering and API documentation
-
Getting Help
If you continue to experience issues:
-
Check the Trento MCP Server logs for detailed error messages
-
Verify configuration values:
-
For systemd deployments, use
mcp-server-trento --help -
For Kubernetes deployments, run Helm with
--render-subchart-notesto view the rendered Trento MCP Server settings
-
-
Test API connectivity directly using curl or similar tools
-
Check the Trento server logs for API authentication and access issues
8.3. Using the Trento MCP Server
The Trento MCP Server provides the interface for AI-assisted infrastructure operations, enabling agentic assistants to integrate with Trento. By utilizing the Model Context Protocol, these assistants can perform monitoring and troubleshooting tasks through natural language. See MCPHost on SLES or Using alternative MCP clients for details.
8.3.1. Integrating the Trento MCP Server with MCPHost
This guide explains how to connect the Trento MCP Server to SUSE Linux Enterprise Server 16 using MCPHost, a lightweight CLI tool for the Model Context Protocol (MCP).
|
Supported only on SUSE Linux Enterprise Server for SAP applications 16.0 |
Prerequisites
-
An LLM provider and credentials.
-
Public hosted options, such as Google Gemini, OpenAI, etc.
-
Private/on-premises option, such as SUSE AI.
-
-
A running Trento Server installation with the Trento MCP Server component enabled.
-
A Trento Personal Access Token generated in Trento Web Profile view.
 Figure 2. Generate a Personal Access Token in Trento
Install MCPHost
To install MCPHost, open a terminal and run the following commands:
sudo zypper refresh
sudo zypper install mcphost
After installation, verify that MCPHost is available and working by checking its version:
mcphost --versionConfigure MCPHost
MCPHost reads its configuration from several locations; one common location is ~/.mcphost.yml. Create ~/.mcphost.yml with the following content:
mcpServers:
  trento-mcp-server:
    type: "remote"
    url: https://trento.example.com/mcp-server-trento/mcp
    headers:
- "Authorization: Bearer ${env://TRENTO_PAT}"-
Replace
https://trento.example.com/mcp-server-trento/mcpwith the actual URL where your Trento MCP Server is accessible:-
For Kubernetes deployments with ingress, use the ingress URL (e.g.,
https://trento.example.com/mcp-server-trento/mcp). -
For local or development setups, use
http://localhost:5000/mcp(adjust the port as needed). -
The transport type is configured on the Trento MCP Server, if using Server-Sent Events (SSE) transport instead of the default streamable transport, change the path from
/mcpto/sse.
-
-
If you configured a custom header name (using
HEADER_NAMEor--header-name), updateAuthorizationaccordingly.
|
Security best practice: Keep secrets out of configuration files. Store your keys in environment variables instead of hardcoding them. Export your keys in the shell before running MCPHost. For example: |
|
Configure remote LLM models directly in your MCPHost configuration. For example, to use Google Gemini as your model provider: |
Run MCPHost and use Trento tools
-
Start MCPHost:
mcphostIf no servers appear on startup, confirm your configuration file exists at
~/.mcphost.ymland that your environment variables are exported in the same shell session. -
Verify the connection to Trento and basic status:
/servers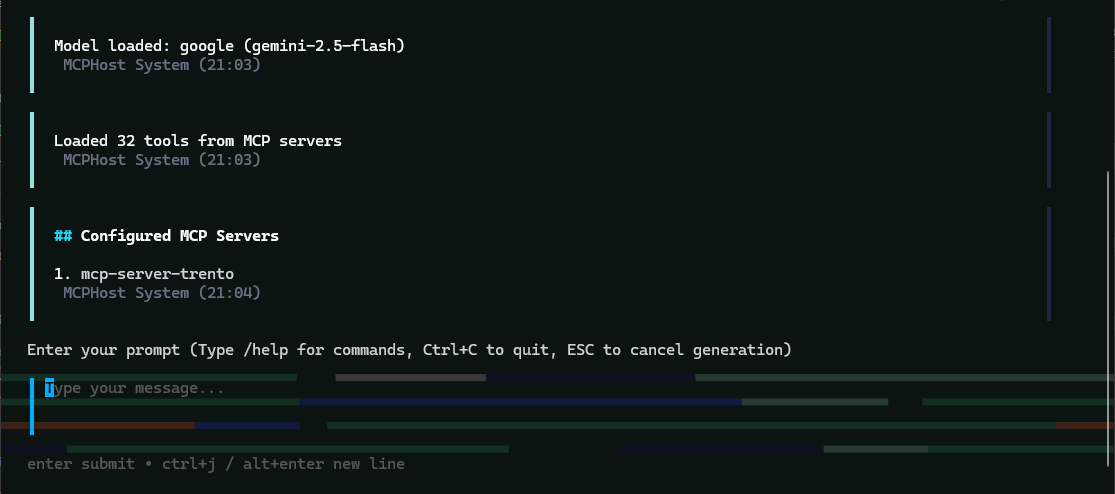 Figure 3. MCPHost initial screen with the Trento MCP Server connected
Use MCPHost to interact with Trento Server
-
"List all SAP systems managed".
-
"Show my HANA clusters".
-
"Are my SAP systems compliant?"
-
"What is the health status of my SAP landscape?"
-
"Show me all hosts running SAP applications".
-
"Are there any critical alerts I need to address?"
-
"Get details about the latest check execution results".
-
"Which SAP systems are currently running?"
Example MCPHost session querying Trento about SAP systems:
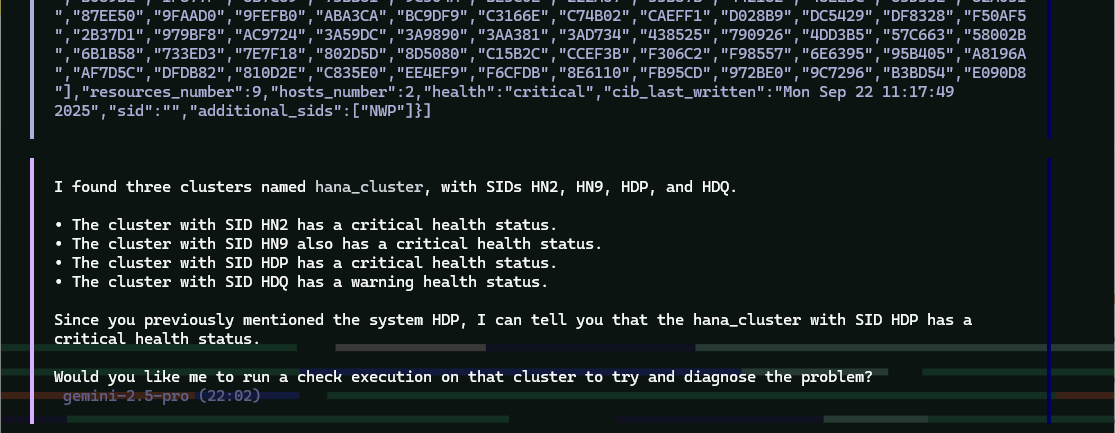
MCPHost Troubleshooting
If you encounter issues connecting MCPHost to the Trento MCP Server:
-
Connection errors
-
Verify that the Trento MCP Server URL in
~/.mcphost.ymlis correct and accessible from your system. -
Check if the Trento MCP Server is running by reviewing logs from your Trento installation.
-
Ensure network connectivity and that any required firewall rules are in place.
-
Test basic connectivity:
curl -I https://trento.example.com/mcp-server-trento/mcp.
-
-
Authentication errors
-
Verify that your personal access token is valid by testing it directly with your Trento Server API.
-
Ensure
TRENTO_PATis exported in the same shell session before runningmcphost. -
Check that the header name matches your server configuration (default:
Authorization). -
Ensure the token has the necessary permissions in Trento.
-
-
LLM provider errors
-
Verify that LLM
GOOGLE_API_KEY(or your provider’s API key) is exported correctly. -
Check the
provider-urlandmodelconfiguration in your~/.mcphost.yml. -
Confirm that your API key has sufficient quota and permissions with your provider.
-
-
General issues
-
Check the MCPHost terminal output for detailed error messages during startup or operation.
-
Review the Trento MCP Server logs for connection attempts and errors.
-
Verify that your configuration file exists at
~/.mcphost.ymland has correct YAML syntax.
-
8.3.2. Integrating the Trento MCP Server with other clients
The Trento MCP Server can be integrated with any client application that supports the Model Context Protocol. This makes it possible to interact with the Trento API and execute tools defined in the OpenAPI specification through your preferred AI assistant or development tool.
This guide uses Visual Studio Code with GitHub Copilot as an example, but the configuration procedures apply to any MCP-compatible client.
Prerequisites
-
An LLM provider and credentials.
-
Public hosted options, such as Google Gemini, OpenAI, etc.
-
Private/on-premises option, such as SUSE AI.
-
-
A running Trento Server installation with the Trento MCP Server component enabled.
-
A Trento Personal Access Token generated in Trento Web Profile view.
Figure 4. Generate a Personal Access Token in Trento
Configuring your client
Once you have your Trento Server installation ready with the Trento MCP Server URL and API token, you can configure the MCP Server client. The examples below show JSON configuration format used by most MCP Server clients, including VS Code, Claude Desktop, and others.
Option 1: Configuration with prompted input
This configuration asks for your personal access token when the client starts, keeping credentials secure and out of configuration files. The password: true setting ensures your personal access token input is masked when you type it.
|
This option is supported by most clients, including VS Code. Check your client’s documentation if the prompt feature is not available. |
{
  "servers": {
    "trento": {
      "type": "http",
      "url": "https://trento.example.com/mcp-server-trento/mcp",
      "headers": {
        "Authorization": "${input:trento-personal-access-token}"
      }
    }
  },
  "inputs": [
    {
      "type": "promptString",
      "id": "trento-personal-access-token",
      "description": "Trento API key",
      "password": true
    }
  ]
}
Option 2: Direct header configuration
For clients that don’t support prompted input, or for testing purposes, set your Trento personal access token directly in the configuration file.
|
When using this option, ensure your configuration file has appropriate permissions and is not committed to version control systems. |
{
  "servers": {
    "trento": {
      "type": "http",
      "url": "https://trento.example.com/mcp-server-trento/mcp",
      "headers": {
        "Authorization": "trento-personal-access-token"
      }
    }
  }
}|
Replace |
Client options
For detailed guidance on taking advantage of MCP capabilities in different tools, refer to the following official documentation:
-
Visual Studio Code with GitHub Copilot - MCP Server Configuration.
-
Cursor - AI-powered code editor with MCP support.
9. Core Features
9.1. User management
Trento provides a local permission-based user management feature with optional multi-factor authentication. This feature enables segregation of duties in the Trento interface and ensures that only authorized users with the right permissions can access it.
User management actions are performed in the Users view in the left-hand side panel of the Trento UI.
By default, a newly created user is granted display access rights except for the Users view. Where available, a user with default access can configure filters and pagination settings matching their preferences.
To perform protected actions, the user must have additional permissions added to their user profile. Below is the list of currently available permissions:
-
all:users: grants full access to user management actions under the Users view -
all:checks_selection: grants check selection capabilities for any target in the registered environment for which checks are available -
all:checks_execution: grants check execution capabilities for any target in the registered environment for which checks are available and have been previously selected -
all:tags: allows creation and deletion of the available tags -
cleanup:all: allows triggering housekeeping actions on hosts where agents heartbeat is lost and SAP or HANA instances that are no longer found -
all:settings: grants changing capabilities on any system settings under the Settings view -
all:all: grants all the permissions above
Using the described permissions, it is possible to create the following types of users:
-
User managers: users with
all:userspermissions -
SAP Basis administrator with Trento display-only access: users with default permissions
-
SAP Basis administrator with Trento configuration access: users with
all:checks_selection,all:tagsandall:settingspermissions -
SAP Basis administrator with Trento operation access: users with
all:check_executionandcleanup:allpermissions.
The default admin user created during the installation process is
granted all:all permissions and cannot be modified or deleted. Use
it only to create the first user manager (a user with all:users
permissions who creates all the other required users). Once a user with
all:users permissions is created, the default admin user must be
treated as a fallback user in case all other access to the console is
lost. If the password of the default admin user is lost, it can be reset
by updating the Helm chart or the web component configuration, depending
on which deployment method was used to install Trento Server.
User passwords, including the default admin user password, must follow the rules below:
-
Password must contain at least 8 characters
-
The same number or letter must not be repeated three or more times in a row (for example: 111 or aaa)
-
Password must not contain four consecutive numbers or letters (for example: 1234, abcd or ABCD)
The Create User and Edit User views provide a built-in password generation button that allows user managers to easily generate secure and compliant passwords. The user manager must provide the user with their password through an authorized secure channel.
User managers may also set a preferred timezone for the account from the Create User and Edit User views. Individual users can configure their own preference later in the Profile view. The web console displays dates and times according to each user’s preferred timezone for presentation; if no preference is set, UTC is used. This preference affects only how timestamps are presented in the UI — backend storage, API payloads, logs and scheduled tasks continue to use UTC.
A user can reset their password in the Profile view. In this view, they can also update their name and email address as well as activate multi-factor authentication using an authenticator app. Multi-factor authentication increases the security of a user account by requesting a temporary second password or code when logging in the console. User managers can disable multi-factor authentication for any given user that has it enabled. However, user managers cannot enable multi-factor authentication on their behalf. The default admin user cannot enable its own multi-factor authentication.
|
Security Tip for Multi-Factor Authentication
Since multi-factor authentication cannot be enabled for the default admin user, keeping its password safe is imperative. If the default admin user’s password is compromised, reset it immediately by updating the Helm chart or the web component configuration, depending on which deployment method was used to install Trento Server. |
User managers can enable and disable users. When a user logged in the console is disabled by a user admin, their session is terminated immediately.
9.2. Single Sign-On integration
Trento can be integrated for Single Sign-On (SSO) with a third-party identity provider (IDP).
|
Trento cannot start with multiple SSO options together, so only one can be chosen. |
The following protocols are supported:
-
OpenID Connect (OIDC)
-
Open Authorization 2.0 (OAuth 2)
-
Security Assertion Markup Language (SAML)
9.2.1. User roles and authentication
User authentication is entirely managed by the IDP, which is responsible for maintaining user accounts. A user, who does not exist on the IDP, is unable to access the Trento web console.
During the installation process, a default admin user is defined using
the ADMIN_USER variable, which defaults to admin. If the
authenticated user’s IDP username matches this admin user’s username,
that user is automatically granted all:all permissions within
Trento.
User permissions are entirely managed by Trento, they are not imported
from the IDP. The permissions must be granted by some user with
all:all or all:users rights (admin user initially). This
means that only basic user information is retrieved from the external
IDP.
9.2.2. Using OpenID Connect
Trento integrates with an IDP that uses the OIDC protocol to authenticate users accessing the Trento web console.
By default, OIDC is disabled.
Enabling OpenID Connect when using kubernetes deployment
To enable OIDC when using kubernetes deployment with helm, add the following variables to the previously documented helm installation command:
helm ... \
   --set trento-web.oidc.enabled=true \
   --set trento-web.oidc.clientId=<OIDC_CLIENT_ID> \
   --set trento-web.oidc.clientSecret=<OIDC_CLIENT_SECRET> \
   --set trento-web.oidc.baseUrl=<OIDC_BASE_URL>
Enabling OpenID Connect when using RPM packages
To enable OIDC when using RPM packages, proceed as follows:
-
Open the file
/etc/trento/trento-web. -
Add the following environment variables to this file. Required variables are:
ENABLE_OIDC=true OIDC_CLIENT_ID=<OIDC_CLIENT_ID> OIDC_CLIENT_SECRET=<OIDC_CLIENT_SECRET> OIDC_BASE_URL=<OIDC_BASE_URL> -
Optionally, add the OIDC callback URL to the configuration. This can be useful if for some reason the default callback URL cannot be used, for example, if
httpis used instead ofhttps. Use the next variable for that:OIDC_CALLBACK_URL=<OIDC_CALLBACK_URL> -
Restart the application.
Available variables for OpenID Connect
- OIDC_CLIENT_ID
-
OIDC client id
- OIDC_CLIENT_SECRET
-
OIDC client secret
- OIDC_BASE_URL
-
OIDC base url
- OIDC_CALLBACK_URL
-
OIDC callback url where the IDP is redirecting once the authentication is completed (default value:
https://#{TRENTO_WEB_ORIGIN}/auth/oidc_callback)
9.2.3. Using OAuth 2.0
Trento integrates with an IDP that uses the OAuth 2 protocol to authenticate users accessing the Trento web console.
By default, OAuth 2.0 is disabled.
Enabling OAuth 2.0 when using kubernetes deployment
To enable OAuth 2.0 when using kubernetes deployment with helm, proceed as follows:
-
Add the following variables to the previously documented helm installation command:
helm ... \
   --set trento-web.oauth2.enabled=true \
   --set trento-web.oauth2.clientId=<OAUTH2_CLIENT_ID> \
   --set trento-web.oauth2.clientSecret=<OAUTH2_CLIENT_SECRET> \
   --set trento-web.oauth2.baseUrl=<OAUTH2_BASE_URL> \
   --set trento-web.oauth2.authorizeUrl=<OAUTH2_AUTHORIZE_URL> \
   --set trento-web.oauth2.tokenUrl=<OAUTH2_TOKEN_URL> \
   --set trento-web.oauth2.userUrl=<OAUTH2_USER_URL>
Additionally, the following optional values are available:
helm ... \
   --set trento-web.oauth2.scopes=<OAUTH2_SCOPES>
Enabling OAuth 2.0 when using RPM packages
To enable OAuth 2.0 when using RPM packages, proceed as follows:
-
Open the file
/etc/trento/trento-web. -
Add the following environment variables to this file. Required variables are:
# Required: ENABLE_OAUTH2=true OAUTH2_CLIENT_ID=<OAUTH2_CLIENT_ID> OAUTH2_CLIENT_SECRET=<OAUTH2_CLIENT_SECRET> OAUTH2_BASE_URL=<OAUTH2_BASE_URL> OAUTH2_AUTHORIZE_URL=<OAUTH2_AUTHORIZE_URL> OAUTH2_TOKEN_URL=<OAUTH2_TOKEN_URL> OAUTH2_USER_URL=<OAUTH2_USER_URL> # Optional: OAUTH2_SCOPES=<OAUTH2_SCOPES> OAUTH2_CALLBACK_URL=<OAUTH2_CALLBACK_URL> -
Restart the application.
Available variables for OAuth 2.0
- OAUTH2_CLIENT_ID
-
OAUTH2 client id
- OAUTH2_CLIENT_SECRET
-
OAUTH2 client secret
- OAUTH2_BASE_URL
-
OAUTH2 base url
- OAUTH2_AUTHORIZE_URL
-
OAUTH2 authorization url
- OAUTH2_TOKEN_URL
-
OAUTH2 token url
- OAUTH2_USER_URL
-
OAUTH2 token url
- OAUTH2_SCOPES
-
OAUTH2 scopes, used to define the user values sent to the SP. It must be adjusted depending on IDP provider requirements (default value:
profile email) - OAUTH2_CALLBACK_URL
-
OAUTH2 callback url where the IDP is redirecting once the authentication is completed (default value:
https://#{TRENTO_WEB_ORIGIN}/auth/oauth2_callback)
9.2.4. Using SAML
Trento integrates with an IDP that uses the SAML protocol to authenticate users accessing the Trento web console. Trento will behave as a Service Provider (SP) in this case.
Commonly, SAML protocol messages are signed with SSL. This is optional using Trento, and the signing is not required (even though it is recommended). If the IDP signs the messages, and expect signed messages back, certificates used by the SP (Trento in this case) must be provided to the IDP, the public certificate file in this case.
To use an existing SAML IDP, follow the next instructions to met the specific requirements. You need:
-
Obtain metadata content from the IDP
-
Start Trento to generate the certificates and get them (SAML must be enabled for this)
-
Provide the generated certificate to the IDP
-
Configure SAML IDP and user profiles
See the following subsections for details.
Obtaining metadata content from the IDP
The metadata.xml file defines the agreement between SP and IDP
during SAML communications. It is used to identify the SAML client as
well. The content of this file must be provided to Trento. Options
SAML_METADATA_URL and SAML_METADATA_CONTENT are available for
that.
If the SAML_METADATA_CONTENT option is being used, the content of
this variable must be updated with the IDP metadata as single line
string. On the other hand, if SAML_METADATA_URL is used, the new
metadata is automatically fetched when Trento starts. If neither of
these steps are completed, communication will fail because the message
signatures will not be recognized.
If the used IDP has the endpoint to provide the metadata.xml file
content, prefer the variable SAML_METADATA_URL. Trento will
automatically fetch metadata when started.
Getting certificates from Trento
Trento provides a certificates set created during the installation. Regardless
of the installation mode, when Trento is installed the first time and SAML is
enabled the certificates are created and the public certificate file content is
available in the https://#{TRENTO_WEB_ORIGIN}/api/public_keys route.
Use the following command to get the certificate content:
curl https://#{TRENTO_WEB_ORIGIN}/api/public_keysCopy the content of the certificate from there and provide it to the IDP. This way, the IDP will sign its messages and verify the messages received from Trento.
|
To get the certificate using this route Trento must be configured to start with SAML enabled. |
Configuring SAML IDP setup
Configure the existing IDP with the next minimum options to be able to connect with Trento as a Service Provider (SP).
Providing certificates
As commented previously, a set of certificates is needed to enable signed communication. Provide the certificate generated by Trento to the IDP (each IDP has a different way to do this). Make sure that the configured certificate is used for signing and encrypting messages.
Configuring SAML user profile
Users provided by the SAML installation must have some few mandatory attributes to login in Trento. The required attributes are: username, email, first name and last name. All of them are mandatory, even though their field names are configurable.
By default, Trento expects the username, email, firstName
and lastName attribute names. All these 4 attribute names are
configurable using the next environment variables, following the same
order: SAML_USERNAME_ATTR_NAME, SAML_EMAIL_ATTR_NAME,
SAML_FIRSTNAME_ATTR_NAME and SAML_LASTNAME_ATTR_NAME.
Both IDP and Trento must know how these 4 fields are mapped. To do this, follow the next instructions:
-
Add the attributes if they don’t exist in the IDP user profile. If they already exist, don’t change the attributes and keep their original values.
-
Configure Trento to use the IDP attribute field names. To do this, set the
SAML_USERNAME_ATTR_NAME,SAML_EMAIL_ATTR_NAME,SAML_FIRSTNAME_ATTR_NAMEandSAML_LASTNAME_ATTR_NAMEenvironment values with the values configured in the IDP. For example, if the IDP user profile username is defined asattr:usernameuseSAML_USERNAME_ATTR_NAME=attr:username.
SAML URLs
Trento exposes some SAML related URLs when SAML is enabled:
-
Assertion consumer service (or ACS): an endpoint to accept SAML messages to establish a session into the Service Provider. The endpoint for ACS in Trento is:
https://#{TRENTO_WEB_ORIGIN}/sso/sp/consume/#{SAML_IDP_ID} -
Single logout service (or SLS): an endpoint to initiate a logout request from the IdP. The endpoint for SLS in Trento is:
https://#{TRENTO_WEB_ORIGIN}/sso/sp/logout/#{SAML_IDP_ID} -
Metadata: an endpoint to retrieve Trento metadata for SAML. The endpoint for metadata in Trento is:
https://#{TRENTO_WEB_ORIGIN}/sso/sp/metadata/#{SAML_IDP_ID}. This URL is used as default value forSAML_SP_ENTITY_IDif the configuration variable is not set
Enabling SAML when using kubernetes deployment
To enable SAML when using kubernetes deployment with helm, proceed as follows:
-
Add the following variables to the previously documented helm installation command:
helm ... \
   --set trento-web.saml.enabled=true \
   --set trento-web.saml.idpId=<SAML_IDP_ID> \
   --set trento-web.saml.spId=<SAML_SP_ID> \
   --set trento-web.saml.metadataUrl=<SAML_METADATA_URL>
To use the
SAML_METADATA_CONTENToption rather thanSAML_METADATA_URLuse:helm ... \ --set trento-web.saml.enabled=true \ --set trento-web.saml.idpId=<SAML_IDP_ID> \ --set trento-web.saml.spId=<SAML_SP_ID> \ --set trento-web.saml.metadataContent=<SAML_METADATA_CONTENT>Additionally, the following optional values are available:
helm ... \
   --set trento-web.saml.idpNameIdFormat=<SAML_IDP_NAMEID_FORMAT> \
   --set trento-web.saml.spDir=<SAML_SP_DIR> \
   --set trento-web.saml.spEntityId=<SAML_SP_ENTITY_ID> \
   --set trento-web.saml.spContactName=<SAML_SP_CONTACT_NAME> \
   --set trento-web.saml.spContactEmail=<SAML_SP_CONTACT_EMAIL> \
   --set trento-web.saml.spOrgName=<SAML_SP_ORG_NAME> \
   --set trento-web.saml.spOrgDisplayName=<SAML_SP_ORG_DISPLAYNAME> \
   --set trento-web.saml.spOrgUrl=<SAML_SP_ORG_URL> \
   --set trento-web.saml.usernameAttrName=<SAML_USERNAME_ATTR_NAME> \
   --set trento-web.saml.emailAttrName=<SAML_EMAIL_ATTR_NAME> \
   --set trento-web.saml.firstNameAttrName=<SAML_FIRSTNAME_ATTR_NAME> \
   --set trento-web.saml.lastNameAttrName=<SAML_LASTNAME_ATTR_NAME> \
   --set trento-web.saml.signRequests=<SAML_SIGN_REQUESTS> \
   --set trento-web.saml.signMetadata=<SAML_SIGN_METADATA> \
   --set trento-web.saml.signedAssertion=<SAML_SIGNED_ASSERTION> \
   --set trento-web.saml.signedEnvelopes=<SAML_SIGNED_ENVELOPES>
Enabling SAML when using RPM packages
To enable SAML when using RPM packages, proceed as follows:
-
Open the file
/etc/trento/trento-web. -
Add the following environment variables to this file. Required variables are:
# Required: ENABLE_SAML=true SAML_IDP_ID=<SAML_IDP_ID> SAML_SP_ID=<SAML_SP_ID> # Only SAML_METADATA_URL or SAML_METADATA_CONTENT must by provided SAML_METADATA_URL=<SAML_METADATA_URL> SAML_METADATA_CONTENT=<SAML_METADATA_CONTENT> # Optional: SAML_IDP_NAMEID_FORMAT=<SAML_IDP_NAMEID_FORMAT> SAML_SP_DIR=<SAML_SP_DIR> SAML_SP_ENTITY_ID=<SAML_SP_ENTITY_ID> SAML_SP_CONTACT_NAME=<SAML_SP_CONTACT_NAME> SAML_SP_CONTACT_EMAIL=<SAML_SP_CONTACT_EMAIL> SAML_SP_ORG_NAME=<SAML_SP_ORG_NAME> SAML_SP_ORG_DISPLAYNAME=<SAML_SP_ORG_DISPLAYNAME> SAML_SP_ORG_URL=<SAML_SP_ORG_URL> SAML_USERNAME_ATTR_NAME=<SAML_USERNAME_ATTR_NAME> SAML_EMAIL_ATTR_NAME=<SAML_EMAIL_ATTR_NAME> SAML_FIRSTNAME_ATTR_NAME=<SAML_FIRSTNAME_ATTR_NAME> SAML_LASTNAME_ATTR_NAME=<SAML_LASTNAME_ATTR_NAME> SAML_SIGN_REQUESTS=<SAML_SIGN_REQUESTS> SAML_SIGN_METADATA=<SAML_SIGN_METADATA> SAML_SIGNED_ASSERTION=<SAML_SIGNED_ASSERTION> SAML_SIGNED_ENVELOPES=<SAML_SIGNED_ENVELOPES> -
Restart the application.
Available variables for SAML
- SAML_IDP_ID
-
SAML IDP id. This is a user-defined string used to identify the associated IDP in Trento. The value is used as well to compose relevant SAML URLs like the ACS and metadata URLs. It can have any value, for example:
trento - SAML_SP_ID
-
SAML SP id. This is a user-defined string to identify Trento as service provider. It can have any value, for example:
trento - SAML_METADATA_URL
-
URL to retrieve the SAML metadata xml file. One of
SAML_METADATA_URLorSAML_METADATA_CONTENTis required - SAML_METADATA_CONTENT
-
One line string containing the SAML metadata xml file content (
SAML_METADATA_URLhas precedence over this) - SAML_IDP_NAMEID_FORMAT
-
SAML IDP name id format, used to interpret the attribute name. Whole urn string must be used (default value:
urn:oasis:names:tc:SAML:1.1:nameid-format:unspecified) - SAML_SP_DIR
-
SAML SP directory, where SP specific required files (such as certificates and metadata file) are placed (default value:
/etc/trento/saml) - SAML_SP_ENTITY_ID
-
SAML SP entity id. This value must match with the entity ID configured in the IDP as SAML client (default value:
https://#{TRENTO_WEB_ORIGIN}/sso/sp/metadata/#{SAML_IDP_ID}) - SAML_SP_CONTACT_NAME
-
SAML SP contact name (default value:
Trento SP Admin) - SAML_SP_CONTACT_EMAIL
-
SAML SP contact email (default value:
admin@trento.suse.com) - SAML_SP_ORG_NAME
-
SAML SP organization name (default value:
Trento SP) - SAML_SP_ORG_DISPLAYNAME
-
SAML SP organization display name (default value:
SAML SP build with Trento) - SAML_SP_ORG_URL
-
SAML SP organization url (default value:
https://www.trento-project.io/) - SAML_USERNAME_ATTR_NAME
-
SAML user profile "username" attribute field name. This attribute must exist in the IDP user (default value:
username) - SAML_EMAIL_ATTR_NAME
-
SAML user profile "email" attribute field name. This attribute must exist in the IDP user (default value:
email) - SAML_FIRSTNAME_ATTR_NAME
-
SAML user profile "first name" attribute field name. This attribute must exist in the IDP user (default value:
firstName) - SAML_LASTNAME_ATTR_NAME
-
SAML user profile "last name" attribute field name. This attribute must exist in the IDP user (default value:
lastName) - SAML_SIGN_REQUESTS
-
Sign SAML requests in the SP side (default value:
true) - SAML_SIGN_METADATA
-
Sign SAML metadata documents in the SP side (default value:
true) - SAML_SIGNED_ASSERTION
-
Require to receive SAML assertion signed from the IDP. Set to false if the IDP doesn’t sign the assertion (default value:
true) - SAML_SIGNED_ENVELOPES
-
Require to receive SAML envelopes signed from the IDP. Set to false if the IDP doesn’t sign the envelopes (default value:
true)
9.2.5. Troubleshooting failed login
In some cases, the IDP successfully authenticates a user, but Trento fails to create a session and displays a "Login Failed" page. This typically indicates that Trento encountered an error while processing the authentication response.
To find the specific cause:
-
Open the Network tab in your browser’s Developer Tools
-
Attempt the login again
-
Look for a 4xx HTTP response
-
View the Response payload. This contains the internal error details, such as missing required user attributes, needed to troubleshoot the failure
For example, the error Some mandatory SAML user attributes are missing means
that Trento didn’t receive some expected user attributes. Have a look into the
Configuring SAML user profile section.
9.3. Activity Log
Trento collects system events and user actions in the Activity Log. It can be accessed from the left-hand side panel of the Trento console.
Each entry in the Activity Log includes the following:
-
A timestamp: the day and time the system event or user action occurred. Timestamps are displayed using the user’s preferred timezone (set in the user profile). If no preference is set, times default to UTC.
-
A message: type of the occurred event or user action
-
The user that triggered the event or performed the action. User system is used for events triggered by the system itself.
-
Severity status (Info, Warning, and Critical are selected by default)
Clicking on the chevron icon in the activity log entry opens a modal window containing the activity metadata.
It is possible to search the activity metadata of the activity log entries. You
can use wildcards as well as the OR and AND logical operators for advanced
search queries. The OR operator is applied by default, meaning that a query like
term1 term2 term3 is treated as term1 OR term2 OR term3. You can combine
multiple logical operators, keeping in mind that they are parsed from left to
right.
The Activity Log allows you to filter by the type of event or user action (commonly referred to as resource type), by the user that triggered the event or performed the action, and by severity status. Only active users are available for filtering. The Activity Log also allows you to filter out entries that are newer and/or older than a specific date and time. Date/time inputs in the UI are interpreted according to the user’s preferred timezone; if no preference is set, UTC is assumed.
Once a filter has been set, click Apply to filter out the undesired entries and Reset to remove all the filters.
Entries related to user management can only be displayed by users that
have the all:all or all:users permissions. This includes the
following:
-
Login attempts
-
User creations
-
User modifications
-
User deletions
-
Profile updates
The Activity Log features a privacy-related access level controlled through the activity_log:users permission. For users without this permission, user-related info in the Activity Log is redacted. Unprivileged users can only see their own user names as well as user system.
Entries in the Activity Log are sorted from newer to older. Click Refresh to update the Activity Log view with entries generated since they accessed the view or after the last refresh. You can also enable the auto-refresh feature by selecting the desired auto-refresh interval.
The pagination features at the bottom of the Activity Log allow you to specify the number of entries to display in a page, go to the next or previous page of the view, and jump to the last page and back to first one.
The default retention time for entries in the Activity Log is one month.
This can be changed in the Activity Log section under Settings. Changing
the retention time requires the all:settings permissions. Entries
older than the specified retention time are deleted every day at
midnight (UTC timezone).
Note that the cleanup schedule uses UTC, but timestamps shown in the UI are
adjusted to each user’s preferred timezone for display purposes.
The correlation functionality of the Activity Log links related events together, offering a chronological, linear view of a chain of events in multi-step workflows triggered by a user action.
For example, the clean-up action in a host that runs a single instance HANA database of an SAP system de-registers the database instance, de-registers the database itself, de-reregisters the SAPsystem and its instances and then de-registers the host. These correlated entries are displayed in a linked, linear view, when you navigate to the host clean-up entry modal in the Activity Log and then click the link in the Related Events section named Show Events.
The following categories of Activity Log entries provide a view of linked or related events:
-
entries caused by de-registration of hosts
-
entries caused by API key re-generation
-
entries caused by SMLM settings save/update
-
entries caused by host, cluster and SAP operations
9.4. Housekeeping
When the heartbeat of an agent fails, an option to clean-up the corresponding host is displayed in the Hosts overview and the corresponding Host details view.

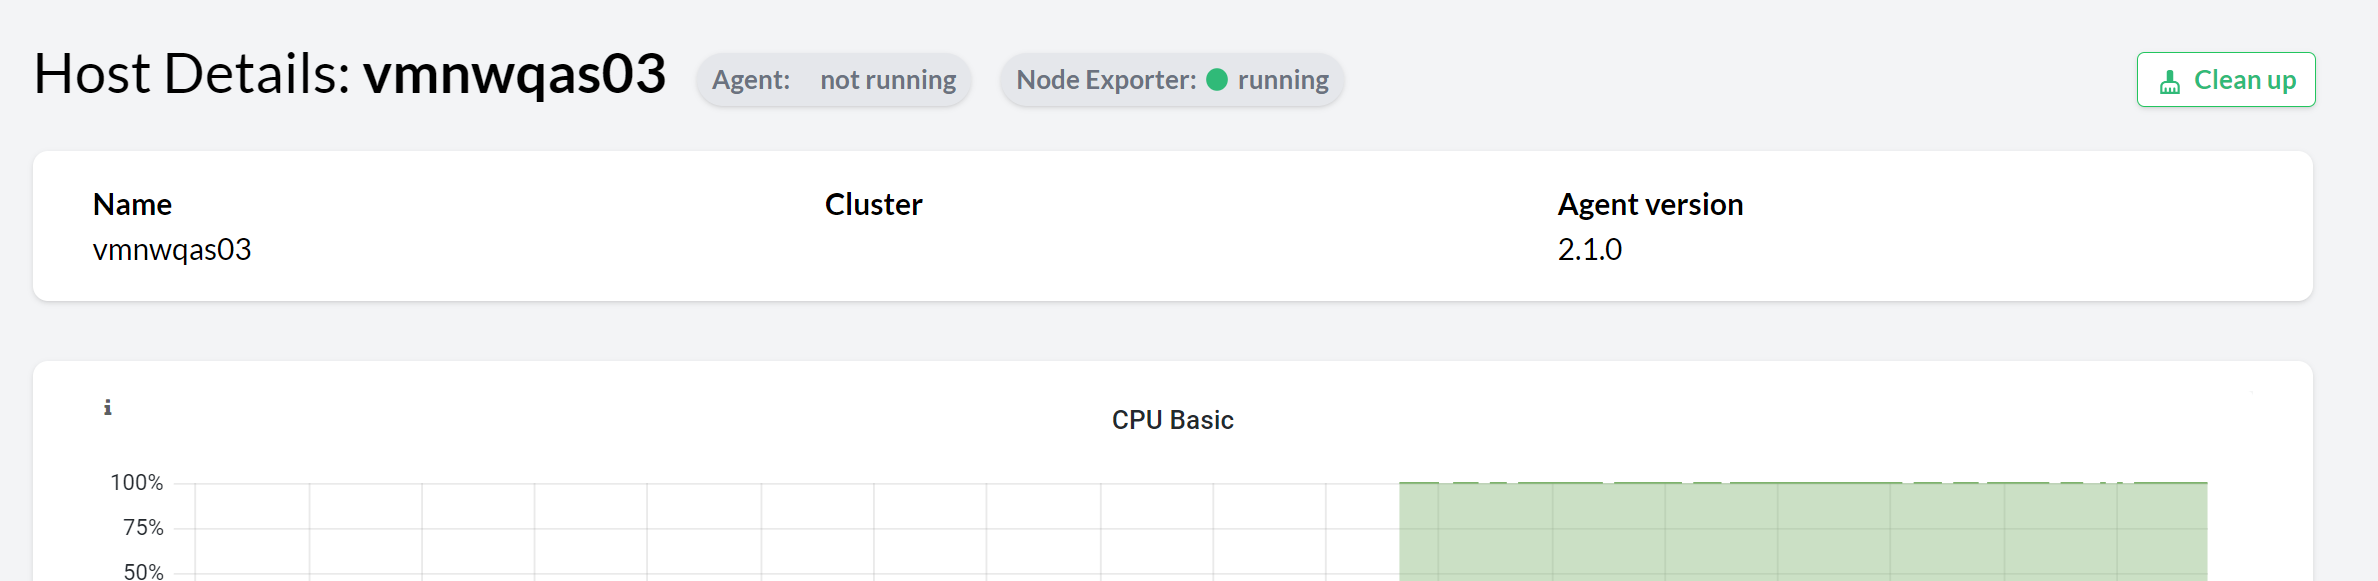
Use the Clean up button to remove all the components discovered by the agent in the host (including the host itself and other components that might depend on the ones running on the host) from the console.
For example, when cleaning up the host where the primary application server of an SAP System is registered, the entire SAP System is removed from the console.
Similarly, when a registered application or SAP HANA instance is no longer discovered, an option to clean it up is displayed in the corresponding overview and the corresponding details view.
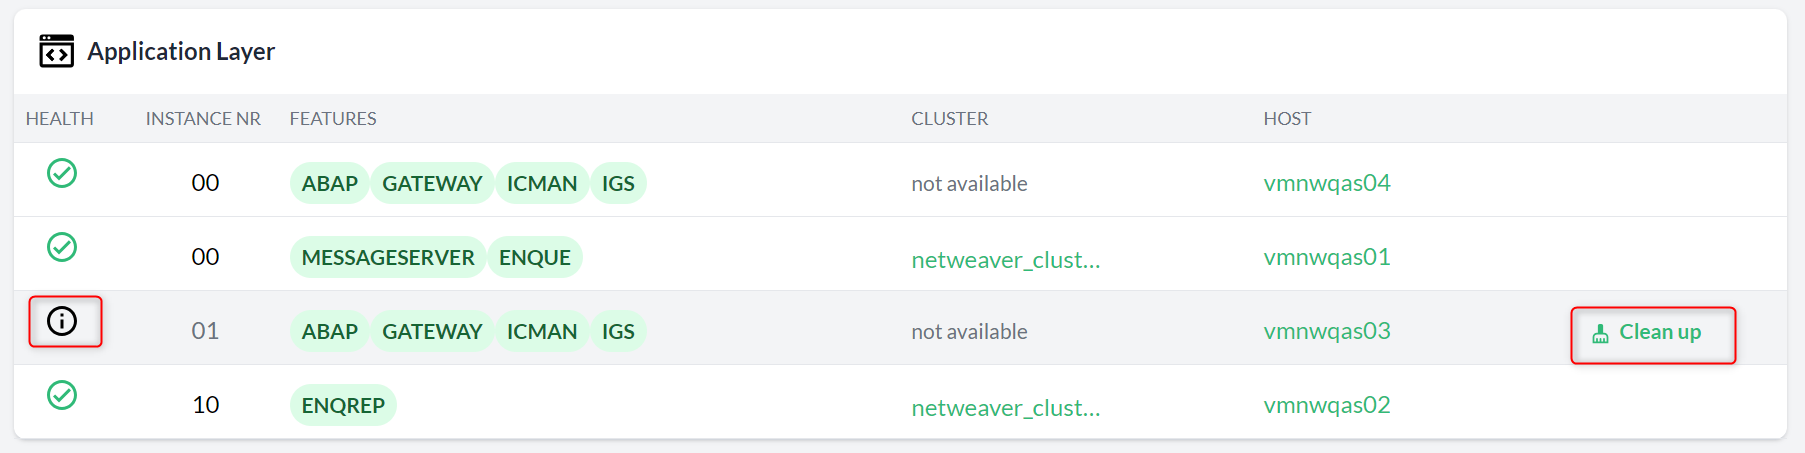
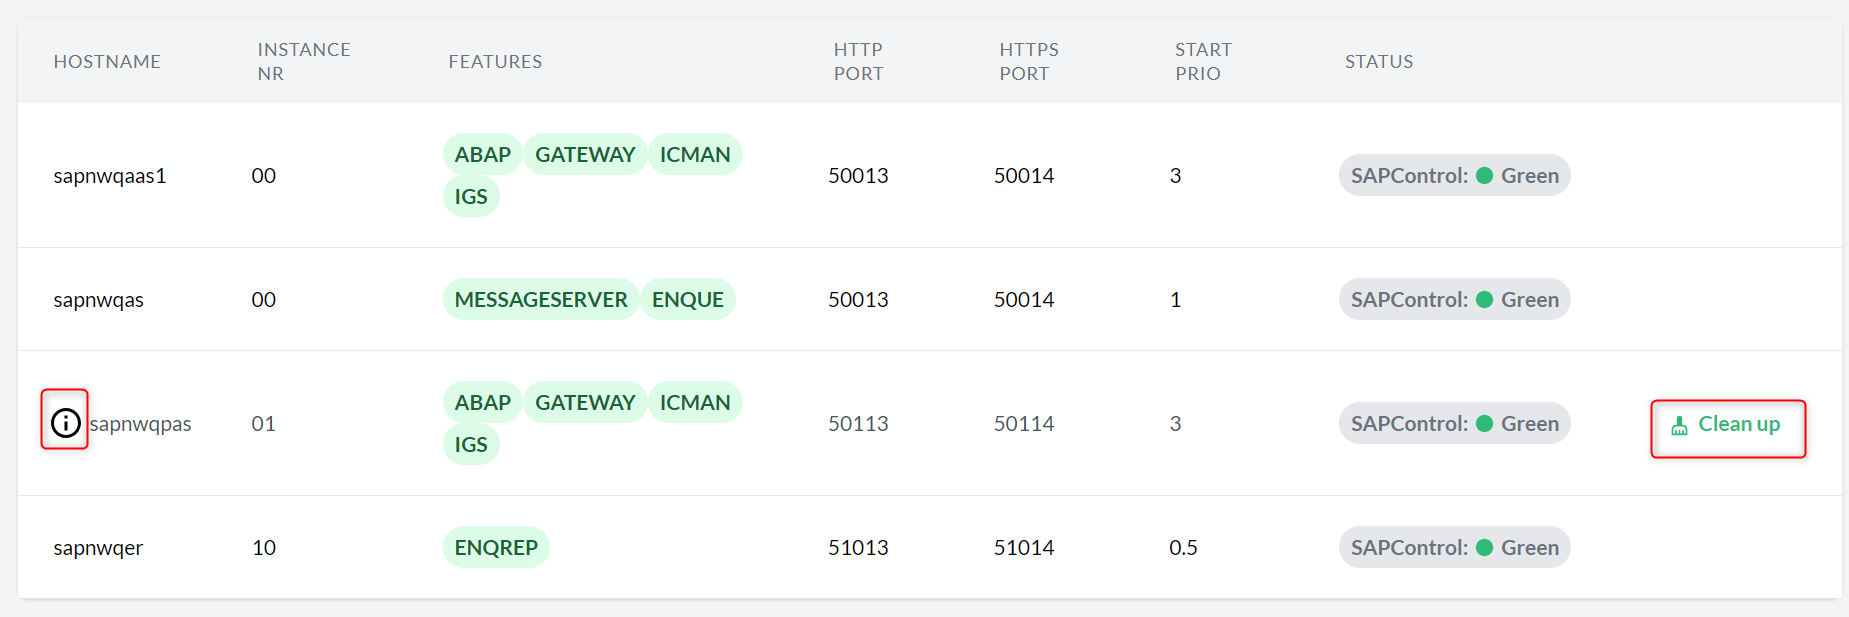
Use the Clean up button to remove the instance and any dependencies from the console.
For example, cleaning up the ASCS instance of an SAP system removes the entire SAP system from the console.
9.5. Managing tags
Tags are used to label specific objects with location, owner, etc. The objects can be hosts, clusters, databases or SAP systems. Tags make it easier to distinguish and show all these different objects, making your lists more readable and searchable. You can use any text you like to create your tags except blank spaces and special characters other than + - = . , _ : and @.
The following subsection shows how you can add, remove, and filter objects based on your tags.
9.5.1. Adding tags to hosts, clusters, databases, and SAP Systems
To add one or more tags to your objects, proceed as follows:
-
Log in to Trento.
-
In the Trento dashboard, go to the overview of the desired object. For example, the Hosts overview.
-
In the Hosts overview, search for the host you want to tag.
-
In the Tags column, click the Add Tag entry.
-
Enter the desired tag and press Enter.
-
Use the described steps to assign other tags to the same or a different host.
You can use the procedure to assign tags to other objects, such as Clusters, SAP Systems, or HANA Databases.
9.5.2. Removing tags
To remove existing tags, click the appropriate part in the dashboard:
-
Log in to Trento.
-
In the Trento dashboard, go to the overview of the desired object. For example, the Hosts overview.
-
In the Hosts overview, search for the host you want to remove a tag from.
-
In the Tags column, click the × icon to remove the tag.
-
Use the described steps to remove other tags from the same or a different host.
9.5.3. Filter by tags
Tags can be used to filter objects.
-
In the Trento dashboard, go to the desired overview.
-
In the second row, click the Filter tags drop-down list to view all existing tags.
-
Select one or more tags to display all hosts that have the selected tags.
To remove the filter, click the × icon from the same drop-down list.
9.6. Rotating API keys
Communication from the Trento Agent to the Trento Server is secured by a API key that must be provided in the agent configuration file.
By default, the API key does not have an expiration date. You can set up a custom expiration date to increase the overall security of the setup and meet internal security requirements. If an expiration date is configured, it is displayed in the user’s timezone but stored in UTC.
To do this, go to the Settings view and click the Generate Key button in the API Key section:
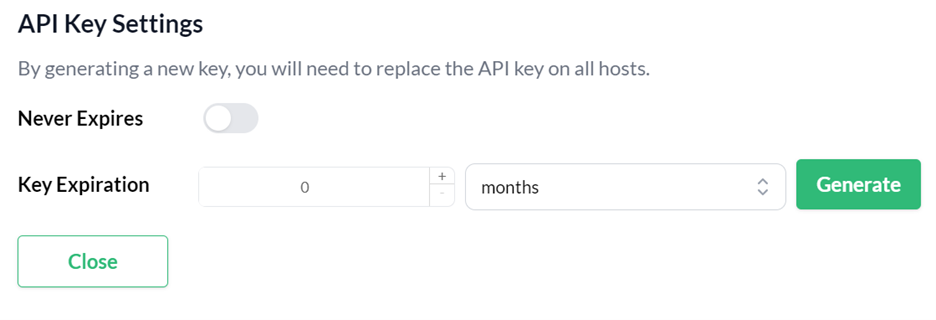
Whenever a new key is generated, the configuration of all the reporting agents must be updated accordingly.
9.7. Personal access tokens
Trento allows users to create personal access tokens (PATs) for authentication and authorization purposes in third-party integrations with the APIs exposed by its components:
9.7.1. Creating a personal access token
Log in to Trento Web UI, click on your username in the top-right corner, and select Profile from the drop-down menu.
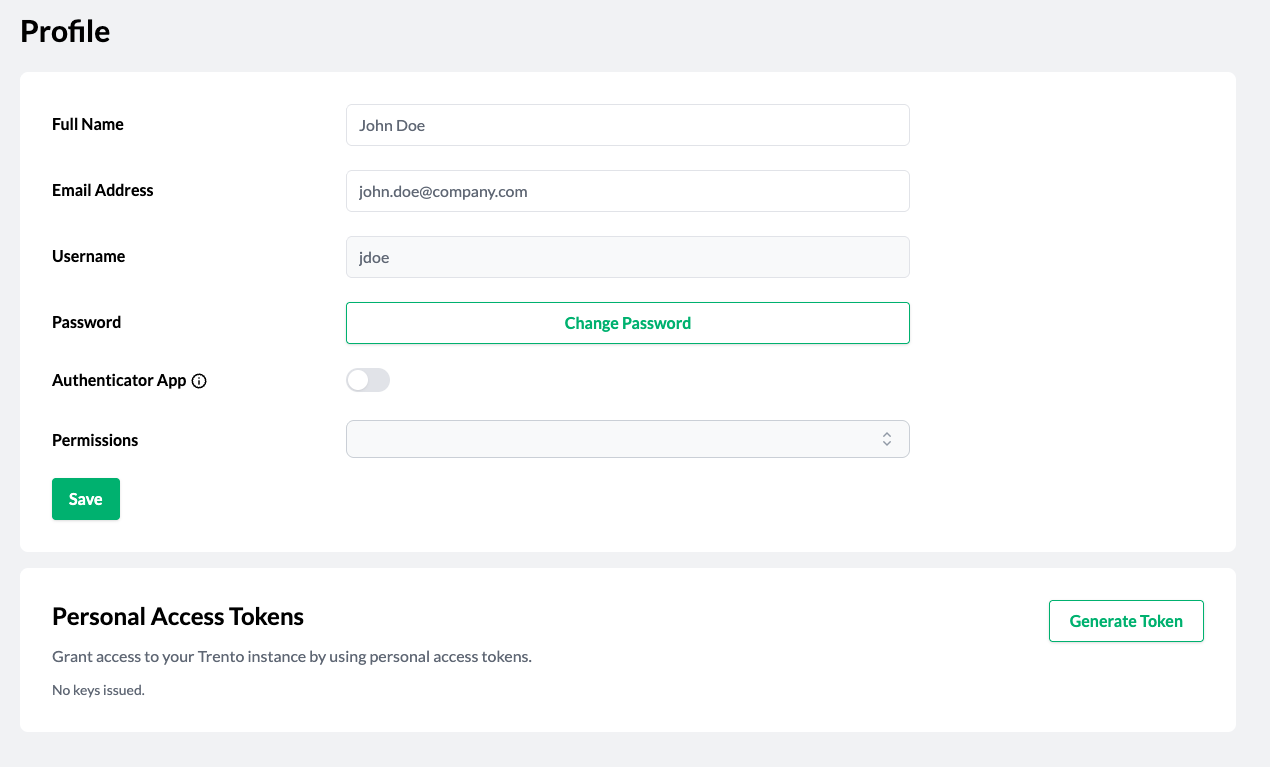
-
Click Generate Token in the Personal Access Tokens section.
-
When prompted, provide a name and an expiration date (shown in the user’s timezone but stored in UTC), then click Generate Token.
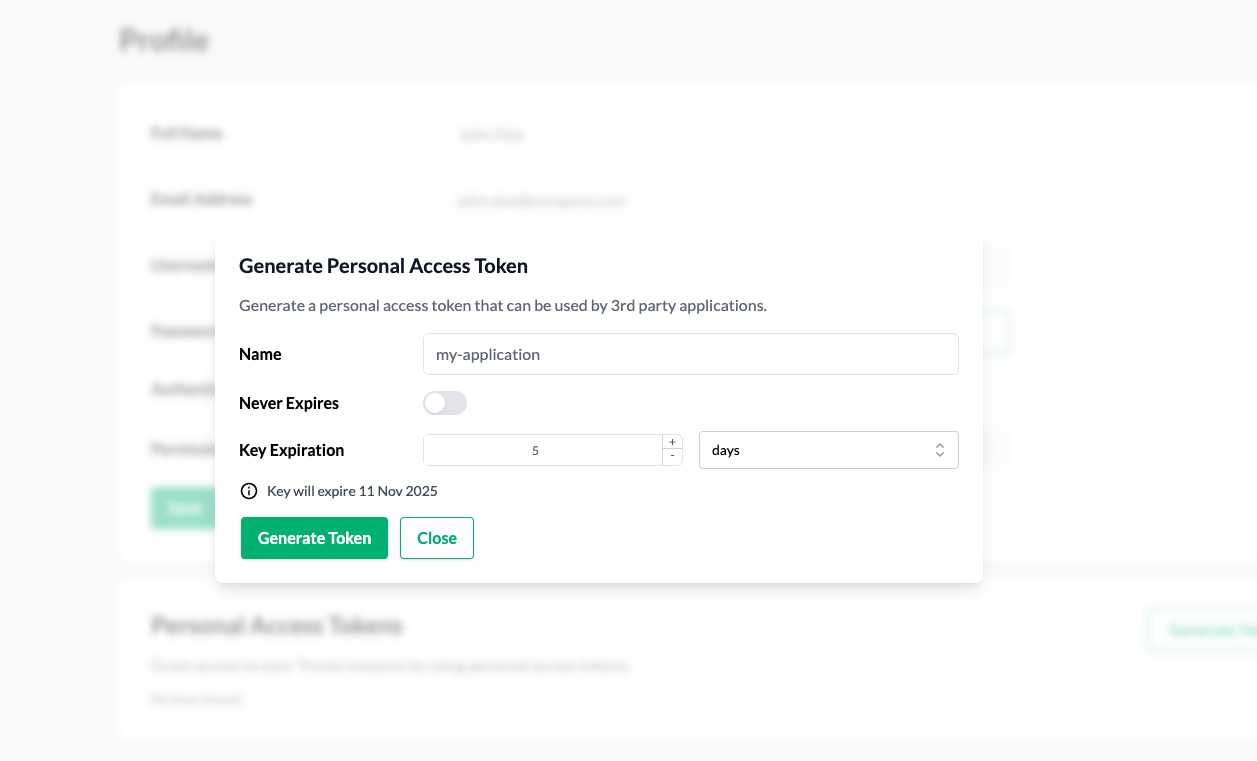 Figure 11. Generate personal access token modal
 -
Copy the generated token starting with
trento_pat_. Keep in mind that the token is shown only once. If you lose the token, you must generate a new one.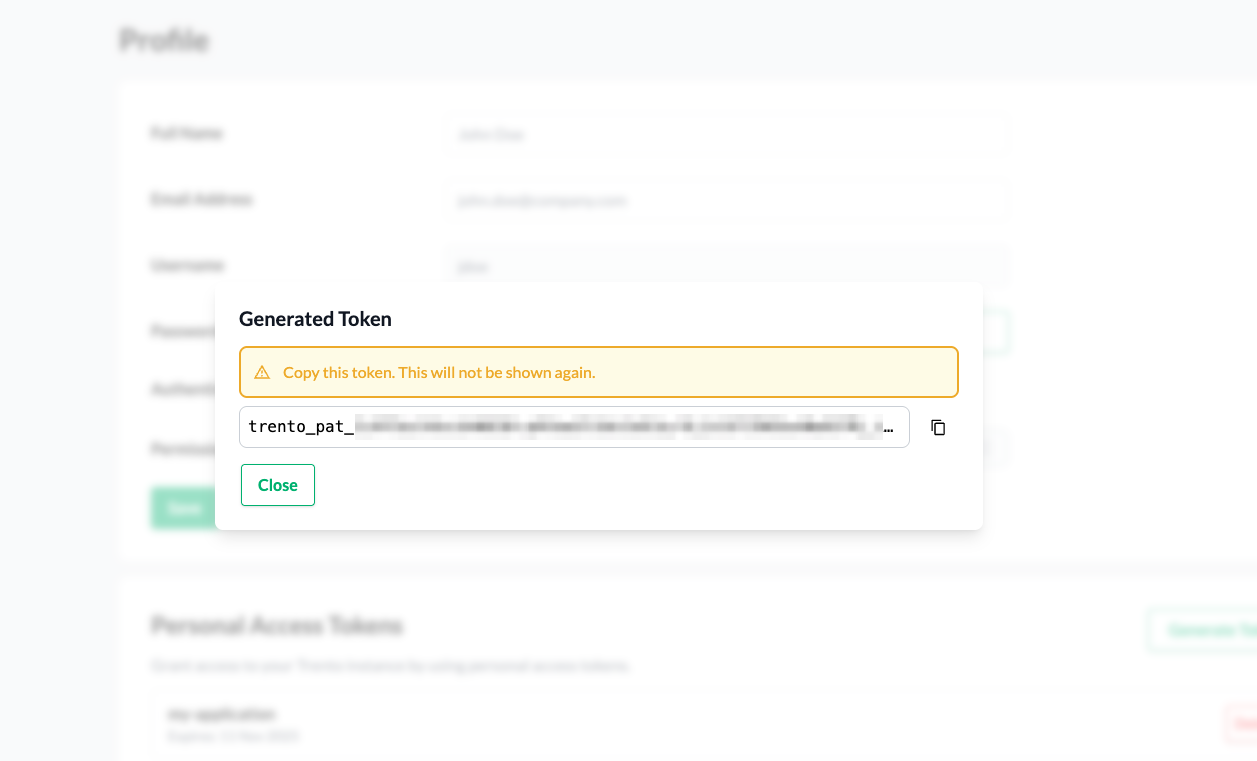 Figure 12. Generated personal access token
9.7.2. Using a personal access token
You can use the created personal access token to authenticate API requests by including it in the Authorization header as a Bearer token.
$ curl -X GET "..." -H "Authorization: Bearer trento_pat_<rest_of_token>"9.7.3. Deleting a personal access token
To delete personal access token, click its contextual Delete button in the Personal Access Tokens section of the profile.

Confirm the deletion
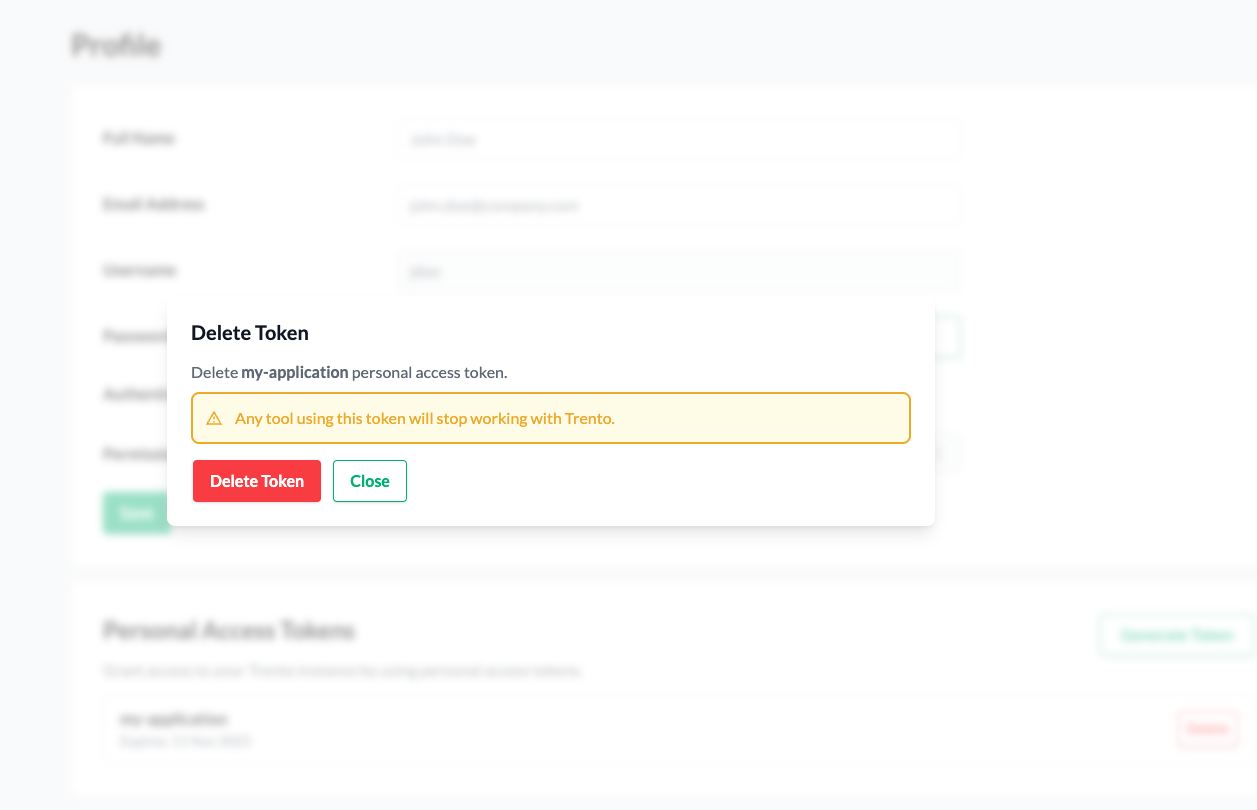
9.7.4. Notes for user admins
User admins can delete tokens for other users. However, admins cannot create new tokens for other users.
To delete a token for another user, a user admin must perform the following steps:
-
navigate to the Users page
-
select a user
-
click a token’s contextual Delete button in the Personal Access Tokens section
10. Compliance Features
10.1. Performing configuration checks
Trento provides configuration checks that ensure your infrastructure setup adheres to our or other vendor’s Best Practices, and it does not diverge with time. Configuration checks are available for HANA clusters, ASCS/ERS clusters and hosts. The following procedure is specific to a HANA cluster. The procedure for an ASCS/ERS cluster or a host would be exactly the same, except it starts from the corresponding Details view.
-
Log in to Trento
-
In the left panel, click Cluster.
-
In the list, search for a SAP HANA cluster.
-
Click the desired cluster name in the Name column. The Details view opens.
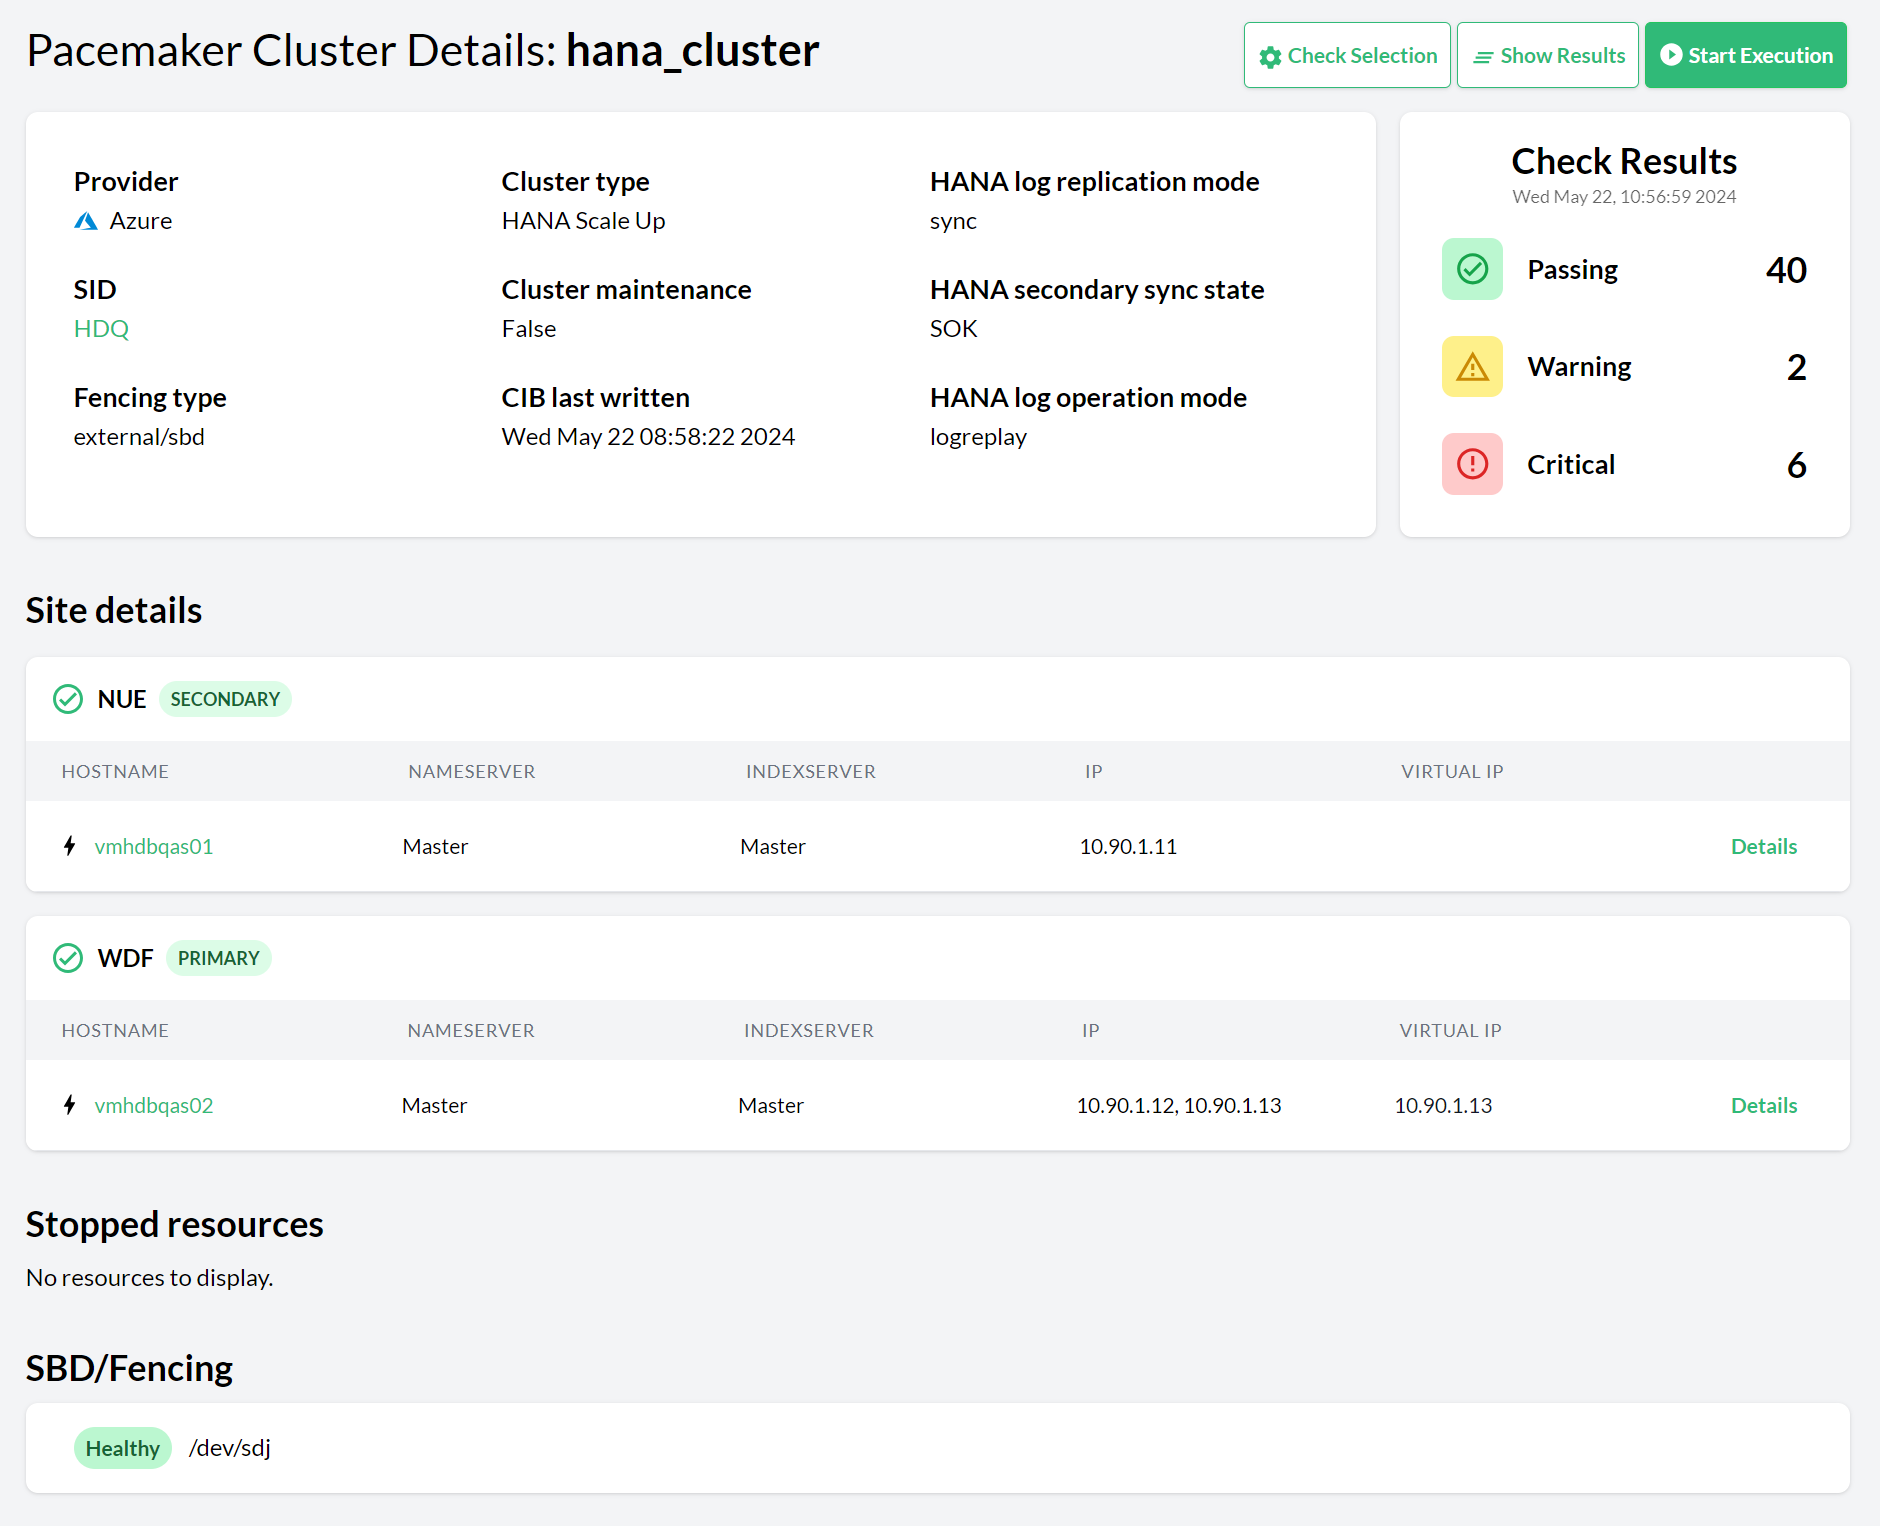 Figure 15. Pacemaker cluster details
 -
Click the Settings button to change the cluster settings of the respective cluster. For checks to be executed, a checks selection must be made. Select the checks to be executed and click Select Checks for Execution.
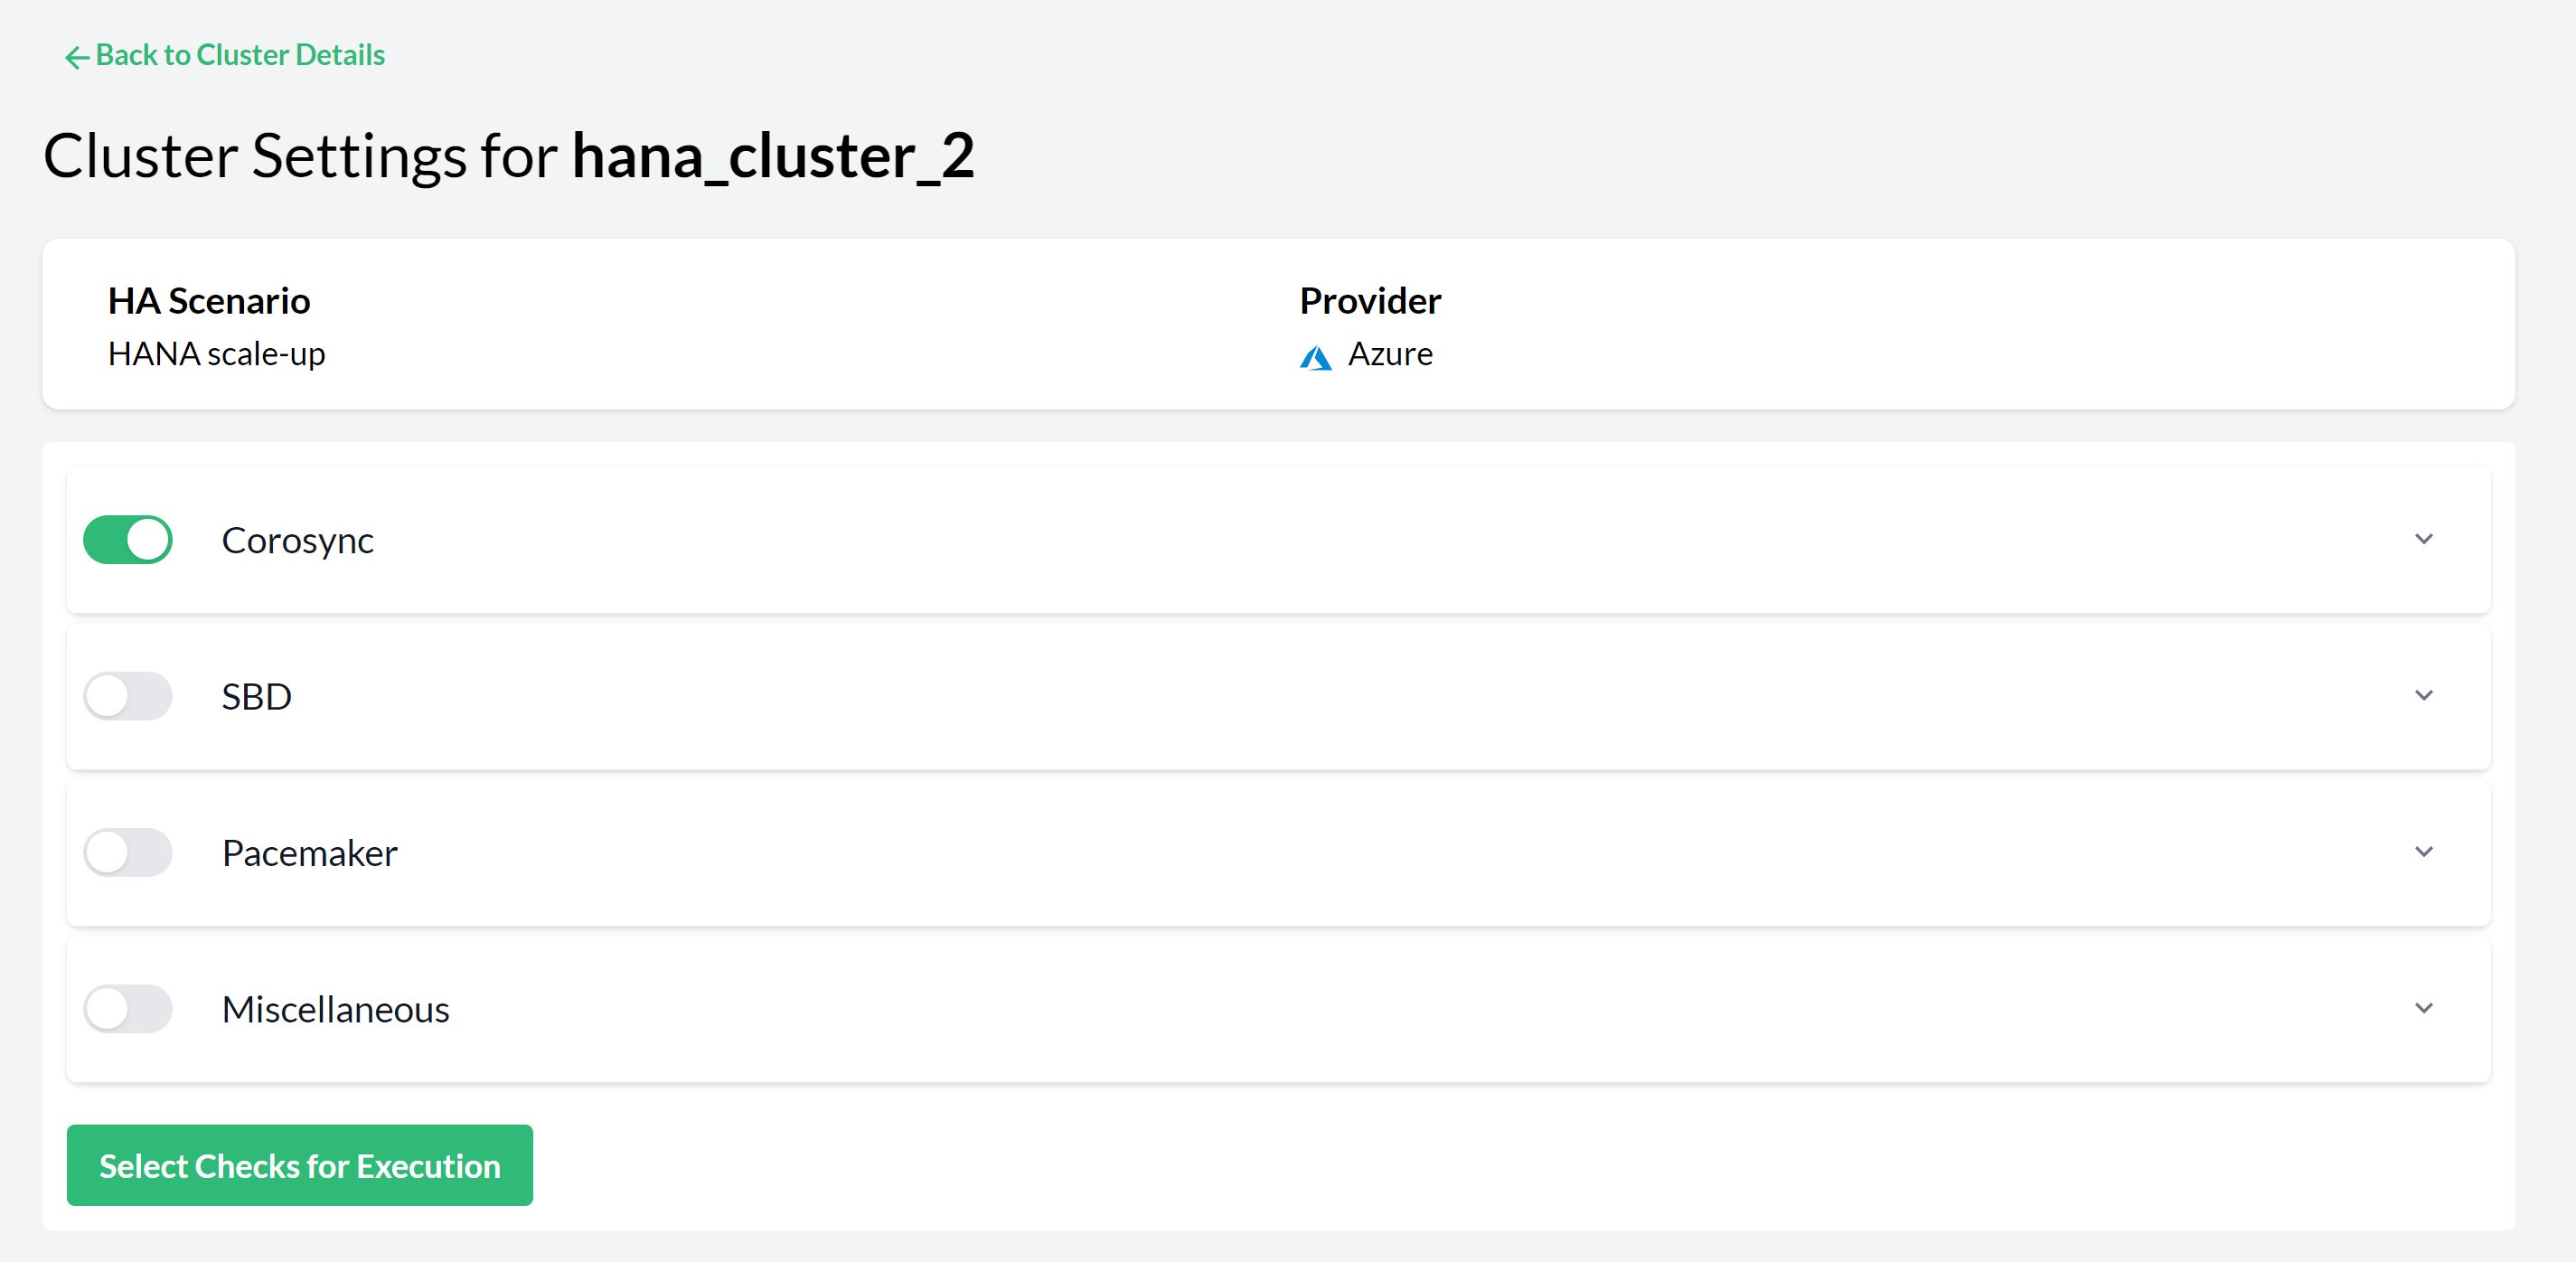 Figure 16. Pacemaker Cluster Settings—Checks Selection
 -
You can then either wait for Trento to execute the selected checks or trigger an execution immediately by clicking the button in the Checks Selection tab.
-
Investigate the result in the Checks Results view. Each row in the view displays a check ID, a short description of the check and the check execution result. Click on a row to open a section that provides information about the execution on each node of the cluster.
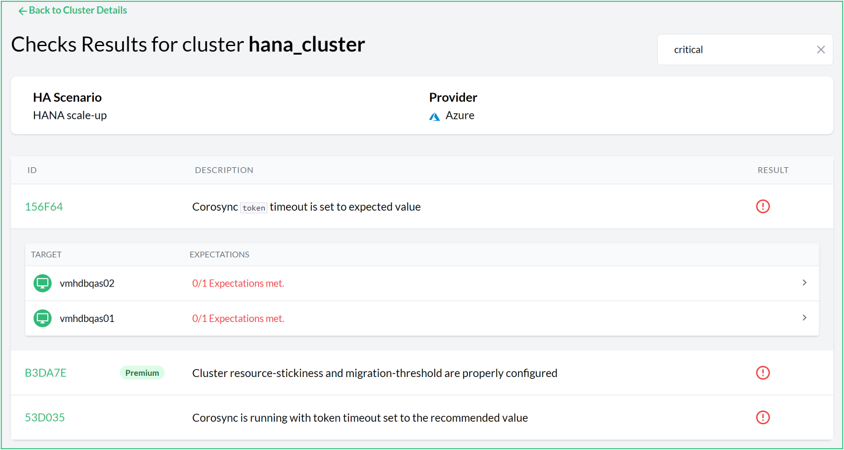 Figure 17. Check results for a cluster
The result of a check execution can be passing, warning, critical:
-
Passing means that the checked configuration meets the recommendation.
-
Warning means that the recommendation is not met but the configuration is not critical for the proper running of the cluster.
-
Critical means that either the execution itself failed (for example, a timeout) or the recommendation is not met and is critical for the well-being of the cluster.
Use the filter to narrow the list to specific results (for example, critical).
-
-
Click a check’s link to open a modal box with the check description. This displays an abstract and a possible solution to the problem. The References section contains links to the documentation from the different vendors for more context when necessary. Close the modal box by pressing the Esc key or click outside of the box.
For each unmet expected result, there is a detailed view with information about it: what facts were gathered, what values were expected, and what was the result of the evaluation. This helps to understand why a certain configuration check is failing:
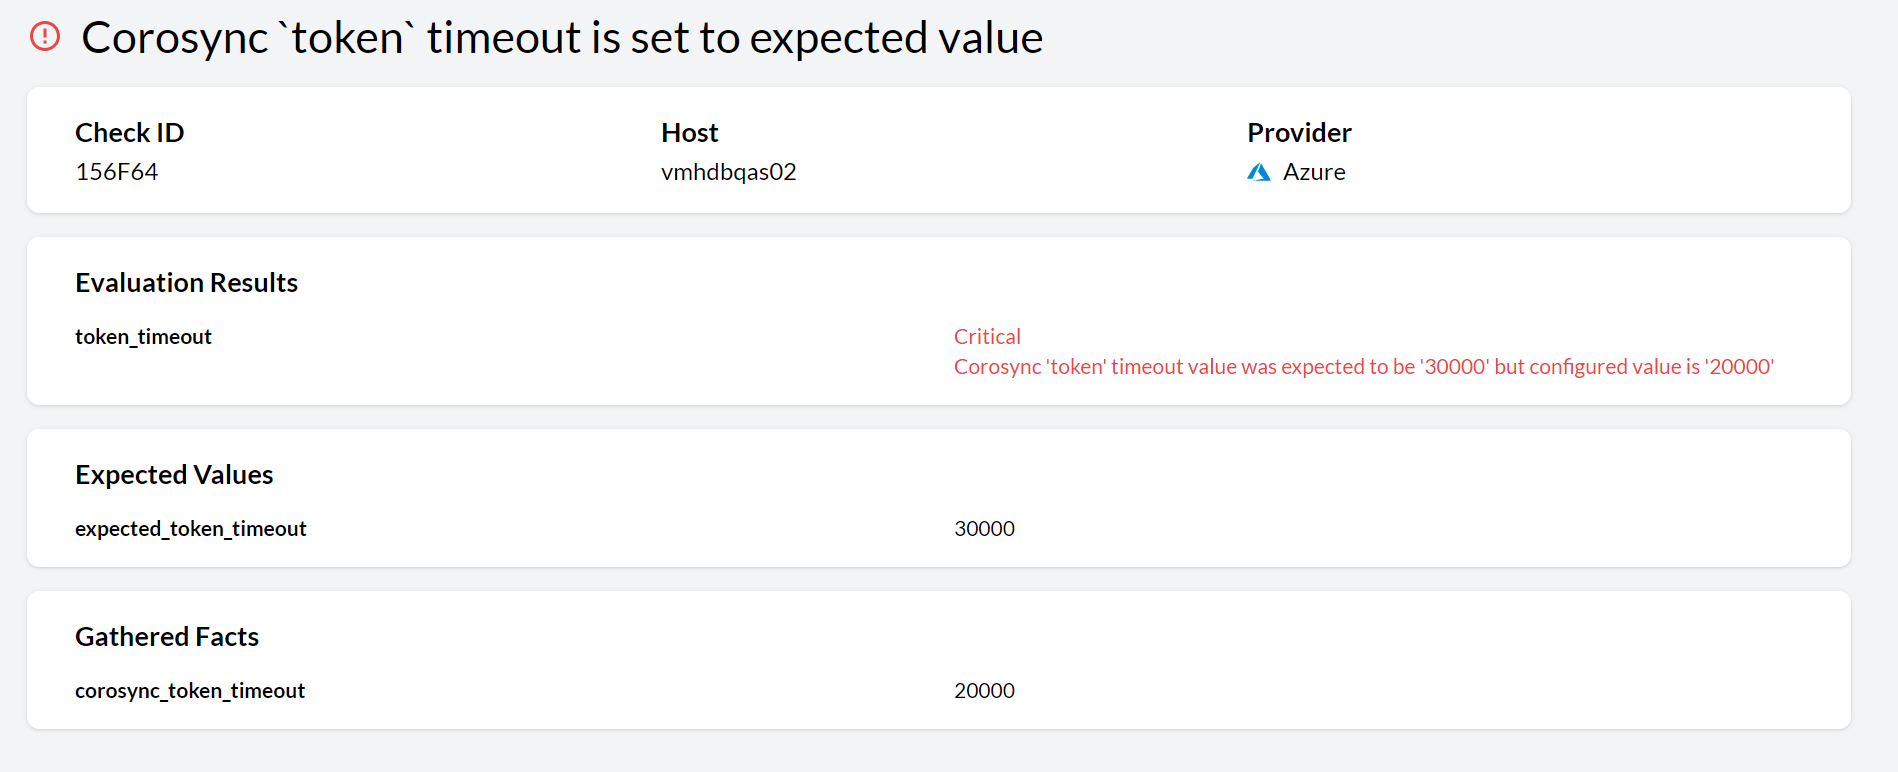 Figure 18. Unmet expected result detail view
When checks for a given cluster have been selected, Trento executes them automatically every five minutes, updating the results. A spinning check execution result icon means that an execution is running.
10.2. Checks Customization
10.2.1. Overview of checks Customization
Trento makes it possible to adjust expected check values to match target-specific requirements. This can be done directly through the Trento Web console without modifying the original check or impacting other targets.
The Trento web console receives a check catalog from Wanda. In the check selection view of a specific target, you can see all available check categories. Click on a category to expand the list of checks associated with it. If you have the required permissions, a settings icon appears to the right of a customizable check. Click on the settings icon to open a modal window where you can adjust check values.
The check customization modal includes the following elements:
-
Selected Check ID.
-
Check description.
-
Warning message that neither Trento nor SUSE can be held responsible for system malfunctions caused by deviations in the target configuration from best practices.
-
A list of all customizable check values. Each value includes a value name with the original default check value and an input field with the current customized or default value.
-
The current target-specific provider.
-
Save, Reset and Close buttons at the bottom.
The Save button is disabled by default. The button is enabled when the user checks the warning and modifies a value. The custom values are stored in the Wanda’s database, so they persist across system reboots.
The Reset button is enabled only when the check has been customized. Use the button to reverse the changes.
A Modified Pill indicator next to the check ID indicates that the values have been customized. A Reset icon next to the Settings icon can be used to revert to default values.
10.2.2. Target-specific check customization
A check is always executed on a target, which can be a host or a cluster. Users can customize check values specific to the target environment to ensure optimal system performance. Customizations are target-specific, and they do not affect other targets or the original default check values.
10.2.3. Required permissions
Only admin users and users with the all:checks_customization permission can customize checks. The customization button in the Trento Web console is not shown for users without this permission. If a check has been modified, the modified Pill is shown for all users.
10.2.4. Customizable checks
All checks with the following value types are customizable:
-
String
-
Number
-
Boolean
User input is validated to ensure that the input value matches the expected type before allowing to save the custom values in Wanda’s database. If the input type is incorrect or mixed, the customization fails, triggering a toast notification, that checks customization failed and a warning message in the modal itself.
10.2.5. Check customization persistence
Customized check values are persistently stored in Wanda’s database. This ensures that any modifications made by users are consistently applied across subsequent executions. Additionally, customized values remain in effect even after system restarts or updates, ensuring continuous adherence to target-specific configurations.
11. Using Trento Web
The left sidebar in the Trento Web contains the following entries:
-
Dashboard Determine at a glance the health status of your SAP environment.
-
Hosts Overview of all registered hosts running the Trento Agent.
-
Clusters Overview of all discovered Pacemaker clusters.
-
SAP Systems Overview of all discovered SAP Systems; identified by the corresponding system IDs.
-
HANA Databases Overview of all discovered SAP HANA databases; identified by the corresponding system IDs.
-
Checks catalog Overview of the catalog of configuration checks that Trento may perform on the different targets (hosts or clusters), cluster types (HANA scale up, HANA scale out or ASCS/ERS) and supported platforms (Azure, AWS, GCP, Nutanix, on-premises/KVM or VMware).
-
Settings Allows you to modify user-defined settings.
-
About Shows the versions of the different components of Trento Server, a link to the GitHub repository of the Trento Web component, and the number of registered SUSE Linux Enterprise Server for SAP applications subscriptions that have been discovered.
11.1. Getting the global health state
The dashboard allows you to determine at a glance the health status of your SAP environment. It is the main page of the Trento Web, and you can always switch to it by clicking on Dashboard in the left sidebar.
The health status of a registered SAP system is the sum of its health status at three different layers representing the SAP architecture:
-
Hosts Reflects the heartbeat of the Trento Agent and the tuning status returned by saptune (where applicable).
-
Pacemaker Clusters The status based on the running status of the cluster and the results of the configuration checks.
-
Database Collects the status of the HANA instances as returned by
sapcontrol. -
Application instances Summarizes the status of the application instances as returned by
sapcontrol.
In addition to the operating system layer, there is also information about the health status of the HA components, where they exist:
-
Database cluster The status based on the running status of the database cluster and the results of the selected configuration checks.
-
Application cluster The status based on the running status of the ASCS/ERS cluster and, eventually, the results of the selected configuration checks.
The dashboard groups systems in three different health boxes (see Dashboard with the global health state):
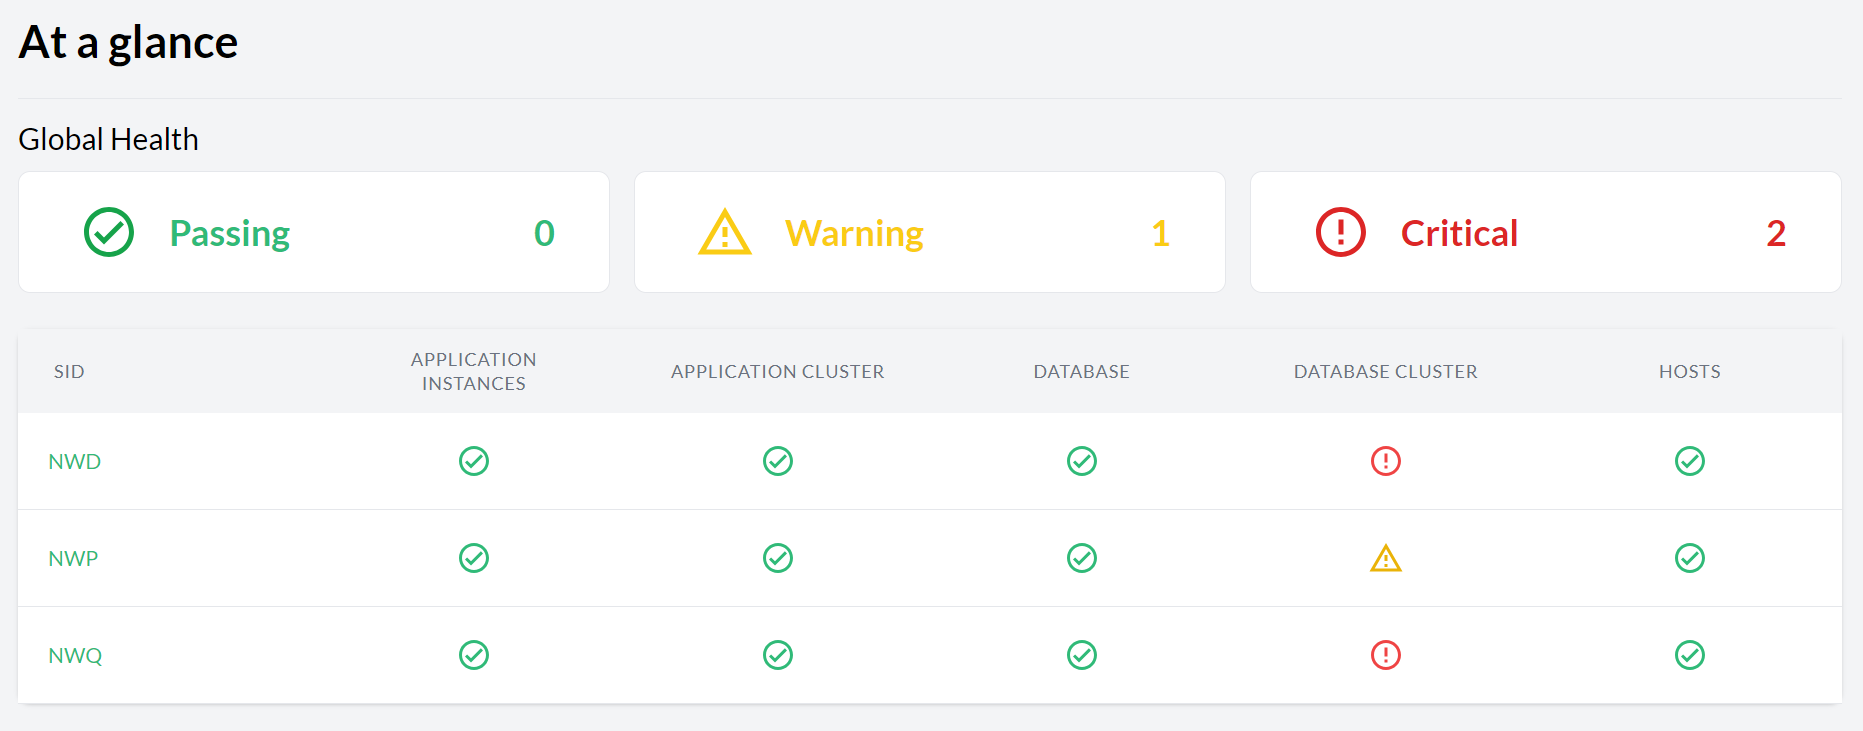
- Passing
-
Shows the number of systems with all layers with passing (green) status.
- Warning
-
Shows the number of systems with at least one layer with warning (yellow) status and the rest with passing (green) status.
- Critical
-
Shows the number of systems with at least one layer with critical (red) status.
The health boxes in the dashboard are clickable. Clicking on a box filters the dashboard by systems with the corresponding health status. In large SAP environments, this feature can help the SAP administrator to determine which systems are in a given status.
The icons representing the health summary of a particular layer contain links to the views in the Trento console that can help determine the source of the issue:
-
Hosts health icon: Link to the Hosts overview filtered by SID equal to the SAPSID and the DBSID of the corresponding SAP system.
-
Database cluster health icon: Link to the corresponding SAP HANA Cluster Details view.
-
Database health icon: Link to the corresponding HANA Database Details view.
-
Application cluster health icon: Link to the corresponding ASCS/ERS Cluster Details view.
-
Application Instances health icon: Link to the corresponding SAP System Details view.
Grey status is returned when either a component does not exist, or it is
stopped (as returned by sapcontrol), or its status is unknown (for
instance, if a command to determine the status fails).
Grey statuses are not yet counted in the calculation of the global health status.
11.2. Viewing the status
The status allows you to see if any of the systems need to be examined further.
The following subsection gives you an overview of specific parts of your SAP Landscape to show their state. Each status site shows an overview of the health states.
11.3. Viewing the status of hosts
To display the lists of registered hosts and their details, proceed as follows:
-
Log in to the Trento Web.
-
Click the Hosts entry in the left sidebar to show a summary of the state for all hosts.
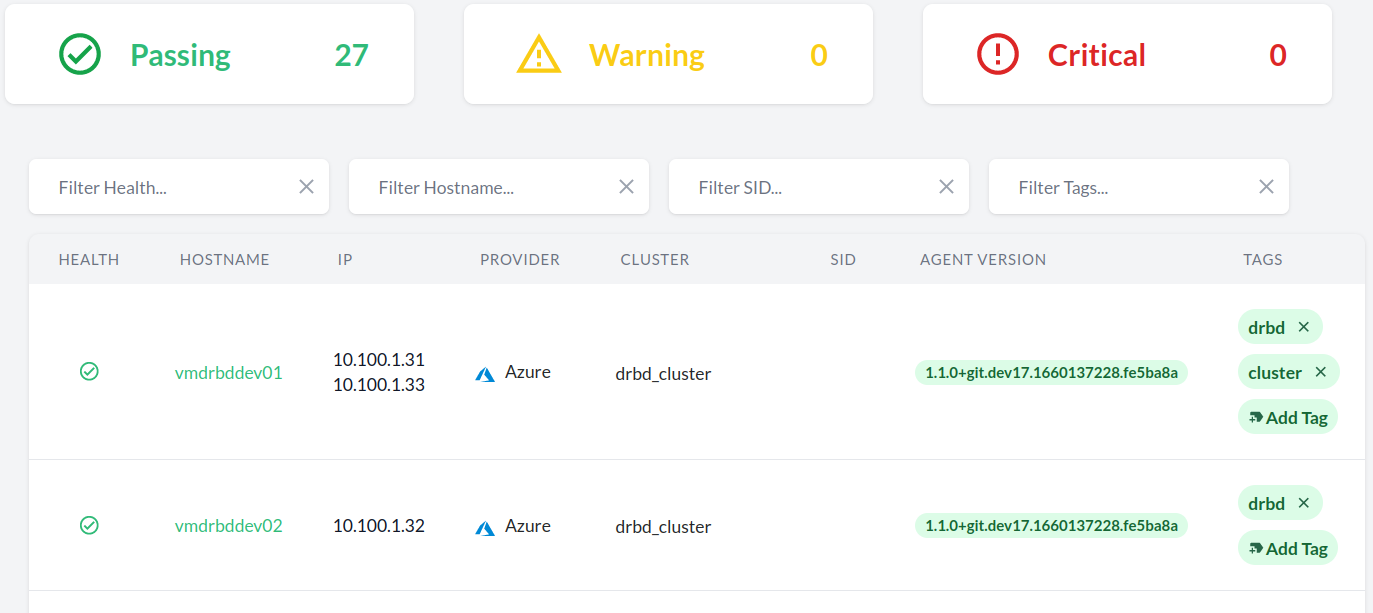 Figure 20. Hosts entry
 -
To look into the specific host details, click the host name in the respective column to open the corresponding Host details view. If the list is too long, shorten it using the filters.
Clicking on a host name opens the corresponding Host details view the Clicking on a host name opens the corresponding Host details view the following information. Note that subscription dates, last reboot and other timestamps are shown in the user’s timezone:
-
The top left of the Hosts Details view shows the status of both the Trento Agent and the Node Exporter/Grafana Alloy and provides the host name, the cluster name (when applicable), the Trento Agent version, last boot information and the host IP addresses.
-
saptune Summary section provides information generated by saptune. saptune comes with SUSE Linux Enterprise Server for SAP applications, and it allows SAP administrators to ensure that their SAP hosts are properly configured to run the corresponding SAP workloads. The integration of saptune in the Trento console gives the SAP administrator access to the saptune information even when they are not working at operating system level. The integration supports saptune 3.1.0 and higher, and includes the addition of the host tuning status in the aggregated health status of the host.
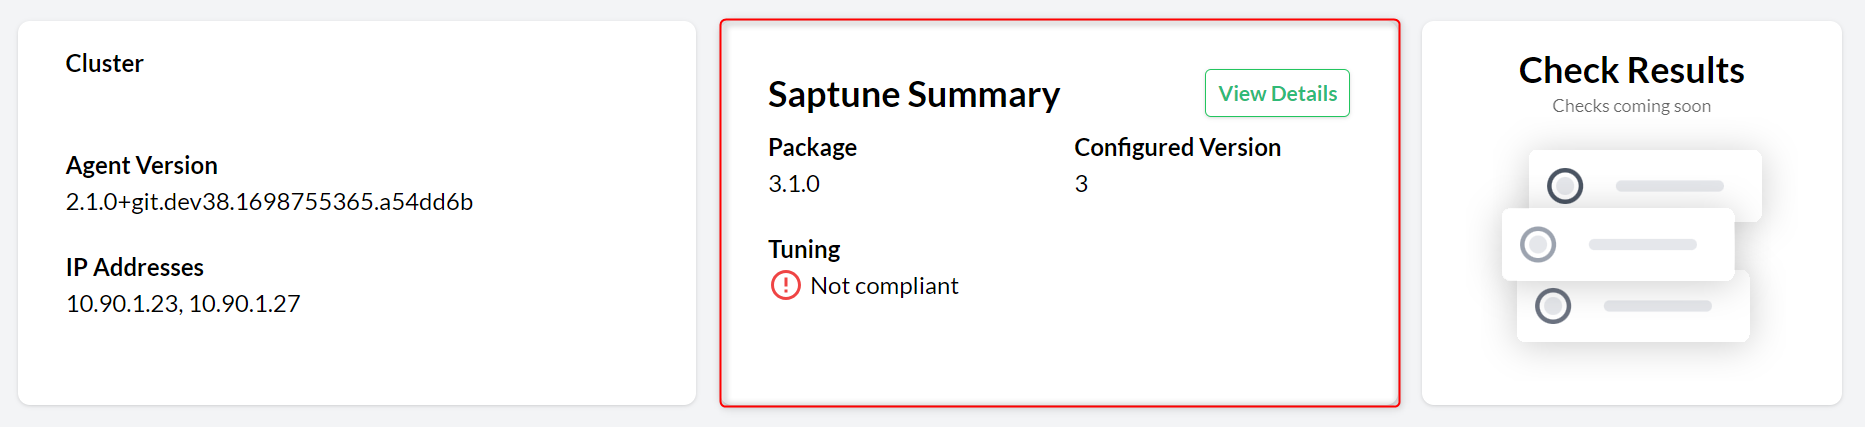 Figure 21. saptune Summary section
If an SAP workload is running on the host but no saptune or a version lower than 3.1.0 is installed, a warning is added to the aggregated health status of the host. When saptune version 3.1.0 or higher is installed, a details view shows detailed information about the saptune status:
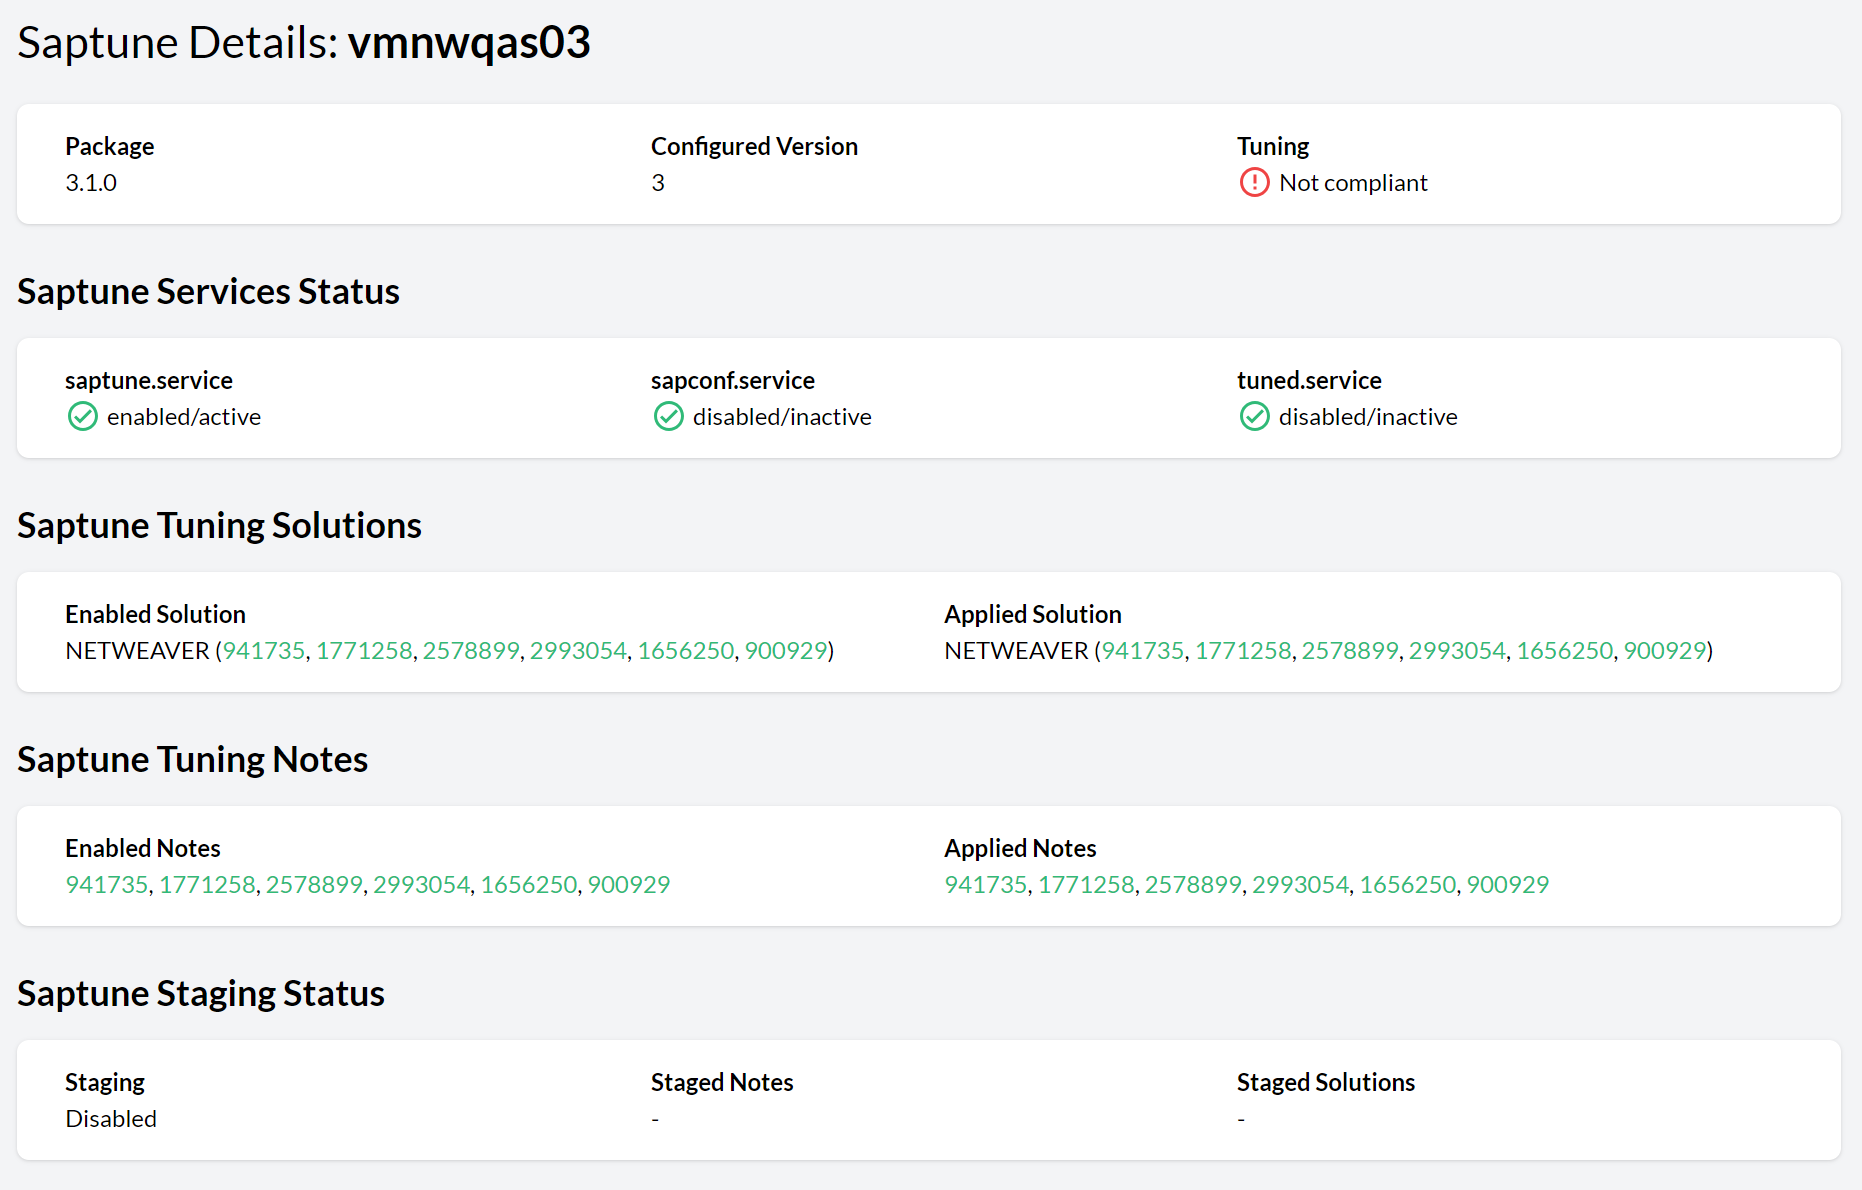 Figure 22. saptune details view
 -
Check Results summary section shows a summary of the checks execution results for the current host.
-
Available Software Updates section shows a summary of the available patches and upgradable packages for the current host when settings for SUSE Multi-Linux Manager are maintained and the host is managed by the SUSE Multi-Linux Manager instance for which connection data has been provided. Refer to section Integration with SUSE Multi-Linux Manager. for further details.
-
Monitoring dashboards show the CPU, memory filesystem and swap usage for the specific host.
-
Provider Details section shows the name of the cloud provider, the name of the virtual machine, the name of the resource group it belongs to, the location, the size of the virtual machine, and other information.
-
SAP Instances section lists the ID, SID, type, features, and instance number of any SAP instance running on the host (SAP NetWeaver or SAP HANA).
-
SUSE Subscription Details section lists the different components or modules that are part of the subscription. For each component and module, the section shows the architecture, the version and type, the registration and subscription status as well as the start and end dates of the subscription.
-
11.4. Viewing the Pacemaker cluster status
To display a list of all available Pacemaker clusters and their details, proceed as follows:
-
Log in to the Trento Web.
-
Click the Clusters entry in the left sidebar to show a state summary for all Pacemaker clusters.
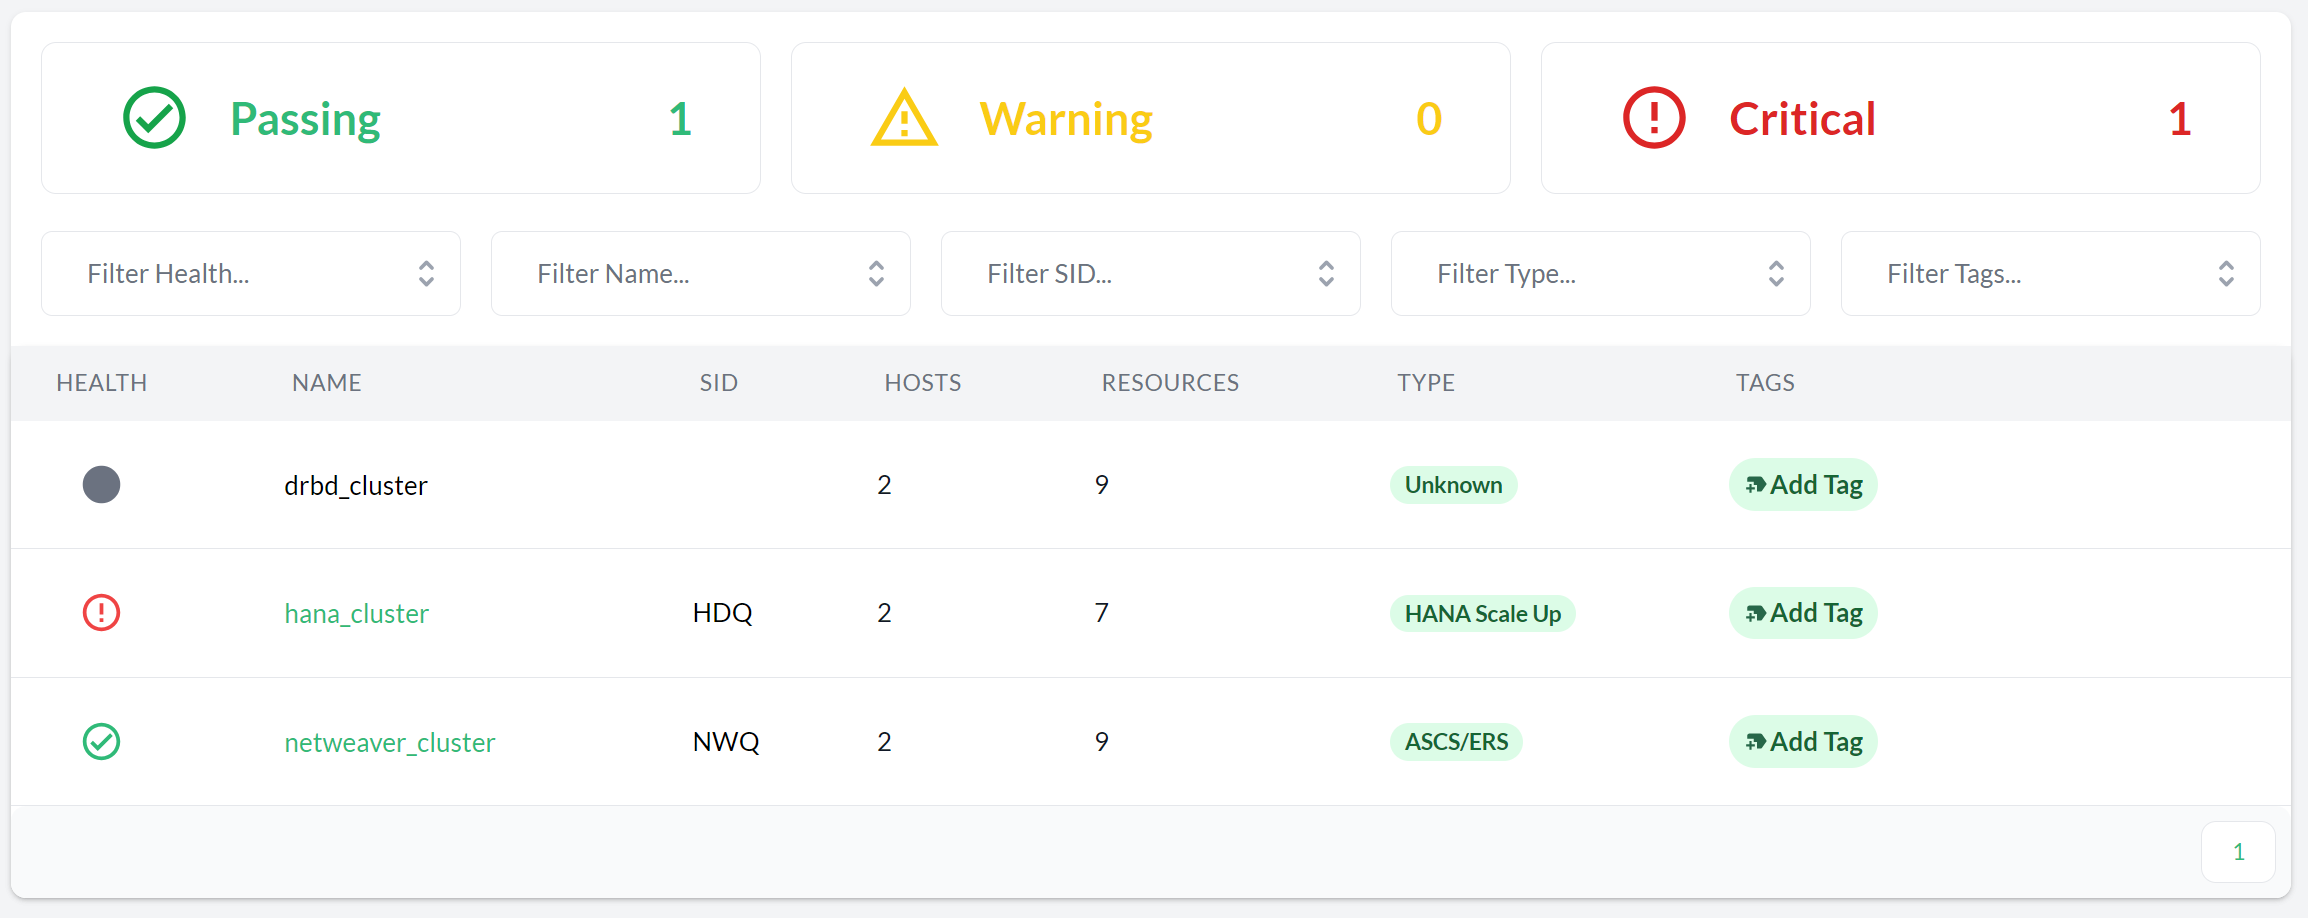 Figure 23. Pacemaker clusters
 -
To view the specific Pacemaker cluster details, click the cluster name in the appropriate column to open the corresponding Pacemaker cluster details view. If the list is too long, shorten it using filters. Note that timestamps in the Cluster details view are shown in the user’s timezone.
The detail views of a HANA cluster and an ASCS/ERS cluster are different:
-
The Settings, Show Results, and Start Execution buttons are used to enable or disable checks and to start them. To execute specific checks, follow the instructions in Step 5 of the Performing configuration checks procedure.
-
The State pill indicates the cluster’s current activity.
Idlevalue signifies a stable state where no transitions are occurring. Any other value indicates an active transition or internal recalcuations are happening. To ensure consistency and safety, cluster operations can only be initiated when the state isIdle. -
Top section displays the cloud provider, the cluster type, the HANA log replication mode, the DBSID, the cluster maintenance status, the HANA secondary sync state, the fencing type, when the CIB was last written, and the HANA log operation mode.
-
The Checks Results section provides a summary of the check execution results for the particular cluster.
-
The Pacemaker Site Details section is split in three subsections: one for each HANA site, and another one for cluster nodes without a HANA workload. For example, in case of a majority maker in a HANA scale out cluster, each HANA site subsection informs about the site role (Primary or Secondary or Failed) and lists the different nodes in the site. Each node entry displays the node status (Online or Maintenance or Other), the roles of the nameserver and indexserver services in that node, the local IPs and any assigned virtual IP address. To view the attributes of that node, the resources running on it and their statuses, click the Details button. Close the view using the key.
-
The Stopped Resources section provides a summary of resources which have been stopped on the cluster.
-
The SBD/Fencing section shows the status of each SBD device when applicable.
-
A top section on the left shows the cloud provider, the cluster type, fencing type, when the CIB was last written and the cluster maintenance status.
-
The next top-center multi-tab section shows the SAP SID, the Enqueue Server version, whether the ASCS and ERS are running on different hosts or not, and whether the instance filesystems are resource based or not. When multiple systems share the same cluster, there is a tab for each system in the cluster, and you can scroll left and right to go through the different systems.
-
The Checks Results section shows a summary of the results of the last check execution, when applicable.
-
The Node Details section shows the following for each node in the cluster: the node status (Online or Maintenance or Other), the host name, the role of the node in the cluster, the assigned virtual IP address and, in case of resource managed filesystems, the full mounting path. To view the attributes and resources associated to that particular node, click Details. Close the view using the key.
This section is system-specific. It shows the information corresponding to the system selected in the multi-tab section above.
-
The Stopped Resources section displays a summary of resources which have been stopped on the cluster.
-
The SBD/Fencing section shows the status of each SBD device when applicable.
-
11.5. Viewing the SAP Systems status
To display a list of all available SAP Systems and their details, proceed as follows:
-
Log in to the Trento Web.
-
Click the SAP Systems entry in the left sidebar to show a state summary for all SAP Systems.
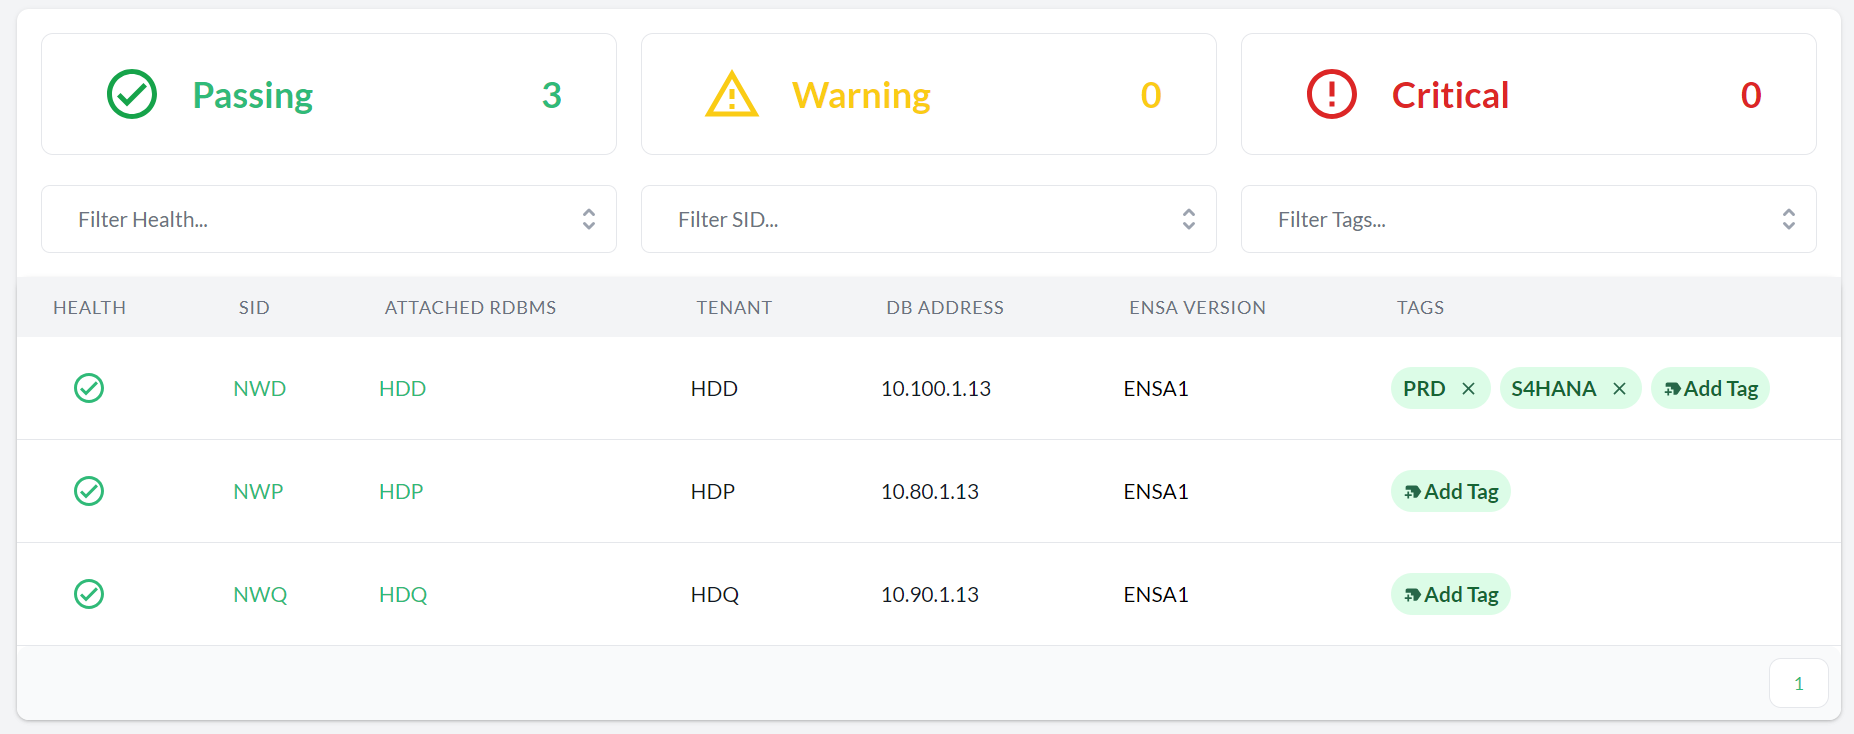 Figure 24. SAP Systems
 -
To open the SAP System Details view, click the corresponding SID. This view provides the following:
-
The name and type of the current SAP System.
-
The Layout section lists all instances and their virtual host names, instance numbers, features (processes), HTTP and HTTPS ports, start priorities, and SAPControl statuses.
-
The Hosts section shows the host name, the IP address, the cloud provider (when applicable), the cluster name (when applicable), and the Trento Agent version for each listed host. Click the host name to go to the corresponding Host details view.
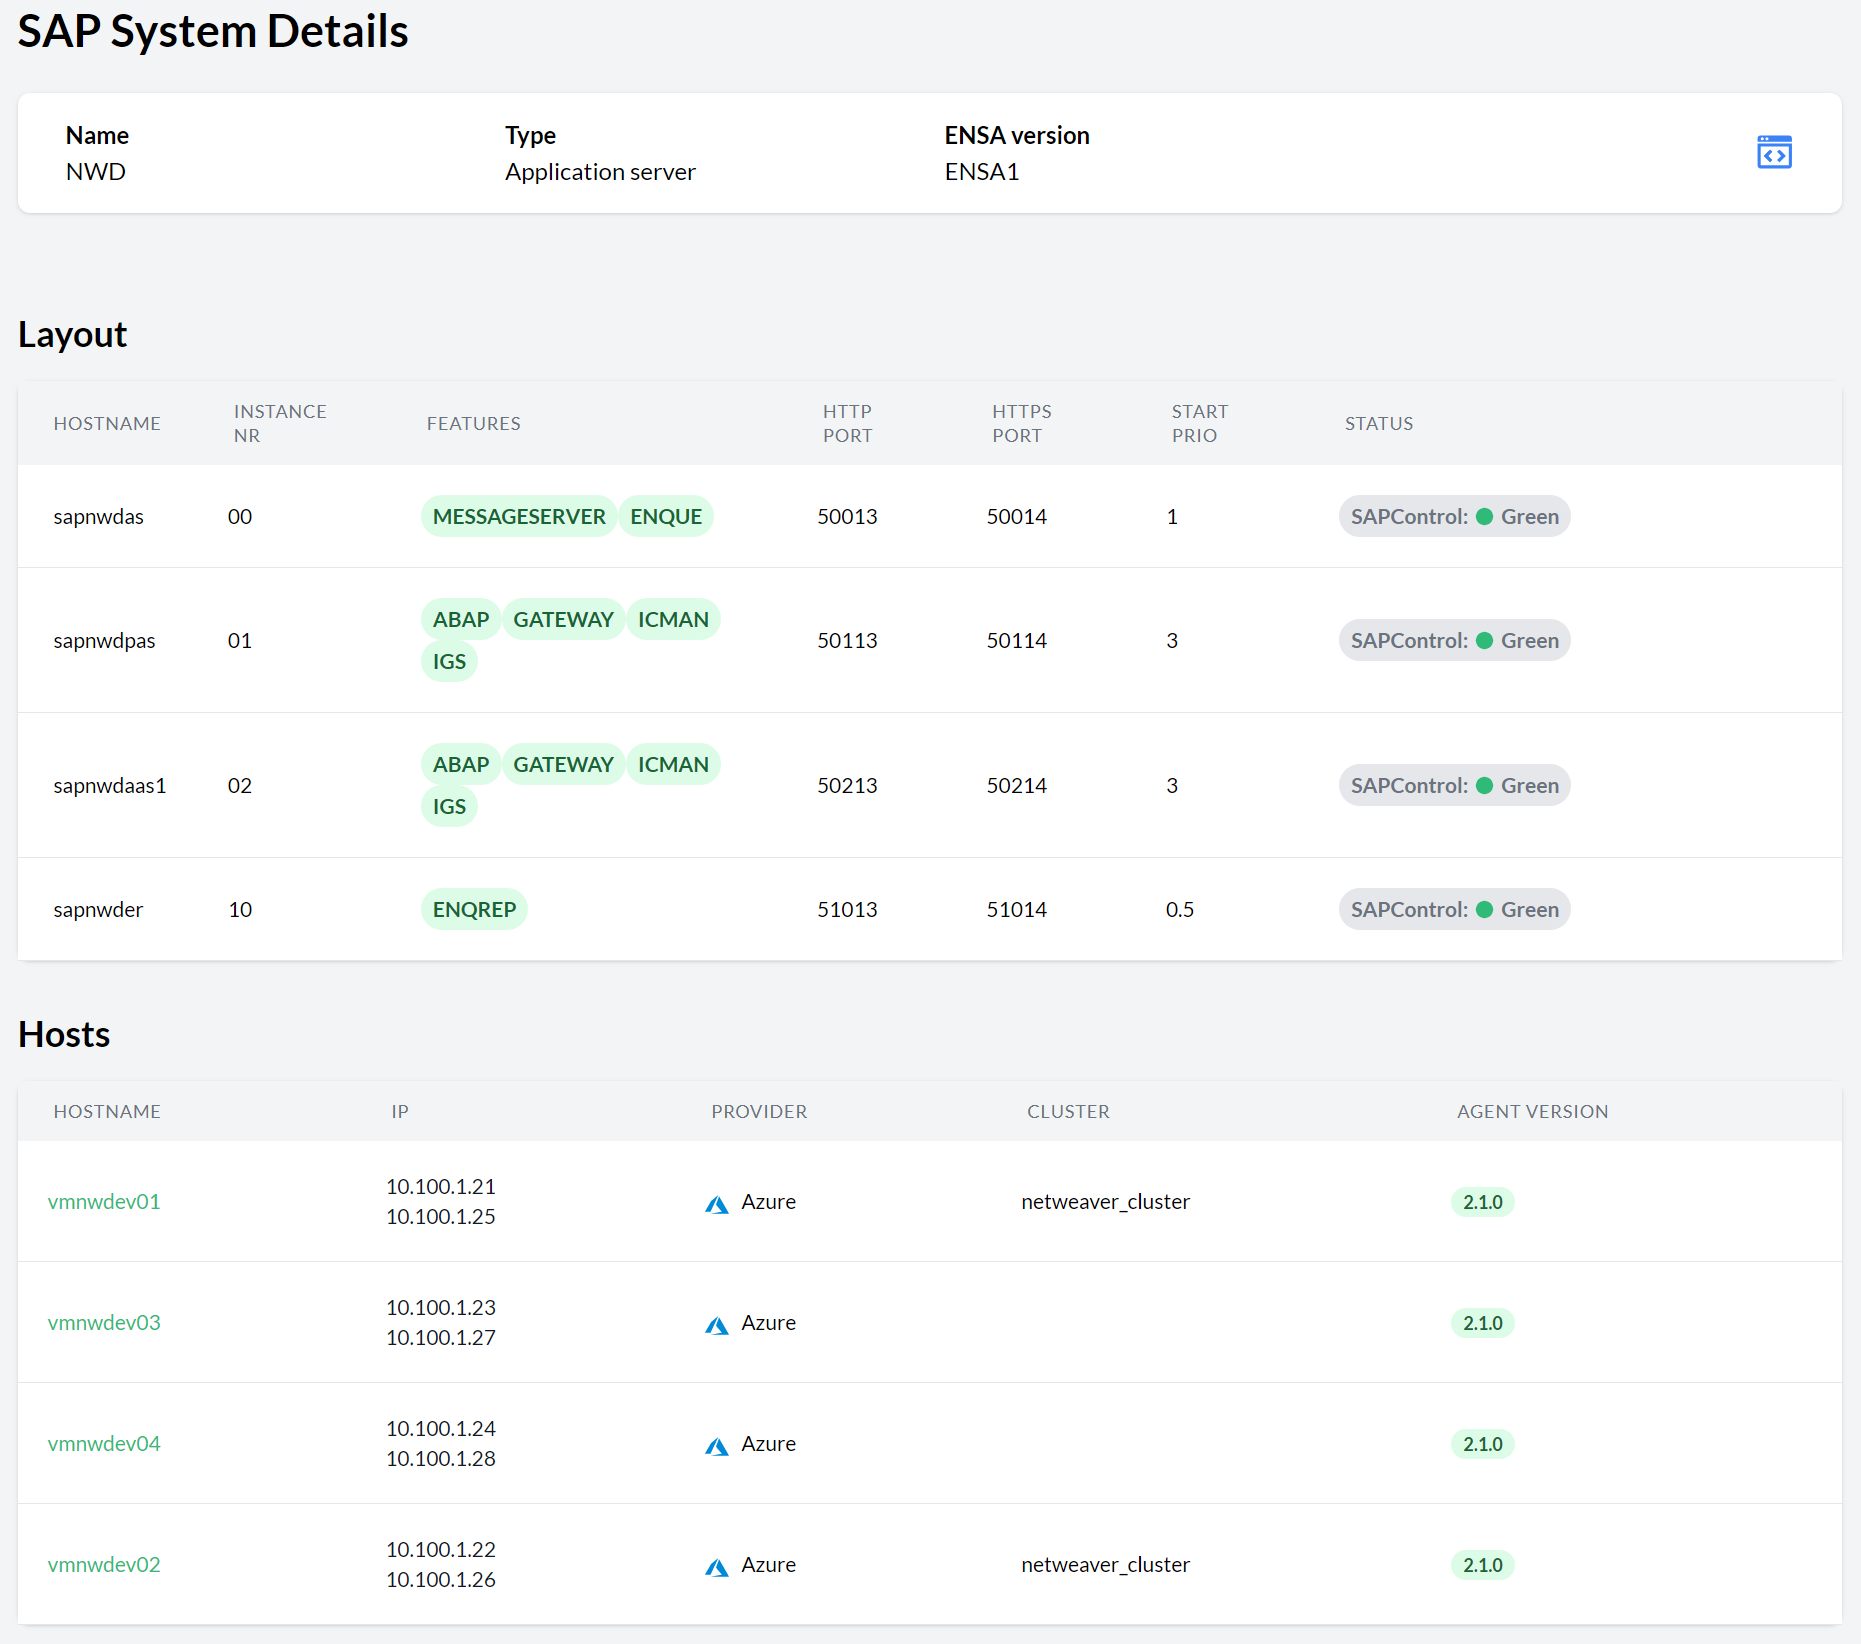 Figure 25. SAP System Details
-
11.6. Viewing the SAP HANA database status
To display a list of all available SAP HANA databases and their details, proceed as follows:
-
Log in to the Trento Web.
-
Click the HANA databases entry in the left sidebar to show a summary of the state for all SAP HANA databases.
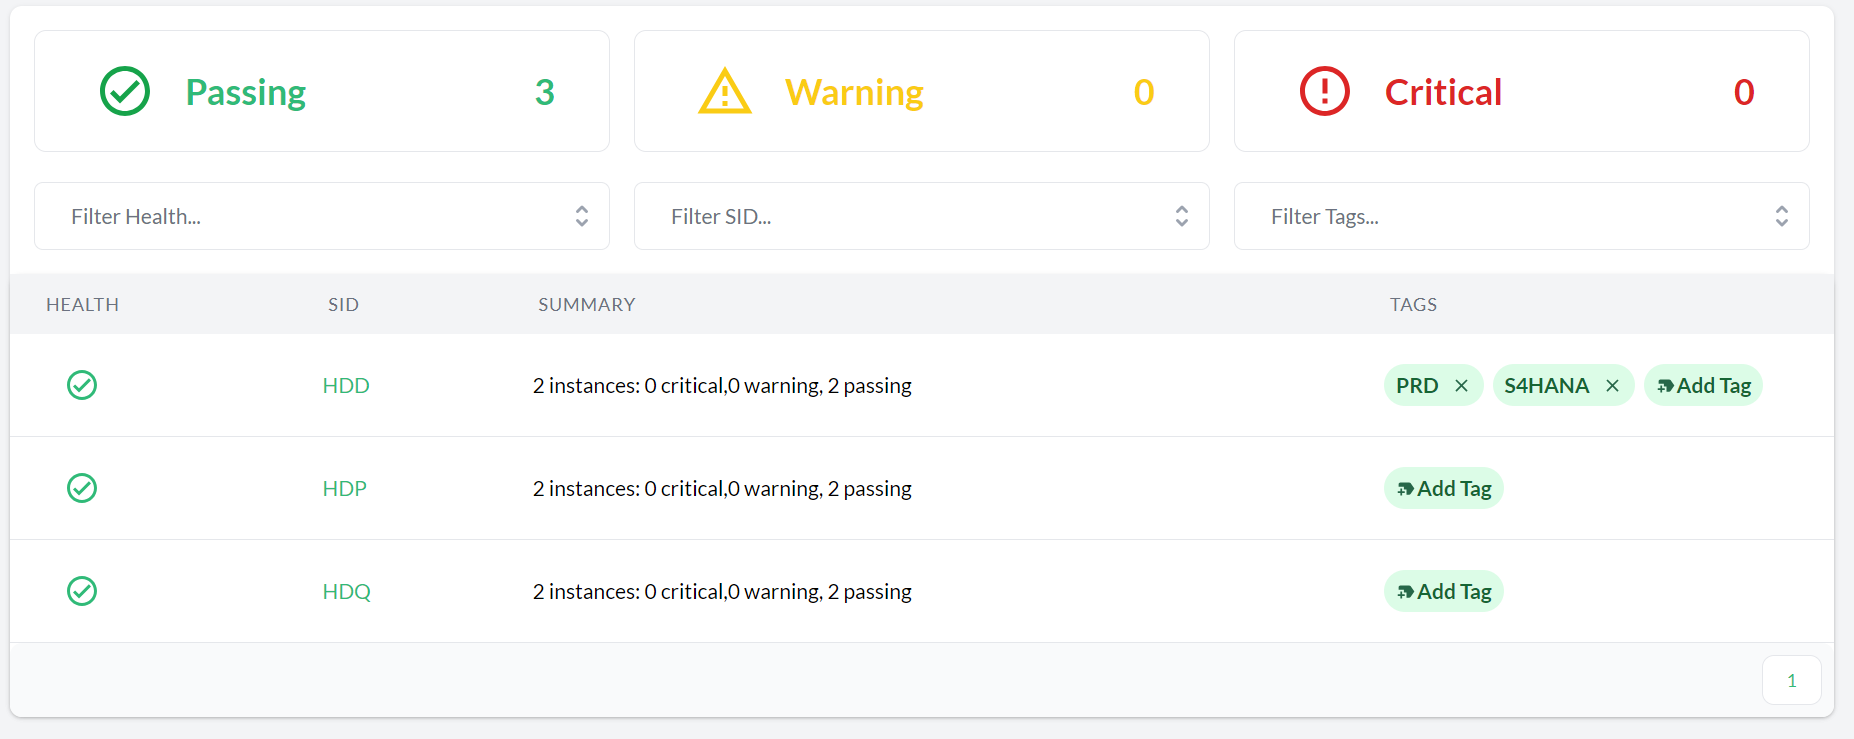 Figure 26. HANA databases
 -
Click one of the SIDs to open the corresponding HANA Databases detail view. This view provides the following:
-
The name and type of this SAP System.
-
The Layout section lists all related SAP HANA instances with their virtual host names, instance numbers, features (roles), HTTP/HTTPS ports, start priorities, and SAPControl statuses.
-
The Hosts section lists the hosts where all related instances are running. For each host, it shows the host name, the local IP address(es), the cloud provider (when applicable), the cluster name (when applicable), the system ID, and the Trento Agent version.
Click on a host name to go to the corresponding Host details view.
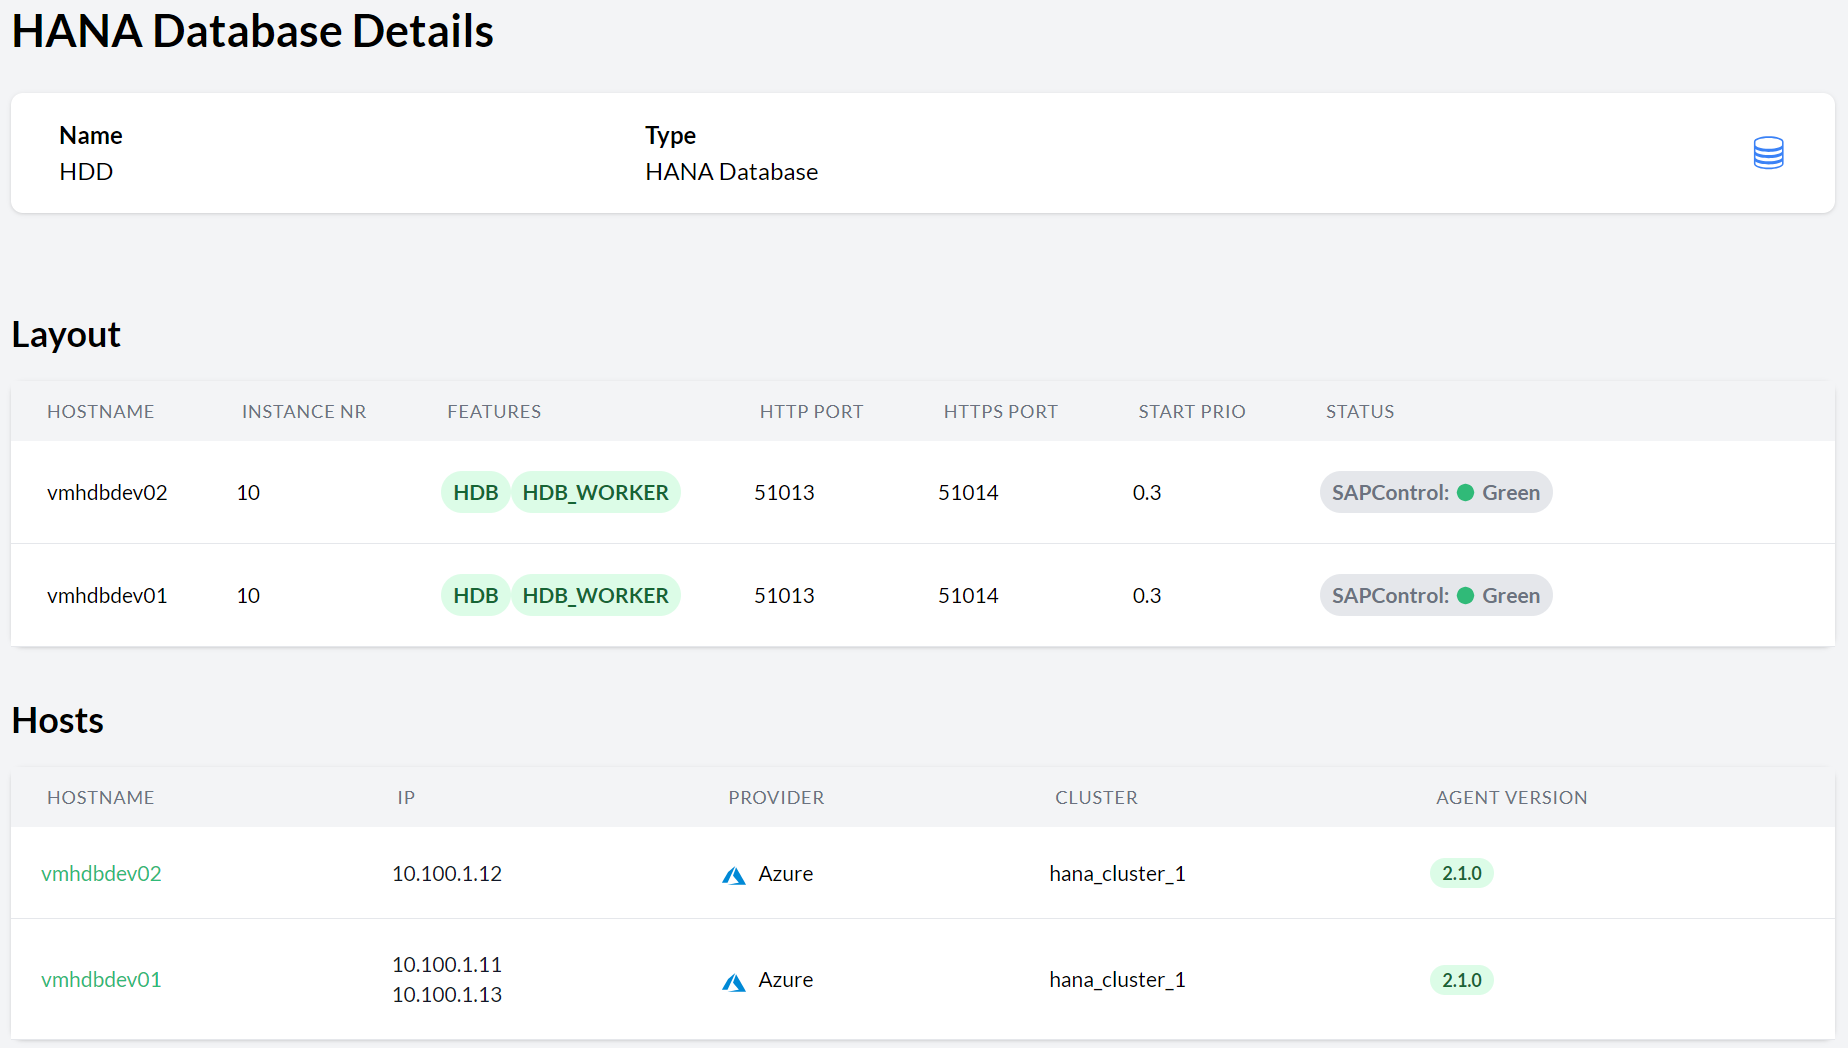 Figure 27. HANA Database details
-
11.7. Configuring Trento Web settings
Users with the all:settings permissions can use the Settings view of Trento Web to modify the following:
-
API key. See Rotating API keys.
-
Connection data for SUSE Multi-Linux Manager. See Integration with SUSE Multi-Linux Manager.
-
Retention time for Activity Log entries. See Activity Log.
-
Settings required for sending alerts via email. Note that if any of the email settings are specified via environment variables (see Enabling email alerts), the web-based configuration is disabled.
12. Integration with SUSE Multi-Linux Manager
Trento can be inegrated with SUSE Multi-Linux Manager to provide the SAP administrator with information about relevant patches and upgradable packages for any host that is registered with both applications.
The user must enter the connection settings for SUSE Multi-Linux Manager in the Settings view:

When the SUSE Multi-Linux Manager settings are configured, the SAP Basis administrator can test the connection by clicking the Test button. If the connection is successful, the Host Details view of each host managed by SUSE Multi-Linux Manager displays a summary of available patches and upgradable packages:
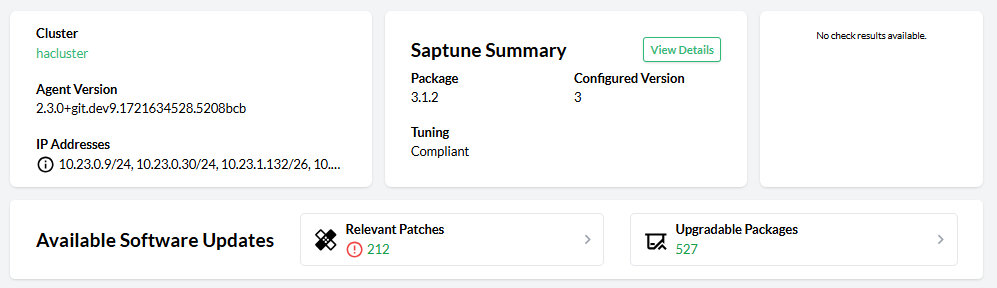
Click Relevant Patches to view a list of patches available for the host:
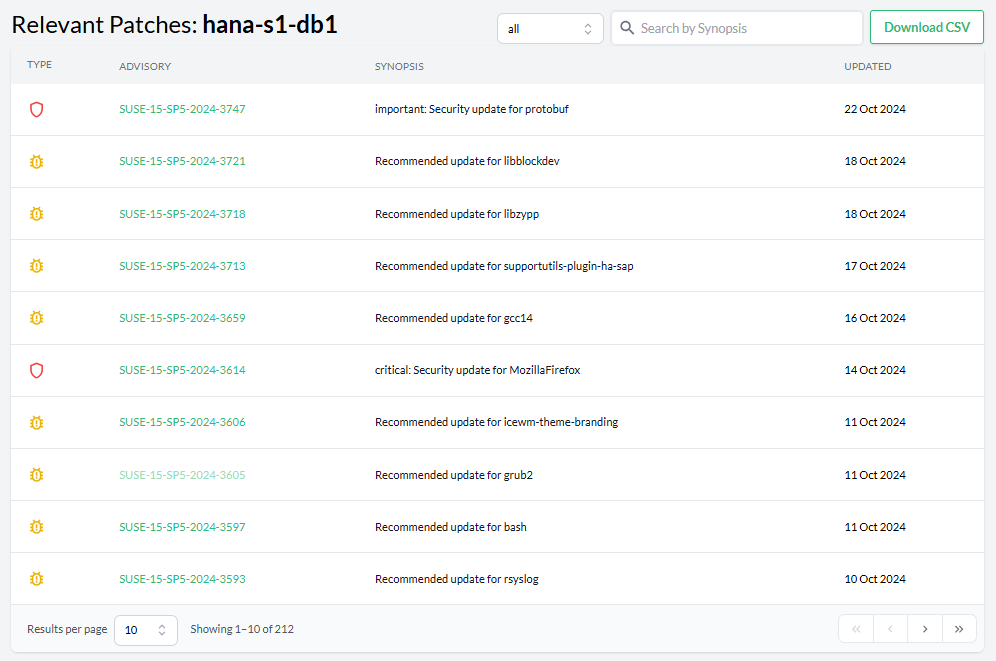
Click Upgradable Packages to view a list of packages that can be upgraded on that particular host:

Click an advisory or patch link to access the corresponding details view with relevant information, such us whether it requires a reboot or not, associated vulnerabilities, or a list of affected hosts:

There are three types of patches or advisories: security advisories, bug fixes and feature enhancements. Security advisories are considered critical. If an advisory is available, the health of the host is set to critical. If there are available patches but none of them is a security one, the health of the host switches to warning. When a host cannot be found in SUSE Multi-Linux Manager, or there is a problem retrieving the data for it, its health is set to unknown.
You can clear the SUSE Multi-Linux Manager settings from the Settings view at any time. When you do this, all information about available software updates disappears from the console, and the status of the hosts is adjusted accordingly.
13. Operations
Operations in Trento follow five principles:
-
Permissions: Only users with
operation:allpermissions can perform operations. -
Contextual UI paths: The path to request an operation depends on the target. To enable maintenance on an entire cluster, use the Operation button in the cluster details view. To enable maintenance on a specific node or resource, use the options menu in the corresponding row.
-
Single operation concurrency: Trento permits only one operation at a time on a target. While an operation runs, all other operations for that target (host, cluster, SAP system, or SAP HANA database) are disabled.
-
Safety policies: Internal policies prevent users from executing operations that violate established best practices, even if the user has the permission to so. For example, if a user attempts to stop a SAP HANA database managed by a cluster, Trento forbids the operation and displays a reason. Each operation has specific internal policies that are listed in the use cases below.
-
Target heartbeat: The execution of an operation depends on the heartbeat status of the target host(s). If the heartbeat is not active the operation is not allowed.
-
Single-host resource operations: The target host must have an active heartbeat. This applies to operations in resources like: Host, Cluster node, SAP instance, etc.
-
Multi-host resource operations: At least one constituent target host must have an active heartbeat. This applies to operations in resources like: Cluster, Database, SAP system, etc.
-
|
Internal policies prevent users from making basic operational mistakes, but they cannot guarantee that an operation will not damage the environment. The user is ultimately responsible for performing operations. |
Every operation request generates an entry in the activity log with a specific activity type. After a successful operation request, Trento attempts to perform the operation. The activity log records the completion of the operation, regardless of success, with the activity type Operation Completed. This entry correlates to the request entry (see Activity Log for details). If an operation fails, the Operation Completed entry provides additional troubleshooting data: the errors field provides detailed reasons for each affected target and the failed_step field identifies where the operation failed. In such cases, Trento restores the original state by rolling back the operation.
To prevent endless execution when an agent is unresponsive, an internal timeout constrains every operation. When the timeout is reached, the operation execution resets.
13.1. Host operations
For any registered host, the details view provides the following operations:
-
Apply saptune Solution: Enabled when an SAP workload is discovered on the host, but no saptune solution is applied. Trento restricts the available solutions based on the SAP workload type. If the SAP workload is a SAP HANA instance, the choice is between
HANAandS4HANA-DESERVER. If the SAP workload is an application instance, the choice is betweenNETWEAVERandS4HANA-APPSERVER.-
Activity type:
Host Operation Requested -
Internal policies: The SAP workload must be stopped.
-
Internal timeout: 5m
-
-
Change saptune Solution: Enabled when an SAP workload is discovered on the host and a saptune solution is already applied. As with the apply operation, Trento restricts the available solutions based on the SAP workload type.
-
Activity type:
Host Operation Requested -
Internal policies: The SAP workload must be stopped.
-
Internal timeout: 5m
-
-
Reboot Host: Schedules a reboot of the target host within one minute of the request.
-
Activity type:
Host Operation Requested -
Internal policies:
-
If an SAP workload is discovered on the host, it must be stopped.
-
If the host is a cluster node, the Pacemaker service must be disabled at boot and stopped (the node must be offline).
-
-
Internal timeout: 5m
-
13.2. Cluster operations
When a user requests a cluster operation, Trento checks the cluster state running crmadmin -qS NODE (NODE being the DC node). If the command returns any state other than IDLE, the operation fails. This restriction prevents users from executing operations while the cluster is in transition.
For any registered cluster, the details view provides the following operations:
-
At cluster level:
-
Cluster maintenance: Enabled when at least one node in the cluster is online. It turns maintenance on or off in the cluster, depending on the current status.
-
Activity type:
Cluster Operation Requested -
Internal policies: Not applicable.
-
Internal timeout: 5m
-
-
Refresh resources: Enabled when at least one node in the cluster is online. It refreshes all the resources in the cluster.
-
Activity type:
Cluster Operation Requested -
Internal policies: Not applicable.
-
Internal timeout: 5m
-
-
-
At node level:
-
Node maintenance: Enabled when the node is online. It turns maintenance on or off in the node, depending on its current status.
-
Activity type:
Operation Requested on a cluster host -
Internal policies: Not applicable.
-
Internal timeout: 5m
-
-
Enable Pacemaker at boot: Enabled when the service is disabled at boot in the corresponding host.
-
Activity type:
Operation Requested on a cluster host -
Internal policies: Not applicable.
-
Internal timeout: 5m
-
-
Disable Pacemaker at boot: Enabled when the service is enabled at boot in the corresponding host.
-
Activity type:
Operation Requested on a cluster host -
Internal policies: Not applicable.
-
Internal timeout: 5m
-
-
Set node online in cluster: Enabled when the node is offline.
-
Activity type:
Operation Requested on a cluster host -
Internal policies: In a SAP HANA cluster, if the node is managing a secondary instance, all the nodes managing primary instances must be online.
-
Internal timeout: 5m
-
-
Set node offline in cluster: Enabled when the node is online.
-
Activity type:
Operation Requested on a cluster host -
Internal policies: In a SAP HANA cluster, if the node is managing a primary instance, all the nodes managing secondary instances must be offline.
-
Internal timeout: 5m
-
-
-
At resource level:
-
Resource maintenance: Enabled when at least one node in the cluster is online. It turns maintenance on or off in the resource, depending on its current status.
-
Activity type:
Cluster Operation Requested -
Internal policies: Not applicable.
-
Internal timeout: 5m
-
-
Refresh resource: Enabled when at least one node in the cluster is online. It refreshes the resource.
-
Activity type:
Cluster Operation Requested -
Internal policies: Not applicable.
-
Internal timeout: 5m
-
-
13.3. SAP HANA operations
For any registered SAP HANA database, the details view provides the following operations at the top:
-
Start database: Enabled when the database, or any database site in a HANA replication setup, is stopped. It calls
sapcontrolwith the functionStartSystem. In a HANA replication setup, it starts the entire database layer, calling thesapcontrolfunction in each database site ordered by the tier number from smallest to highest.-
Options:
-
Timeout: Establishes the time in minutes that Trento waits for the database to start before initiating a rollback.
-
-
Activity type:
Database Operation Requested -
Internal policies:
-
If the database is managed by a Pacemaker cluster, the corresponding multistate resource or the cluster itself must be in maintenance mode.
-
-
Internal timeout: 12 hours
-
-
Stop database: Enabled when the database, or any database site in a HANA replication setup, is started. It calls
sapcontrolwith the functionStopSystem. In a HANA replication setup, it stops the entire database layer, calling thesapcontrolfunction in each database site ordered by the tier number from highest to smallest.-
Options:
-
Timeout: Establishes the time in minutes that Trento waits for the database to stop before initiating a rollback.
-
-
Activity type:
Database Operation Requested -
Internal policies:
-
If the database is managed by a Pacemaker cluster, the corresponding multistate resource or the cluster itself must be in maintenance mode.
-
If there is an application layer (SAP system) on top of the database, all application server instances must be stopped.
-
-
Internal timeout: 12 hours
-
For any registered SAP HANA database that is part of a HANA replication system, the details view provides the following operations in the different layout sections:
-
Start database: Enabled when the database site is stopped. It calls
sapcontrolwith the functionStartSystem.-
Options:
-
Timeout: Establishes the time in minutes that Trento waits for the database to start before initiating a rollback.
-
-
Activity type:
Database Operation Requested -
Internal policies:
-
If the database is managed by a Pacemaker cluster, the corresponding multistate resource or the cluster itself must be in maintenance mode.
-
If the database site is a secondary one, the database site being replicated must be started.
-
-
Internal timeout: 12 hours
-
-
Stop database: Enabled when the database site is started. It calls
sapcontrolwith the functionStopSystem.-
Options:
-
Timeout: Establishes the time in minutes that Trento waits for the database to stop before initiating a rollback.
-
-
Activity type:
Database Operation Requested -
Internal policies:
-
If the database is managed by a Pacemaker cluster, the corresponding multistate resource or the cluster itself must be in maintenance mode.
-
If the database site is being replicated (by a secondary or disaster recovery site), the replicating database site must be stopped.
-
If the database site is a primary one and there is an application layer (SAP system) on top of the database, all application server instances must be stopped.
-
-
Internal timeout: 12 hours
-
13.4. SAP operations
For any registered SAP system, the details view provides the following operations:
-
Start system: Enabled when at least one instance of the system is stopped. It calls
sapcontrolwith the functionStartSystemand the parameter selected as Instance Type:-
Options:
-
Instance Type: The available values are:
-
All instances: Select to start all the instances in the system.
-
ABAP: Select to start the instances with ABAP work processes.
-
J2EE: Select to start the instances with J2EE work processes.
-
ASCS/SCS: Select to start the instance with a message server and an enqueue server.
-
ENQREP: Select to start the instance with an enqueue replication server.
-
-
Timeout: Establishes the time in minutes that Trento waits for the SAP system to start before initiating a rollback.
-
-
Activity type:
SAP System Operation Requested -
Internal policies: If any of the instances included in the Instance Type selection is managed by a cluster, the corresponding resource or the cluster itself must be in maintenance mode.
-
Internal timeout: 1h
-
-
Stop system: Enabled when at least one instance of the system is started. It calls
sapcontrolwith the functionStopSystemand the parameter selected as Instance Type:-
Options:
-
Instance Type:
-
All instances: Select to stop all the instances in the system.
-
ABAP: Select to stop the instances with ABAP work processes.
-
J2EE: Select to stop the instances with J2EE work processes.
-
ASCS/SCS: Select to stop the instance with a message server and an enqueue server.
-
ENQREP: Select to stop the instance with an enqueue replication server.
-
-
Timeout: Establishes the time in minutes that Trento waits for the SAP system to stop before initiating a rollback.
-
-
Activity type:
SAP System Operation Requested -
Internal policies: If any of the instances included in the Instance Type selection is managed by a cluster, the corresponding resource or the cluster itself must be in maintenance mode.
-
Internal timeout: 1h
-
-
Start instance: Enabled when the instance is stopped. It calls
sapcontrolwith the corresponding instance number and functionStartin the host where the instance was discovered.-
Activity type:
Application Instance Operation Requested -
Internal policies:
-
If the instance is managed by a cluster, the corresponding resource or the cluster itself must be in maintenance mode.
-
In the case of an application server instance, the ASCS/SCS instance and the database must be running.
-
In the case of an ERS instance, the ASCS/SCS instance must be running.
-
-
Internal timeout: 5m
-
-
Stop instance: Enabled when the instance is started. It calls
sapcontrolwith the corresponding instance number and functionStopin the host where the instance was discovered.-
Activity type:
Application Instance Operation Requested -
Internal policies:
-
If the instance is managed by a cluster, the corresponding resource or the cluster itself must be in maintenance mode.
-
In the case of an ASCS instance, the application server instances and, if it exists, the ERS instance must be stopped.
-
-
Internal timeout: 5m
-
14. Reporting an Issue
SUSE customers with registered SUSE Linux Enterprise Server for SAP applications 15 (SP4 or higher) or SUSE Linux Enterprise Server for SAP applications 16.0 distributions can report Trento issues either directly in the SUSE Customer Center or through the corresponding vendor, depending on their licensing model. Problems must be reported under SUSE Linux Enterprise Server for SAP applications 15 and component trento.
When opening a support case for Trento, provide the relevant deployment option for Trento Server: Kubernetes, or systemd deployment.
In case of a Kubernetes deployment, provide the output of the Trento support script as explained in section Problem Analysis.
In case of a systemd deployment, provide the output of the Trento supportconfig plugin, as explained in section Problem Analysis.
For issues with a particular Trento Agent, or a component discovered by a particular Trento Agent, also provide the following:
-
status of the Trento Agent
-
journal of the Trento Agent
-
output of the command
supportconfigin the Trento Agent host. See https://documentation.suse.com/sles/html/SLES-all/cha-adm-support.html#sec-admsupport-cli for information on how to run this command from command line.
15. Problem Analysis
15.1. Trento Server
There are two tools you can use to collect information and data that can be useful when troubleshooting and analyzing issues with Trento Server.
15.1.1. Trento support plugin
The Trento support plugin consists of the trento-support.sh script and the supportconfig plugin. The tool automates the collection of logs and relevant runtime information on the server side. It can be used in two different scenarios:
-
A deployment on K3s
-
A systemd deployment
15.1.2. Using the Trento support plugin with a K3s deployment
Using the plugin with a K3s deployment requires a SUSE Linux Enterprise Server for SAP applications 15 SP3 or higher host with the following setup:
-
Packages
jqandyqare installed -
Helm is installed
-
kubectlis installed and connected to the Kubernetes cluster where Trento Server is running
To use the plugin, proceed as follows:
-
Install the Trento support plugin:
# zypper ref # zypper install supportutils-plugin-trento -
Run the
trento-support.shscript:# trento-support --output file-tgz --collect all -
Send the generated archive file to support for analysis.
The script accepts the following options:
-
-o,--outputOutput type (stdout,file,file-tgz) -
-c,--collectCollection options (configuration,base,kubernetes,all) -
-r,--release-nameRelease name to use for the chart installation. Default istrento-server -
-n,--namespaceKubernetes namespace used when installing the chart.Default isdefault -
--helpShows help messages
15.1.3. Using the Trento support plugin with a systemd deployment
To use the plugin in this scenario, proceed as follows:
-
Install the Trento support plugin:
# zypper ref # zypper install supportutils-plugin-trento -
Execute
supportconfigas described in https://documentation.suse.com/smart/systems-management/html/supportconfig/index.html. Thesupportconfigtool will call the Trento support plugin. -
Send the generated output to support for analysis.
15.2. Scenario dump
A scenario dump is a dump of the Trento database. It helps the Trento team to recreate the scenario to test it.
In systemd scenarios, the Trento support plugin generates a scenario dump when executed.
For Kubernetes based scenarios, a script is available in the Trento upstream project. Using this script requires a host with the following setup:
-
kubectlis installed and connected to the Kubernetes cluster where Trento Server is running.
To generate the dump, proceed as follows:
-
Download the latest version of the dump script:
> wget https://raw.githubusercontent.com/trento-project/web/main/hack/dump_scenario_from_k8.sh -
Make the script executable:
> chmod +x dump_scenario_from_k8.sh -
Make sure that
kubectlis connected to the Kubernetes cluster where Trento Server is running and run the script:> ./dump_scenario_from_k8.sh -n SCENARIO_NAME -p PATH -
Go to
PATH/scenarios/SCENARIO_NAME, package all the generated JSON files, and send the package to support for analysis.
15.3. Pods descriptions and logs
In case of a deployment on K3s, the descriptions and logs of the Trento Server pods can be useful for analysis and troubleshooting purposes (in addition to the output of the trento-support.sh script and the dump scenario script). These descriptions and logs can be obtained with the kubectl command. For this to work, you need a host with kubectl is installed and connected to the K3s cluster running Trento Server.
-
List the pods running in Kubernetes cluster and their statuses. Run the command below to view Trento Server pods:
> kubectl get pods NAME READY STATUS RESTARTS AGE trento-server-postgresql-0 1/1 Running 0 87m trento-server-prometheus-server-7b5c9474bc-wmv8s 2/2 Running 0 87m trento-server-rabbitmq-0 1/1 Running 0 87m trento-server-wanda-67ffbb79dc-7t6xw 1/1 Running 0 87m trento-server-web-7df8f65794-vdbhs 1/1 Running 0 87m -
Retrieve the description of a pod as follows:
> kubectl describe pod POD_NAME -
Retrieve the log of a pod as follows:
> kubectl logs POD_NAME -
Monitor the log of a pod as follows:
> kubectl logs POD_NAME --follow
16. Analytics
16.1. What is Analytics?
Analytics is the collection of information related to the installation of Trento and feature usage of the product. This information is used by the Trento team to help improve the product and it is not shared with third-parties.
16.2. What information is collected?
No specific information related to usernames, passwords and the names of user resource addresses will be collected.
Types of information that will be collected include:
-
Name of the page URLs.
-
Page links clicked.
-
Names of pages viewed.
-
Name and version of installed Trento application.
-
Unique randomly-generated identifier for each Trento Installation.
17. Compatibility matrix between Trento Server and Trento Agents
| Trento Agent | Trento Server | ||||||||||
|---|---|---|---|---|---|---|---|---|---|---|---|
1.0 |
1.1 |
1.2 |
2.0 |
2.1 |
2.2 |
2.3 |
2.4 |
2.5 |
3.0 |
3.1 |
|
1.0 |
✓ |
✓ |
✓ |
||||||||
1.1 |
✓ |
✓ |
|||||||||
1.2 |
✓ |
||||||||||
2.0 |
✓ |
✓ |
✓ |
✓ |
✓ |
✓ |
|||||
2.1 |
✓ |
✓ |
✓ |
✓ |
✓ |
||||||
2.2 |
✓ |
✓ |
✓ |
✓ |
|||||||
2.3 |
✓ |
✓ |
✓ |
||||||||
2.4 |
✓ |
✓ |
|||||||||
2.5 |
✓ |
||||||||||
3.0 |
✓ |
✓ |
|||||||||
3.1 |
✓ |
||||||||||
18. Highlights of Trento versions
Below is a list of the most important user-facing features in the different versions of Trento. For a more detailed information about the changes included in each new version, visit https://github.com/trento-project.
-
For changes in the Trento Helm Chart, visit https://github.com/trento-project/helm-charts/releases.
-
For changes in the Trento Server Web component, visit https://github.com/trento-project/web/releases.
-
For changes in the Trento Server old checks engine component (runner), visit https://github.com/trento-project/runner/releases.
-
For changes in the Trento Server new checks engine component (wanda), visit https://github.com/trento-project/wanda/releases.
-
For changes it the Trento checks, visit https://github.com/trento-project/checks/releases.
-
For changes in the Trento Agent, visit https://github.com/trento-project/agent/releases.
- Version 3.1.0 (released on 2026/05/27)
-
Includes Helm chart 3.1.0, Trento Web component 3.1.0, orchestration engine (Wanda) 2.1.0, compliance checks 1.3.0, MCP Server 1.1.0, and Trento Agent 3.1.0, with the following highlights:
-
Opt-in analytics option
-
Timezone awareness
-
Integration with Grafana Alloy
-
Information about versions of all Trento Server components
-
Last boot information in Host details view
-
Improved AI capabilities by exposing collected host metrics to MCP Server
-
Improved monitoring of cluster shutdown
-
Filesystem and swap utilization dashboards in Host details view
-
Improved saptune gatherer
-
Improved UX around operations:
-
Cluster state information in Cluster details view
-
Troubleshooting information about operation failures in Activity Log
-
Heartbeat of target host taken into account when requesting operations
-
Direct access from operation forbidden modals to relevant details views
-
-
New operations:
-
Cluster resource refresh
-
Stop/start entire database layer in SAP HANA HA setups
-
-
Bug fixes:
-
Discovery of SAP HANA multi-tier setups
-
Flaky host heartbeat producing false negatives
-
Trento Agent requiring restart to connect to message broker
-
Enabling alert emails with Helm chart flags in Kubernetes deployments
-
-
- Version 3.0.0 (released on 2025/12/16)
-
Includes Helm chart 3.0.0, Web Component 3.0.0, orchestration engine (Wanda) 2.0.0, compliance checks 1.2.0, MCP Server 1.0.0, and agent 3.0.0, with the following highlights:
-
First operation use cases
-
MCP Server integration
-
A more flexible, secure alert emails configuration
-
A more helpful activity log with correlation of entries
-
Improved observability around offline clusters and SAP HANA native HA scenarios (including multi target/tier setups)
-
Improved compliance validation with additional scenario-specific checks
-
- Version 2.5.0 (released on 2025/08/07)
-
Includes Helm chart 2.5.0, Web Component 2.4.0, checks engine (wanda) 1.5.0, configuration checks 1.1.0 and agent 2.5.0, with the following highlights:
-
Discovery of HANA scale-up cost-optimized clusters
-
Checks customization
-
Enhanced activity log (search by metadata, auto refresh capabilities, severity information and permission-based access level)
-
A more flexible Prometheus integration
-
Discovery optimization in edge-case scenarios
-
Major updates to the Checks Catalog
-
- Version 2.4.0 (released on 2024/12/06)
-
Consisting of Helm chart 2.4.0, Web component 2.4.0, checks engine (wanda) 1.4.0, configuration checks 1.0.0 and agent 2.4.0.
-
New permission-based user management system with optional MFA.
-
SSO and third-party IDP integration via OIDC, OAUTH2 and SAML protocols.
-
Contextual, detailed overview of available patches and upgradable packages in the SUSE Multi-Linux Manager integration.
-
Inception of the Activity Log, allowing users to browse a single centralized event log for their entire SAP landscape.
-
Trento Checks delivery is now decoupled from the core platform, and the Checks themselves have been relicensed from Apache 2.0 to GPL 3.0
-
Enhanced discovery capabilities including clusters using angi architecture and SAP systems running on JAVA stacks.
-
New HANA scale-out cluster configuration checks.
-
More ASCS/ERS cluster configuration checks.
-
- Version 2.3.2 (released on 2024/09/01)
-
Consisting of Helm chart 2.3.2, Web component 2.3.2, checks engine (wanda) 1.3.0 and agent 2.3.0.
-
Fix for bug in the web component causing it to crash upon certain events after update from an earlier version.
-
- Version 2.3.1 (released on 2024/06/18)
-
Consisting of Helm chart 2.3.1, Web component 2.3.1, checks engine (wanda) 1.3.0 and agent 2.3.0.
-
non-K8s installation of Trento Server.
-
Enhanced discovery capabilities, including improved support HANA multi-tenant architecture, HANA scale out cluster discovery, discovery of clsluters using diskless SBD and maintenance awareness.
-
Information about available patches and upgradable packages for each registered hosts via integration with SUSE Multi-Linux Manager.
-
Rotating API key.
-
Saptune configuration checks.
-
Simpler, more secure architecture without Grafana.
-
Revamped metric visualization.
-
Enhanced Checks Catalog view with dynamic filtering capabilities.
-
- Version 2.2.0 (released on 2023/12/04)
-
Consisting of Helm chart 2.2.0, Web component 2.2.0, checks engine (wanda) 1.2.0 and agent 2.2.0.
-
saptune Web integration.
-
Intance clean-up capabilities.
-
Ability to run host-level configuration checks.
-
- Version 2.1.0 (released on 2023/08/02)
-
Consisting of Helm chart 2.1.0, Web component 2.1.0, checks engine (wanda) 1.1.0 and agent 2.1.0.
-
ASCS/ERS cluster discovery, from single-sid, two-node scenarios to multi-sid, multi-node setups. The discovery covers both versions of the enqueue server, ENSA1 and ENSA2, and both scenarios with resource managed instance filesystems and simple mount setups.
-
Host clean-up capabilities, allowing users to get rid of hosts that are no longer part of their SAP environment.
-
New checks results view that leverages the potential of the new checks engine (wanda) and provides the user with insightful information about the check execution.
-
- Version 2.0.0 (released on 2023/04/26)
-
Consisting of Helm chart 2.0.0, Web component 2.0.0, checks engine (wanda) 1.0.0 and agent 2.0.0.
-
A brand-new safer, faster, ligher SSH-less configuration checks engine (wanda) which not only opens the door to configuration checks for other HA scenarios (ASCS/ER, HANA scale-up cost optimized, SAP HANA scale-out) and other targes in the environment (hosts, SAP HANA databases, SAP NetWeaver instances), but also will allow customization of existing checks and addition of custom checks.
-
Addition of VMware to the list of known platforms.
-
Versioned external APIs for both the Web and the checks engine (wanda) components. The full list of available APIs can be found at https://www.trento-project.io/web/swaggerui/ and https://www.trento-project.io/wanda/swaggerui/ respectively.
-
- Version 1.2.0 (released on 2022/11/04)
-
Consisting of Helm chart 1.2.0, Web component 1.2.0, checks engine (runner) 1.1.0 and agent 1.1.0.
-
Configuration checks for HANA scale-up performance optimized two-node clusters on on-premise bare metal platforms, including KVM and Nutanix.
-
A dynamic dashboard that allows you to determine, at a glance, the overall health status of your SAP environment.
-
- Version 1.1.0 (released on 2022/07/14)
-
Consisting of Helm chart 1.1.0, Web component 1.1.0, checks engine (runner) 1.0.1 and agent 1.1.0.
-
Fix for major bug in the checks engine that prevented the Web component to load properly.
-
- Version 1.0.0 (general availability, released on 2022/04/29)
-
Consisting of Helm chart 1.0.0, Web component 1.0.0, checks engine (runner) 1.0.0 and agent 1.0.0.
-
Clean, simple Web console designed with SAP basis in mind. It reacts in real time to changes happening in the backend environment thanks to the event-driven technology behind it.
-
Automated discovery of SAP systems, SAP instances and SAP HANA scale-up two-node clusters
-
Configuration checks for SAP HANA scale-up performance optimized two-node clusters on Azure, AWS and GCP.
-
Basic integration with Grafana and Prometheus to provide graphic dashboards about CPU and memory utilization in each discovered host.
-
Basic alert emails for critical events happening in the monitored environment.
-
19. More information
-
Official project website: https://www.trento-project.io/
-
Trento project: https://github.com/trento-project/web