Core Features
User management
Trento provides a local permission-based user management feature with optional multi-factor authentication. This feature enables segregation of duties in the Trento interface and ensures that only authorized users with the right permissions can access it.
User management actions are performed in the Users view in the left-hand side panel of the Trento UI.
By default, a newly created user is granted display access rights except for the Users view. Where available, a user with default access can configure filters and pagination settings matching their preferences.
To perform protected actions, the user must have additional permissions added to their user profile. Below is the list of currently available permissions:
-
all:users: grants full access to user management actions under the Users view -
all:checks_selection: grants check selection capabilities for any target in the registered environment for which checks are available -
all:checks_execution: grants check execution capabilities for any target in the registered environment for which checks are available and have been previously selected -
all:tags: allows creation and deletion of the available tags -
cleanup:all: allows triggering housekeeping actions on hosts where agents heartbeat is lost and SAP or HANA instances that are no longer found -
all:settings: grants changing capabilities on any system settings under the Settings view -
all:all: grants all the permissions above
Using the described permissions, it is possible to create the following types of users:
-
User managers: users with
all:userspermissions -
SAP Basis administrator with Trento display-only access: users with default permissions
-
SAP Basis administrator with Trento configuration access: users with
all:checks_selection,all:tagsandall:settingspermissions -
SAP Basis administrator with Trento operation access: users with
all:check_executionandcleanup:allpermissions.
The default admin user created during the installation process is
granted all:all permissions and cannot be modified or deleted. Use
it only to create the first user manager (a user with all:users
permissions who creates all the other required users). Once a user with
all:users permissions is created, the default admin user must be
treated as a fallback user in case all other access to the console is
lost. If the password of the default admin user is lost, it can be reset
by updating the Helm chart or the web component configuration, depending
on which deployment method was used to install Trento Server.
User passwords, including the default admin user password, must follow the rules below:
-
Password must contain at least 8 characters
-
The same number or letter must not be repeated three or more times in a row (for example: 111 or aaa)
-
Password must not contain four consecutive numbers or letters (for example: 1234, abcd or ABCD)
The Create User and Edit User views provide a built-in password generation button that allows user managers to easily generate secure and compliant passwords. The user manager must provide the user with their password through an authorized secure channel.
User managers may also set a preferred timezone for the account from the Create User and Edit User views. Individual users can configure their own preference later in the Profile view. The web console displays dates and times according to each user’s preferred timezone for presentation; if no preference is set, UTC is used. This preference affects only how timestamps are presented in the UI — backend storage, API payloads, logs and scheduled tasks continue to use UTC.
A user can reset their password in the Profile view. In this view, they can also update their name and email address as well as activate multi-factor authentication using an authenticator app. Multi-factor authentication increases the security of a user account by requesting a temporary second password or code when logging in the console. User managers can disable multi-factor authentication for any given user that has it enabled. However, user managers cannot enable multi-factor authentication on their behalf. The default admin user cannot enable its own multi-factor authentication.
|
Security Tip for Multi-Factor Authentication
Since multi-factor authentication cannot be enabled for the default admin user, keeping its password safe is imperative. If the default admin user’s password is compromised, reset it immediately by updating the Helm chart or the web component configuration, depending on which deployment method was used to install Trento Server. |
User managers can enable and disable users. When a user logged in the console is disabled by a user admin, their session is terminated immediately.
Single Sign-On integration
Trento can be integrated for Single Sign-On (SSO) with a third-party identity provider (IDP).
|
Trento cannot start with multiple SSO options together, so only one can be chosen. |
The following protocols are supported:
-
OpenID Connect (OIDC)
-
Open Authorization 2.0 (OAuth 2)
-
Security Assertion Markup Language (SAML)
User roles and authentication
User authentication is entirely managed by the IDP, which is responsible for maintaining user accounts. A user, who does not exist on the IDP, is unable to access the Trento web console.
During the installation process, a default admin user is defined using
the ADMIN_USER variable, which defaults to admin. If the
authenticated user’s IDP username matches this admin user’s username,
that user is automatically granted all:all permissions within
Trento.
User permissions are entirely managed by Trento, they are not imported
from the IDP. The permissions must be granted by some user with
all:all or all:users rights (admin user initially). This
means that only basic user information is retrieved from the external
IDP.
Using OpenID Connect
Trento integrates with an IDP that uses the OIDC protocol to authenticate users accessing the Trento web console.
By default, OIDC is disabled.
Enabling OpenID Connect when using a Kubernetes deployment
To enable OIDC when using a Kubernetes deployment with helm, add the following variables to the previously documented helm installation command:
helm ... \
   --set trento-web.oidc.enabled=true \
   --set trento-web.oidc.clientId=<OIDC_CLIENT_ID> \
   --set trento-web.oidc.clientSecret=<OIDC_CLIENT_SECRET> \
   --set trento-web.oidc.baseUrl=<OIDC_BASE_URL>
Enabling OpenID Connect when using RPM packages
To enable OIDC when using RPM packages, proceed as follows:
-
Open the file
/etc/trento/trento-web. -
Add the following environment variables to this file. Required variables are:
ENABLE_OIDC=true OIDC_CLIENT_ID=<OIDC_CLIENT_ID> OIDC_CLIENT_SECRET=<OIDC_CLIENT_SECRET> OIDC_BASE_URL=<OIDC_BASE_URL> -
Optionally, add the OIDC callback URL to the configuration. This can be useful if for some reason the default callback URL cannot be used, for example, if
httpis used instead ofhttps. Use the next variable for that:OIDC_CALLBACK_URL=<OIDC_CALLBACK_URL> -
Restart the application.
Available variables for OpenID Connect
- OIDC_CLIENT_ID
-
OIDC client id
- OIDC_CLIENT_SECRET
-
OIDC client secret
- OIDC_BASE_URL
-
OIDC base url
- OIDC_CALLBACK_URL
-
OIDC callback url where the IDP is redirecting once the authentication is completed (default value:
https://#{TRENTO_WEB_ORIGIN}/auth/oidc_callback)
Using OAuth 2.0
Trento integrates with an IDP that uses the OAuth 2 protocol to authenticate users accessing the Trento web console.
By default, OAuth 2.0 is disabled.
Enabling OAuth 2.0 when using a Kubernetes deployment
To enable OAuth 2.0 when using a Kubernetes deployment with helm, proceed as follows:
-
Add the following variables to the previously documented helm installation command:
helm ... \
   --set trento-web.oauth2.enabled=true \
   --set trento-web.oauth2.clientId=<OAUTH2_CLIENT_ID> \
   --set trento-web.oauth2.clientSecret=<OAUTH2_CLIENT_SECRET> \
   --set trento-web.oauth2.baseUrl=<OAUTH2_BASE_URL> \
   --set trento-web.oauth2.authorizeUrl=<OAUTH2_AUTHORIZE_URL> \
   --set trento-web.oauth2.tokenUrl=<OAUTH2_TOKEN_URL> \
   --set trento-web.oauth2.userUrl=<OAUTH2_USER_URL>
Additionally, the following optional values are available:
helm ... \
   --set trento-web.oauth2.scopes=<OAUTH2_SCOPES>
Enabling OAuth 2.0 when using RPM packages
To enable OAuth 2.0 when using RPM packages, proceed as follows:
-
Open the file
/etc/trento/trento-web. -
Add the following environment variables to this file. Required variables are:
# Required: ENABLE_OAUTH2=true OAUTH2_CLIENT_ID=<OAUTH2_CLIENT_ID> OAUTH2_CLIENT_SECRET=<OAUTH2_CLIENT_SECRET> OAUTH2_BASE_URL=<OAUTH2_BASE_URL> OAUTH2_AUTHORIZE_URL=<OAUTH2_AUTHORIZE_URL> OAUTH2_TOKEN_URL=<OAUTH2_TOKEN_URL> OAUTH2_USER_URL=<OAUTH2_USER_URL> # Optional: OAUTH2_SCOPES=<OAUTH2_SCOPES> OAUTH2_CALLBACK_URL=<OAUTH2_CALLBACK_URL> -
Restart the application.
Available variables for OAuth 2.0
- OAUTH2_CLIENT_ID
-
OAUTH2 client id
- OAUTH2_CLIENT_SECRET
-
OAUTH2 client secret
- OAUTH2_BASE_URL
-
OAUTH2 base url
- OAUTH2_AUTHORIZE_URL
-
OAUTH2 authorization url
- OAUTH2_TOKEN_URL
-
OAUTH2 token url
- OAUTH2_USER_URL
-
OAUTH2 token url
- OAUTH2_SCOPES
-
OAUTH2 scopes, used to define the user values sent to the SP. It must be adjusted depending on IDP provider requirements (default value:
profile email) - OAUTH2_CALLBACK_URL
-
OAUTH2 callback url where the IDP is redirecting once the authentication is completed (default value:
https://#{TRENTO_WEB_ORIGIN}/auth/oauth2_callback)
Using SAML
Trento integrates with an IDP that uses the SAML protocol to authenticate users accessing the Trento web console. Trento will behave as a Service Provider (SP) in this case.
Commonly, SAML protocol messages are signed with SSL. This is optional using Trento, and the signing is not required (even though it is recommended). If the IDP signs the messages, and expect signed messages back, certificates used by the SP (Trento in this case) must be provided to the IDP, the public certificate file in this case.
To use an existing SAML IDP, follow the next instructions to met the specific requirements. You need:
-
Obtain metadata content from the IDP
-
Start Trento to generate the certificates and get them (SAML must be enabled for this)
-
Provide the generated certificate to the IDP
-
Configure SAML IDP and user profiles
See the following subsections for details.
Obtaining metadata content from the IDP
The metadata.xml file defines the agreement between SP and IDP
during SAML communications. It is used to identify the SAML client as
well. The content of this file must be provided to Trento. Options
SAML_METADATA_URL and SAML_METADATA_CONTENT are available for
that.
If the SAML_METADATA_CONTENT option is being used, the content of
this variable must be updated with the IDP metadata as single line
string. On the other hand, if SAML_METADATA_URL is used, the new
metadata is automatically fetched when Trento starts. If neither of
these steps are completed, communication will fail because the message
signatures will not be recognized.
If the used IDP has the endpoint to provide the metadata.xml file
content, prefer the variable SAML_METADATA_URL. Trento will
automatically fetch metadata when started.
Getting certificates from Trento
Trento provides a certificates set created during the installation. Regardless
of the installation mode, when Trento is installed the first time and SAML is
enabled the certificates are created and the public certificate file content is
available in the https://#{TRENTO_WEB_ORIGIN}/api/public_keys route.
Use the following command to get the certificate content:
curl https://#{TRENTO_WEB_ORIGIN}/api/public_keysCopy the content of the certificate from there and provide it to the IDP. This way, the IDP will sign its messages and verify the messages received from Trento.
|
To get the certificate using this route Trento must be configured to start with SAML enabled. |
Configuring SAML IDP setup
Configure the existing IDP with the next minimum options to be able to connect with Trento as a Service Provider (SP).
Providing certificates
As commented previously, a set of certificates is needed to enable signed communication. Provide the certificate generated by Trento to the IDP (each IDP has a different way to do this). Make sure that the configured certificate is used for signing and encrypting messages.
Configuring SAML user profile
Users provided by the SAML installation must have some few mandatory attributes to login in Trento. The required attributes are: username, email, first name and last name. All of them are mandatory, even though their field names are configurable.
By default, Trento expects the username, email, firstName
and lastName attribute names. All these 4 attribute names are
configurable using the next environment variables, following the same
order: SAML_USERNAME_ATTR_NAME, SAML_EMAIL_ATTR_NAME,
SAML_FIRSTNAME_ATTR_NAME and SAML_LASTNAME_ATTR_NAME.
Both IDP and Trento must know how these 4 fields are mapped. To do this, follow the next instructions:
-
Add the attributes if they don’t exist in the IDP user profile. If they already exist, don’t change the attributes and keep their original values.
-
Configure Trento to use the IDP attribute field names. To do this, set the
SAML_USERNAME_ATTR_NAME,SAML_EMAIL_ATTR_NAME,SAML_FIRSTNAME_ATTR_NAMEandSAML_LASTNAME_ATTR_NAMEenvironment values with the values configured in the IDP. For example, if the IDP user profile username is defined asattr:usernameuseSAML_USERNAME_ATTR_NAME=attr:username.
SAML URLs
Trento exposes some SAML related URLs when SAML is enabled:
-
Assertion consumer service (or ACS): an endpoint to accept SAML messages to establish a session into the Service Provider. The endpoint for ACS in Trento is:
https://#{TRENTO_WEB_ORIGIN}/sso/sp/consume/#{SAML_IDP_ID} -
Single logout service (or SLS): an endpoint to initiate a logout request from the IdP. The endpoint for SLS in Trento is:
https://#{TRENTO_WEB_ORIGIN}/sso/sp/logout/#{SAML_IDP_ID} -
Metadata: an endpoint to retrieve Trento metadata for SAML. The endpoint for metadata in Trento is:
https://#{TRENTO_WEB_ORIGIN}/sso/sp/metadata/#{SAML_IDP_ID}. This URL is used as default value forSAML_SP_ENTITY_IDif the configuration variable is not set
Enabling SAML when using a Kubernetes deployment
To enable SAML when using a Kubernetes deployment with helm, proceed as follows:
-
Add the following variables to the previously documented helm installation command:
helm ... \
   --set trento-web.saml.enabled=true \
   --set trento-web.saml.idpId=<SAML_IDP_ID> \
   --set trento-web.saml.spId=<SAML_SP_ID> \
   --set trento-web.saml.metadataUrl=<SAML_METADATA_URL>
To use the
SAML_METADATA_CONTENToption rather thanSAML_METADATA_URLuse:helm ... \ --set trento-web.saml.enabled=true \ --set trento-web.saml.idpId=<SAML_IDP_ID> \ --set trento-web.saml.spId=<SAML_SP_ID> \ --set trento-web.saml.metadataContent=<SAML_METADATA_CONTENT>Additionally, the following optional values are available:
helm ... \
   --set trento-web.saml.idpNameIdFormat=<SAML_IDP_NAMEID_FORMAT> \
   --set trento-web.saml.spDir=<SAML_SP_DIR> \
   --set trento-web.saml.spEntityId=<SAML_SP_ENTITY_ID> \
   --set trento-web.saml.spContactName=<SAML_SP_CONTACT_NAME> \
   --set trento-web.saml.spContactEmail=<SAML_SP_CONTACT_EMAIL> \
   --set trento-web.saml.spOrgName=<SAML_SP_ORG_NAME> \
   --set trento-web.saml.spOrgDisplayName=<SAML_SP_ORG_DISPLAYNAME> \
   --set trento-web.saml.spOrgUrl=<SAML_SP_ORG_URL> \
   --set trento-web.saml.usernameAttrName=<SAML_USERNAME_ATTR_NAME> \
   --set trento-web.saml.emailAttrName=<SAML_EMAIL_ATTR_NAME> \
   --set trento-web.saml.firstNameAttrName=<SAML_FIRSTNAME_ATTR_NAME> \
   --set trento-web.saml.lastNameAttrName=<SAML_LASTNAME_ATTR_NAME> \
   --set trento-web.saml.signRequests=<SAML_SIGN_REQUESTS> \
   --set trento-web.saml.signMetadata=<SAML_SIGN_METADATA> \
   --set trento-web.saml.signedAssertion=<SAML_SIGNED_ASSERTION> \
   --set trento-web.saml.signedEnvelopes=<SAML_SIGNED_ENVELOPES>
Enabling SAML when using RPM packages
To enable SAML when using RPM packages, proceed as follows:
-
Open the file
/etc/trento/trento-web. -
Add the following environment variables to this file. Required variables are:
# Required: ENABLE_SAML=true SAML_IDP_ID=<SAML_IDP_ID> SAML_SP_ID=<SAML_SP_ID> # Only SAML_METADATA_URL or SAML_METADATA_CONTENT must by provided SAML_METADATA_URL=<SAML_METADATA_URL> SAML_METADATA_CONTENT=<SAML_METADATA_CONTENT> # Optional: SAML_IDP_NAMEID_FORMAT=<SAML_IDP_NAMEID_FORMAT> SAML_SP_DIR=<SAML_SP_DIR> SAML_SP_ENTITY_ID=<SAML_SP_ENTITY_ID> SAML_SP_CONTACT_NAME=<SAML_SP_CONTACT_NAME> SAML_SP_CONTACT_EMAIL=<SAML_SP_CONTACT_EMAIL> SAML_SP_ORG_NAME=<SAML_SP_ORG_NAME> SAML_SP_ORG_DISPLAYNAME=<SAML_SP_ORG_DISPLAYNAME> SAML_SP_ORG_URL=<SAML_SP_ORG_URL> SAML_USERNAME_ATTR_NAME=<SAML_USERNAME_ATTR_NAME> SAML_EMAIL_ATTR_NAME=<SAML_EMAIL_ATTR_NAME> SAML_FIRSTNAME_ATTR_NAME=<SAML_FIRSTNAME_ATTR_NAME> SAML_LASTNAME_ATTR_NAME=<SAML_LASTNAME_ATTR_NAME> SAML_SIGN_REQUESTS=<SAML_SIGN_REQUESTS> SAML_SIGN_METADATA=<SAML_SIGN_METADATA> SAML_SIGNED_ASSERTION=<SAML_SIGNED_ASSERTION> SAML_SIGNED_ENVELOPES=<SAML_SIGNED_ENVELOPES> -
Restart the application.
Available variables for SAML
- SAML_IDP_ID
-
SAML IDP id. This is a user-defined string used to identify the associated IDP in Trento. The value is used as well to compose relevant SAML URLs like the ACS and metadata URLs. It can have any value, for example:
trento - SAML_SP_ID
-
SAML SP id. This is a user-defined string to identify Trento as service provider. It can have any value, for example:
trento - SAML_METADATA_URL
-
URL to retrieve the SAML metadata xml file. One of
SAML_METADATA_URLorSAML_METADATA_CONTENTis required - SAML_METADATA_CONTENT
-
One line string containing the SAML metadata xml file content (
SAML_METADATA_URLhas precedence over this) - SAML_IDP_NAMEID_FORMAT
-
SAML IDP name id format, used to interpret the attribute name. Whole urn string must be used (default value:
urn:oasis:names:tc:SAML:1.1:nameid-format:unspecified) - SAML_SP_DIR
-
SAML SP directory, where SP specific required files (such as certificates and metadata file) are placed (default value:
/etc/trento/saml) - SAML_SP_ENTITY_ID
-
SAML SP entity id. This value must match with the entity ID configured in the IDP as SAML client (default value:
https://#{TRENTO_WEB_ORIGIN}/sso/sp/metadata/#{SAML_IDP_ID}) - SAML_SP_CONTACT_NAME
-
SAML SP contact name (default value:
Trento SP Admin) - SAML_SP_CONTACT_EMAIL
-
SAML SP contact email (default value:
admin@trento.suse.com) - SAML_SP_ORG_NAME
-
SAML SP organization name (default value:
Trento SP) - SAML_SP_ORG_DISPLAYNAME
-
SAML SP organization display name (default value:
SAML SP build with Trento) - SAML_SP_ORG_URL
-
SAML SP organization url (default value:
https://www.trento-project.io/) - SAML_USERNAME_ATTR_NAME
-
SAML user profile "username" attribute field name. This attribute must exist in the IDP user (default value:
username) - SAML_EMAIL_ATTR_NAME
-
SAML user profile "email" attribute field name. This attribute must exist in the IDP user (default value:
email) - SAML_FIRSTNAME_ATTR_NAME
-
SAML user profile "first name" attribute field name. This attribute must exist in the IDP user (default value:
firstName) - SAML_LASTNAME_ATTR_NAME
-
SAML user profile "last name" attribute field name. This attribute must exist in the IDP user (default value:
lastName) - SAML_SIGN_REQUESTS
-
Sign SAML requests in the SP side (default value:
true) - SAML_SIGN_METADATA
-
Sign SAML metadata documents in the SP side (default value:
true) - SAML_SIGNED_ASSERTION
-
Require to receive SAML assertion signed from the IDP. Set to false if the IDP doesn’t sign the assertion (default value:
true) - SAML_SIGNED_ENVELOPES
-
Require to receive SAML envelopes signed from the IDP. Set to false if the IDP doesn’t sign the envelopes (default value:
true)
Troubleshooting failed login
In some cases, the IDP successfully authenticates a user, but Trento fails to create a session and displays a "Login Failed" page. This typically indicates that Trento encountered an error while processing the authentication response.
To find the specific cause:
-
Open the Network tab in your browser’s Developer Tools
-
Attempt the login again
-
Look for a 4xx HTTP response
-
View the Response payload. This contains the internal error details, such as missing required user attributes, needed to troubleshoot the failure
For example, the error Some mandatory SAML user attributes are missing means
that Trento didn’t receive some expected user attributes. Have a look into the
Configuring SAML user profile section.
Tracking events and user actions with the Activity Log
Trento collects system events and user actions in the Activity Log. It records what happened in the monitored landscape and who triggered the event. With the Activity Log, you can discover health and heartbeat changes, host de-registrations, login attempts, user updates and more.
The Activity Log can be accessed from the left-hand side panel of the Trento console.
Understanding an Activity Log entry
Entries are listed from newest to oldest. Each entry in the Activity Log includes the following information:
- Timestamp
-
When the system event or user action occurred. Timestamps are displayed in the user’s preferred timezone, which is set in the user profile. If no preference is set, times default to UTC.
- Message
-
Type of the occurred event or user action.
- User
-
The user that triggered the event or performed the action. User
systemmarks events triggered by the system itself. - Severity status
-
The log shows Info, Warning and Critical entries by default.
The list view is a summary. To see the full context of an entry, such as the affected
resource and the values involved, click the chevron icon (>) on the entry. This opens the Activity Details window with the activity metadata.
Filtering for relevant log entries
You can use filters to isolate the entries you are interested in. For more specific queries, use the search field to find exact terms from the activity metadata, such as a specific host name or setting value.
-
In the Activity Log view, set one or more of the following filters:
-
User: The user who triggered the entry. Only active users are available for filtering.
-
Type: The type of event or user action.
-
Severity: Info, Warning, Critical, or Debug.
-
From date and To date: A date and time range. Both accept user’s preferred timezone. If no preference is set, time defaults to UTC.
-
-
To match the content of the activity metadata, enter a query in the search field.
The field supports wildcards and the
ORandANDlogical operators, which you can combine in a single query. Operators are parsed from left to right, andORis applied by default. For example, the queryterm1 term2 term3is treated asterm1 OR term2 OR term3. -
Click Apply Filter.
To remove all the filters, click Reset Filters.
Following a chain of related events
Certain user actions and system events trigger a multi-step workflow that produces several log entries. Trento correlates those entries, so that you can review the workflow as one chronological, linear chain instead of reconstructing it from individual entries.
Example workflows that produce such chains include:
-
De-registration of hosts
-
API key re-generation
-
SUSE Multi-Linux Manager settings save or update
-
Host, cluster and SAP operations
For example, cleaning up a host that runs a single-instance SAP HANA database de-registers the database instance, the database itself, the SAP system and its instances, and then the host.
To review the whole chain:
-
Click the chevron icon (
>) for the action that is a part of the workflow to open the Activity Details window. -
In the Related Events section, click Show Events.
The Activity Log is then automatically filtered by
correlation_idto show you the chain of related events.
|
Not every entry must belong to a chain. If an entry is not part of a larger workflow, clicking Show Events filters the log to display only that single entry. |
Refreshing the Activity Log
New entries are not automatically added to an open view. Click Refresh to load any new entries generated since the view was opened or last refreshed. If you are monitoring an ongoing operation, select an auto-refresh interval instead and let the view update itself.
Getting access to user data
Not every user sees the same Activity Log. Permissions govern which entries are listed, and whether the user names in them are readable.
all:allandall:users-
Entries related to user management can only be displayed by users that have the
all:allorall:userspermissions.This includes for example:
-
Login attempts
-
User creations
-
User modifications
-
User deletions
-
Profile updates
-
activity_log:users-
This permission controls a privacy-related access level. For users without this permission, only their own user name and the user
systemis visible in the Activity Log.
For more information about permissions, see User management.
Modifying log retention time
Entries are retained for one month by default. Increase the retention time if you need a longer audit history, or reduce it to limit database growth. Changing it requires the all:settings permission.
-
In the left sidebar of the Trento Web console, click Settings.
-
In the Activity Logs section, click Edit Settings.
-
Set the desired retention time and save the change.
Entries older than the retention time are deleted every day at midnight UTC. The cleanup schedule always uses UTC, regardless of the preferred timezone that the console uses to display timestamps.
Housekeeping
When the heartbeat of an agent fails, an option to clean-up the corresponding host is displayed in the Hosts overview and the corresponding Host details view.

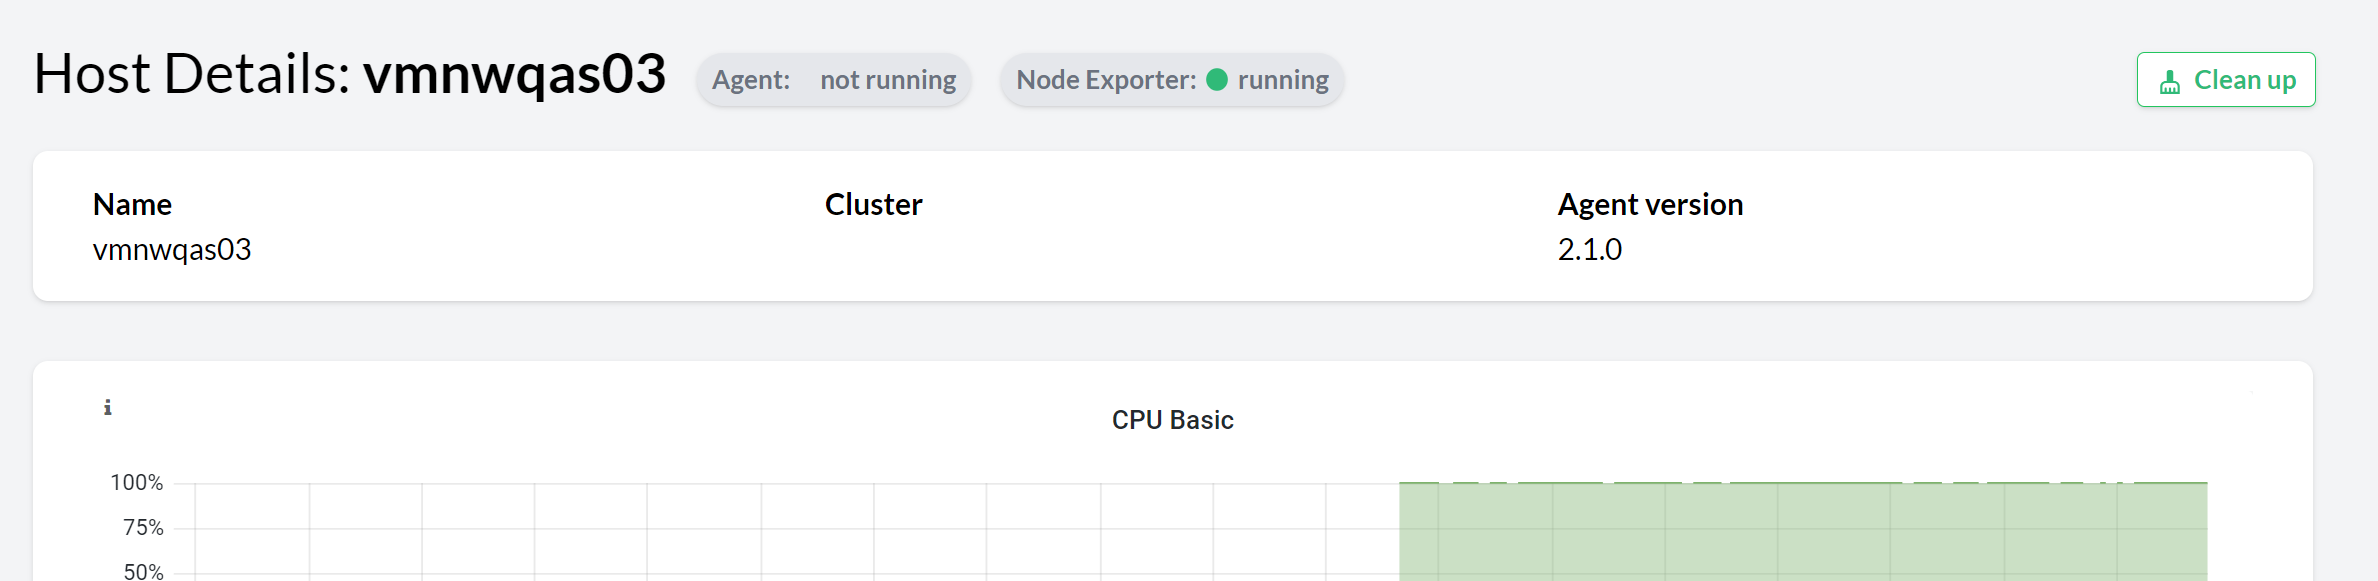
Use the Clean up button to remove all the components discovered by the agent in the host (including the host itself and other components that might depend on the ones running on the host) from the console.
For example, when cleaning up the host where the primary application server of an SAP System is registered, the entire SAP System is removed from the console.
Similarly, when a registered application or SAP HANA instance is no longer discovered, an option to clean it up is displayed in the corresponding overview and the corresponding details view.
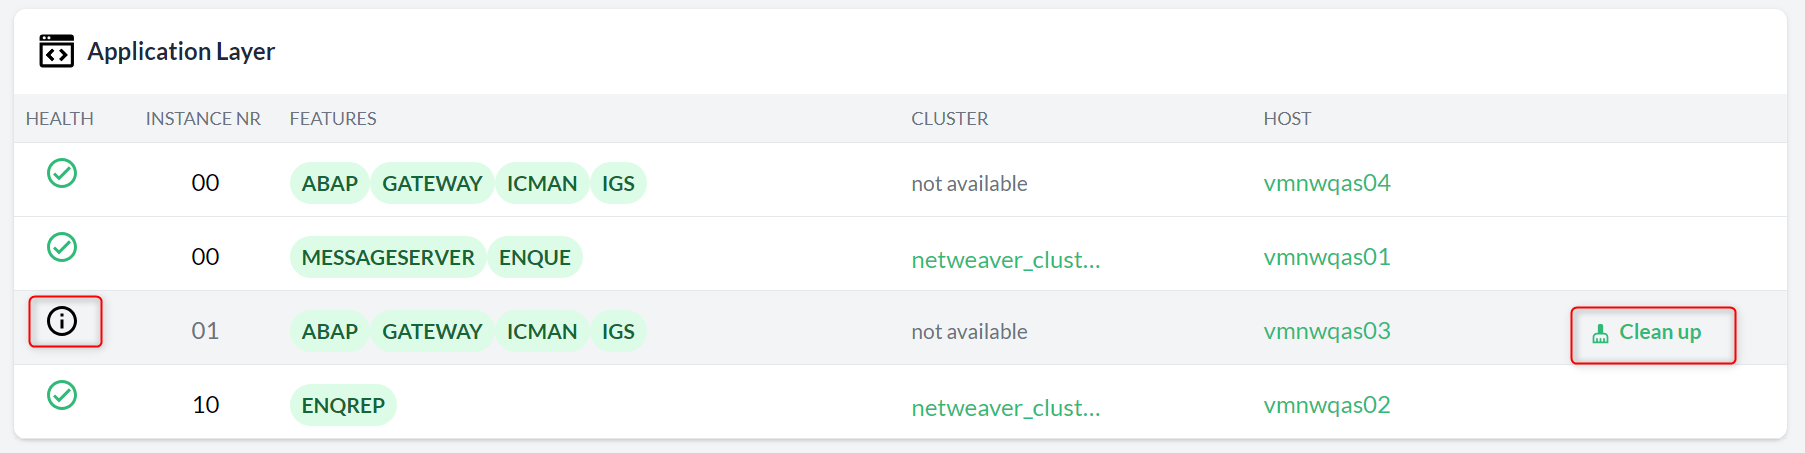
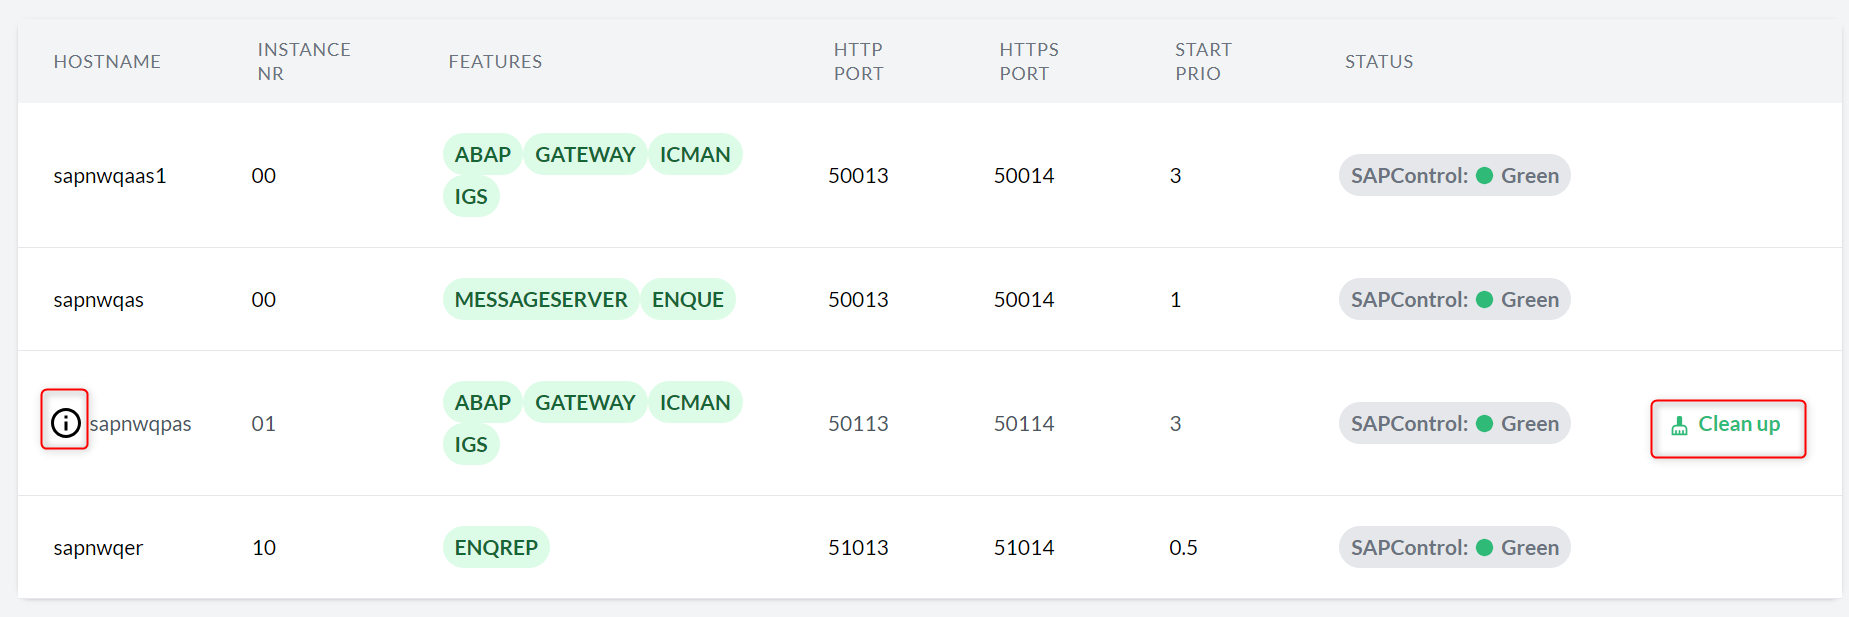
Use the Clean up button to remove the instance and any dependencies from the console.
For example, cleaning up the ASCS instance of an SAP system removes the entire SAP system from the console.
Managing Trento Server storage
To preserve peak performance and manage disk space, administrators can optimize the storage used by Trento Server by adjusting data retention.
Several factors impact the amount of storage Trento Server uses, such as:
- Database event retention
-
The number of registered events stored in the database. The default retention time is 10 days. You can change the default retention by following the configuration procedures in this section.
- Activity log retention
-
The retention time for entries in the Activity Log. The default retention time is 1 month. You can change the default retention through the UI as described in Modifying log retention time.
- Component log level
-
The log level for the different components of Trento Server. The
debuglevel produces considerably more traces than the defaultinfolevel. For more information about log levels, see Configuring log levels.
|
A shorter retention time reduces storage consumption but limits the capability to analyze and troubleshoot issues beyond that time frame. |
The event pruning feature allows administrators to manage how long registered events are stored in the database and how often the expired events are removed.
The following configuration options are available:
| Kubernetes option | systemd option | Description | Default value |
|---|---|---|---|
|
|
The number of days registered events are stored in the database. |
|
|
|
The frequency of the cron job that deletes expired events. The default runs daily at midnight. |
|
Configuring event retention on Kubernetes deployments
For Kubernetes deployments, use the helm upgrade command to set the configuration options.
Example command to retain events for 30 days and schedule pruning daily at 3 AM:
helm upgrade \
   --install trento-server oci://registry.suse.com/trento/trento-server \
   --set global.trentoWeb.origin=TRENTO_SERVER_HOSTNAME \
   --set trento-web.adminUser.password=ADMIN_PASSWORD \
   --set prometheus.enabled=false \
   --set trento-web.pruneEventsOlderThan=30 \
   --set trento-web.pruneEventsCronjobSchedule="0 3 * * *"
Configuring event retention on systemd deployments
For systemd deployments, perform the following steps:
-
Add or modify the environment variables in the
/etc/trento/trento-webTrento Web configuration file:Example values that retain events for 30 days and schedules pruning daily at 3 AM:
PRUNE_EVENTS_OLDER_THAN=30 PRUNE_EVENTS_INTERVAL="0 3 * * *" -
Restart the
trento-webservice for the changes to take effect:systemctl restart trento-web
Configuring log levels
You can adjust the level of detail that Trento Server components write to their logs to manage disk space, capture more detailed information, for example for troubleshooting purposes, or to reduce log noise. The available log levels are debug, info, warning and error, and the default level is info for every component and deployment type. You can change log levels for Trento Web, Trento Wanda and Trento MCP Server.
|
The Trento MCP Server has a separate implementation with its own configuration options and naming conventions, using verbosity instead of log level. The configuration settings described in this section, such as To set the log level of the Trento MCP Server with its own options, see the documentation at [sec-trento-mcp-integration]. |
Available log levels
Every trace starts with its log level, so you can identify which level produced each line. For example:
08:56:57.668 [info] Access TrentoWeb.Endpoint at http://localhost:4000
08:56:57.760 [debug] Attempting to start Postgrex
A component outputs logs for the configured level and all higher-severity levels. For example, setting the level to warning also includes error traces.
The following log levels are available, listed from lowest to highest severity:
debug-
Troubleshooting level. Prints low-level traces that help analyze the behavior of the system. We recommend this level when you prepare a support case.
Log level changes apply only to new traces. Diagnostic data collected from a component that ran at the
infolevel does not contain thedebugtraces that support might need.To gather the needed logs, set the log level to
debugand reproduce the issue. For more information about collecting diagnostic data, see [trento-report-issue].After the diagnostic data is collected, we recommend setting the level back to
infoto prevent excessive disk consumption. info-
Default level. Prints traces of standard actions that serve informative purposes.
warning-
Prints traces about potentially dangerous situations that require attention. These traces do not mean that the system works incorrectly.
error-
Prints traces about failures or about data that a component receives but cannot process. These traces require attention.
Configuring log levels on Kubernetes deployments
For Kubernetes deployments, use the helm upgrade command to set the log level.
-
To use the same log level for Trento Web and Trento Wanda, set
global.logLevel:helm upgrade \ --install trento-server oci://registry.suse.com/trento/trento-server \ --set global.logLevel=warning \ ... -
To use a different log level for each component, set the component-specific flags:
trento-web.logLevelandtrento-wanda.logLevel. A component option takes precedence overglobal.logLevel:helm upgrade \ --install trento-server oci://registry.suse.com/trento/trento-server \ --set trento-web.logLevel=info \ --set trento-wanda.logLevel=debug \ ...
To set the log level of the Trento MCP Server, see [mcp-adjust-log-verbosity].
Configuring log levels on systemd deployments
For systemd deployments, perform the following steps:
-
Add or modify the
LOG_LEVELvariable in the configuration file of the component.To set the log level for Trento Web, edit
/etc/trento/trento-web. To set the log level for Trento Wanda, edit/etc/trento/trento-wanda:LOG_LEVEL=debug
-
Restart the services for the changes to take effect:
systemctl restart trento-web
systemctl restart trento-wanda
To set the log level of the Trento MCP Server, see [mcp-systemd-configure].
Configuring log levels with Ansible
For Ansible deployments, the log level is a role-level variable. Set it in the vars: section of the inventory file, or pass it on the command line with --extra-vars. For more information about role-level variables, see [ansible-role-level-configuration].
-
To use the same log level for Trento Web and Trento Wanda, set the
trento_log_levelvariable:all: vars: trento_log_level: "debug" -
To use a different log level for each component, set the component-specific variables:
web_log_levelandwanda_log_level. A component variable takes precedence overtrento_log_level:all: vars: web_log_level: "info" wanda_log_level: "debug" -
To set the variables during a playbook run, use the
--extra-varsoption:ansible-playbook -i PATH_TO_INVENTORY suse.trento.site --extra-vars trento_log_level=debug
Managing tags
Tags are used to label specific objects with location, owner, etc. The objects can be hosts, clusters, databases or SAP systems. Tags make it easier to distinguish and show all these different objects, making your lists more readable and searchable. You can use any text you like to create your tags except blank spaces and special characters other than + - = . , _ : and @.
The following subsection shows how you can add, remove, and filter objects based on your tags.
Adding tags to hosts, clusters, databases, and SAP Systems
To add one or more tags to your objects, proceed as follows:
-
Log in to Trento.
-
In the Trento dashboard, go to the overview of the desired object. For example, the Hosts overview.
-
In the Hosts overview, search for the host you want to tag.
-
In the Tags column, click the Add Tag entry.
-
Enter the desired tag and press Enter.
-
Use the described steps to assign other tags to the same or a different host.
You can use the procedure to assign tags to other objects, such as Clusters, SAP Systems, or HANA Databases.
Removing tags
To remove existing tags, click the appropriate part in the dashboard:
-
Log in to Trento.
-
In the Trento dashboard, go to the overview of the desired object. For example, the Hosts overview.
-
In the Hosts overview, search for the host you want to remove a tag from.
-
In the Tags column, click the × icon to remove the tag.
-
Use the described steps to remove other tags from the same or a different host.
Filter by tags
Tags can be used to filter objects.
-
In the Trento dashboard, go to the desired overview.
-
In the second row, click the Filter tags drop-down list to view all existing tags.
-
Select one or more tags to display all hosts that have the selected tags.
To remove the filter, click the × icon from the same drop-down list.
Rotating API keys
Communication from the Trento Agent to the Trento Server is secured by a API key that must be provided in the agent configuration file.
By default, the API key does not have an expiration date. You can set up a custom expiration date to increase the overall security of the setup and meet internal security requirements. If an expiration date is configured, it is displayed in the user’s timezone but stored in UTC.
To do this, go to the Settings view and click the Generate Key button in the API Key section:
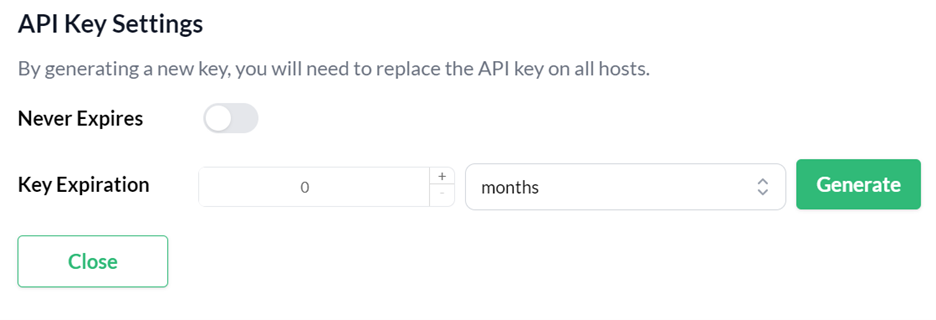
Whenever a new key is generated, the configuration of all the reporting agents must be updated accordingly.
Personal access tokens
Trento allows users to create personal access tokens (PATs) for authentication and authorization purposes in third-party integrations with the APIs exposed by its components:
Creating a personal access token
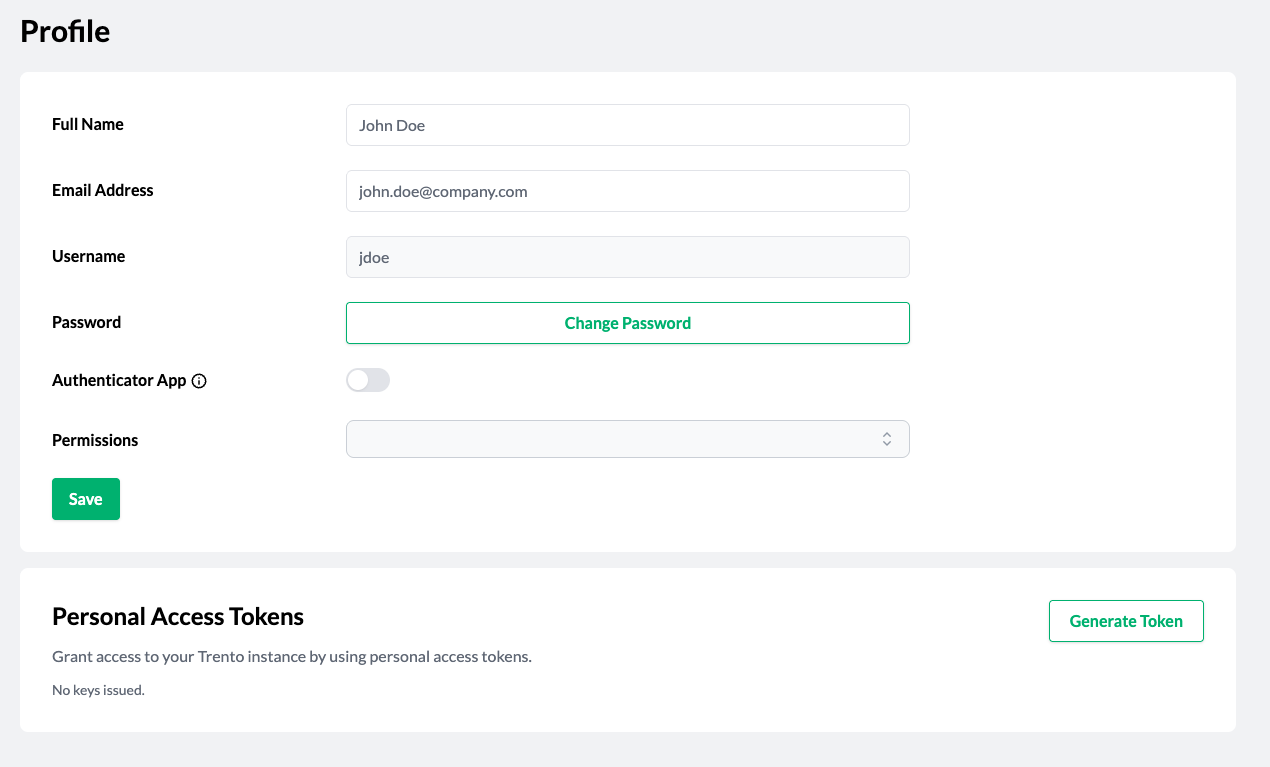
Log in to Trento Web UI, click on your username in the top-right corner, and select Profile from the drop-down menu.
-
Click Generate Token in the Personal Access Tokens section.
-
When prompted, provide a name and an expiration date (shown in the user’s timezone but stored in UTC), then click Generate Token.
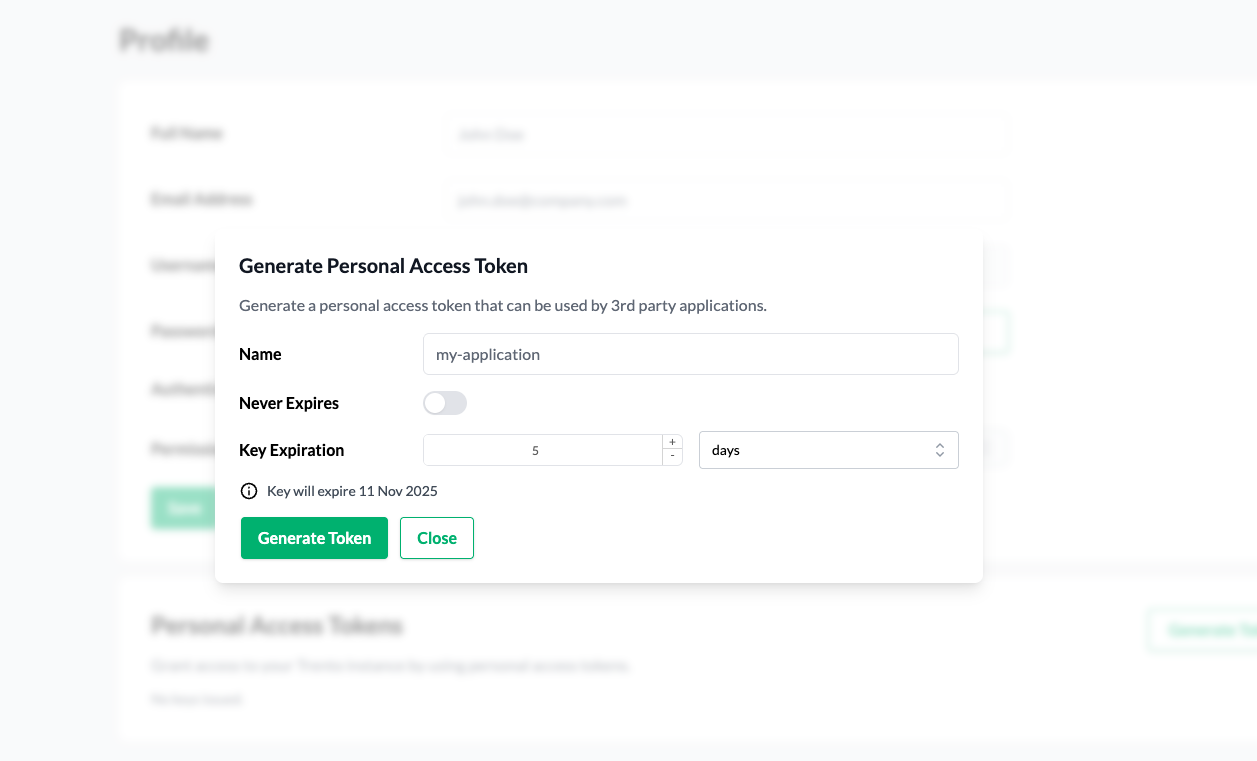 Figure 7. Generate personal access token modal
 -
Copy the generated token starting with
trento_pat_. Keep in mind that the token is shown only once. If you lose the token, you must generate a new one.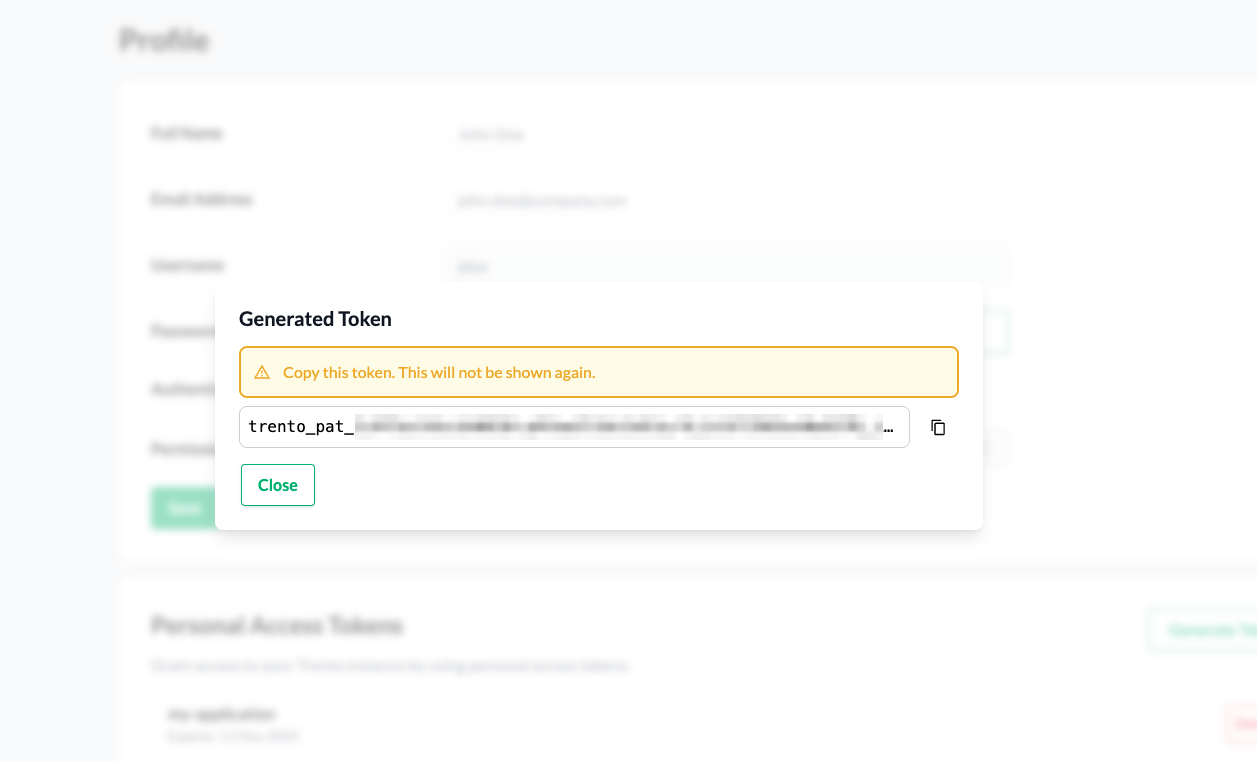 Figure 8. Generated personal access token
Using a personal access token
You can use the created personal access token to authenticate API requests by including it in the Authorization header as a Bearer token.
$ curl -X GET "..." -H "Authorization: Bearer trento_pat_<rest_of_token>"Deleting a personal access token
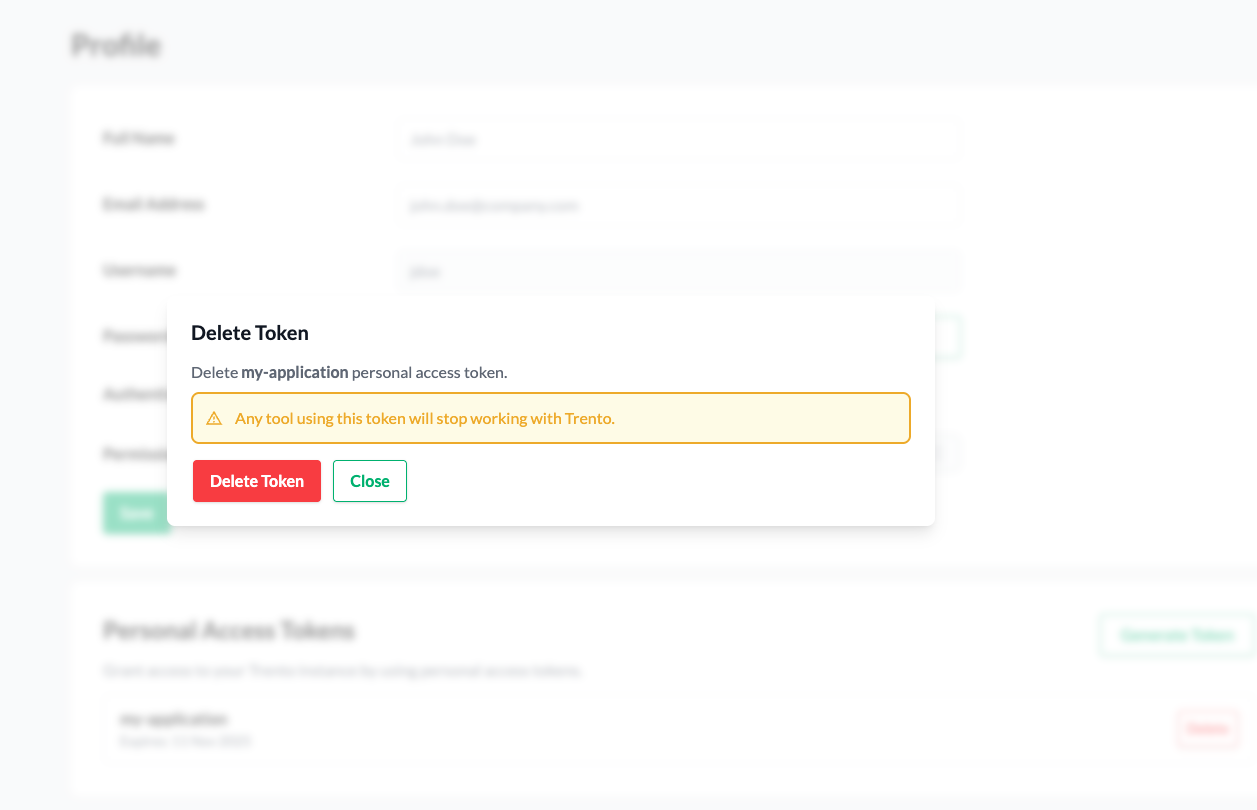
To delete personal access token, click its contextual Delete button in the Personal Access Tokens section of the profile.

Confirm the deletion
Notes for user admins
User admins can delete tokens for other users. However, admins cannot create new tokens for other users.
To delete a token for another user, a user admin must perform the following steps:
-
navigate to the Users page
-
select a user
-
click a token’s contextual Delete button in the Personal Access Tokens section