Integrating the Trento MCP Server with other MCP Hosts
The Trento MCP Server can be integrated with any client application that supports the Model Context Protocol (MCP). This allows you to interact with the Trento API and execute tools defined in the OpenAPI specification through your preferred AI assistant or development tool.
This guide uses Visual Studio Code with GitHub Copilot as the primary example, but the configuration patterns apply to any MCP-compatible host.
Prerequisites
Before configuring your MCP Host, ensure you have:
-
A running Trento Server installation with the Trento MCP Server component enabled:
-
Follow the Installation Guide to deploy the Trento Server and enable the Trento MCP Server.
-
Note the Trento MCP Server endpoint URL (e.g.,
https://trento.example.com/mcp-server-trento/mcp).
-
-
A Trento API token (Personal Access Token):
-
Log in to your Trento web interface with your username and password.
-
Click on your username in the top-right corner and select Profile.
-
Scroll down to the Personal Access Tokens section.
-
Click the Generate Token button.
-
Enter a descriptive name for the token (e.g., "VS Code MCP Client").
-
Optionally configure an expiration date for the token, or select Never Expires.
-
Click Generate Token.
-
Important: Copy the generated token immediately and store it securely - it will not be shown again.
-

Configuring Your MCP Host
Once you have your Trento installation ready with the Trento MCP Server URL and API token, you can configure your MCP Host. The examples below show JSON configuration format, which is used by most MCP Hosts, including VS Code, Claude Desktop, and others.
Option 1: Configuration with Prompted Input (Recommended)
This configuration prompts you for your API key when the Host starts, keeping credentials secure and out of configuration files. The password: true setting ensures your API key input is masked when you type it.
|
This option is supported by most MCP Hosts, including VS Code. Check your MCP Host’s documentation if the prompt feature is not available. |
{
  "servers": {
    "trento": {
      "type": "http",
      "url": "https://trento.example.com/mcp-server-trento/mcp",
      "headers": {
        "Authorization": "${input:trento-pat}"
      }
    }
  },
  "inputs": [
    {
      "type": "promptString",
      "id": "trento-pat",
      "description": "Trento PAT",
      "password": true
    }
  ]
}|
Alternatively, you can use this link to install the server directly in VS Code: |
Option 2: Direct Header Configuration
For MCP Hosts that don’t support prompted input, or for testing purposes, you can set your Trento PAT directly in the configuration file.
|
When using this option, ensure your configuration file has appropriate permissions and is not committed to version control systems. |
{
  "servers": {
    "trento": {
      "type": "http",
      "url": "https://trento.example.com/mcp-server-trento/mcp",
      "headers": {
        "Authorization": "your-trento-pat"
      }
    }
  }
}|
Replace |
Client-Specific Notes
-
VS Code: Configuration is typically stored in
.vscode/settings.jsonor in your user settings. The client will remember your API key for the session. -
Claude Desktop: Configuration is usually in
~/Library/Application Support/Claude/claude_desktop_config.json(macOS) or%APPDATA%\Claude\claude_desktop_config.json(Windows). -
Other MCP Hosts: Refer to your client’s documentation for the configuration file location. For examples of how other tools integrate with MCP, see the GitHub MCP Server installation guides.
General Configuration Notes
-
Replace
https://trento.example.com/mcp-server-trento/mcpwith the actual URL where your Trento MCP Server is accessible:-
For Kubernetes deployments with ingress, use the ingress URL (e.g.,
https://trento.example.com/mcp-server-trento/mcp). -
For local or development setups, use
http://localhost:5000/mcp(adjust the port as needed). -
If using Server-Sent Events (SSE) transport instead of the default streamable transport, change the path from
/mcpto/sse- The transport type is configured on the Trento MCP Server using theTRANSPORTconfiguration key or--transportflag (see Configuration Options).
-
-
Replace
your-trento-patwith the API token you generated from your Trento instance. -
If you configured a custom header name (using
HEADER_NAMEor--header-name), updateAuthorizationaccordingly.
Troubleshooting
If you encounter issues connecting your MCP Host to the Trento MCP Server:
-
Connection Errors:
-
Verify that the Trento MCP Server URL is correct and accessible from your machine.
-
Check if the Trento MCP Server is running by reviewing logs from your Trento installation.
-
Ensure network connectivity and that any required firewall rules are in place.
-
-
Authentication Errors:
-
Verify that your API token is valid by testing it directly against your Trento Server API.
-
Check that the header name matches your server configuration (default:
Authorization). -
Ensure the token has the necessary permissions in Trento.
-
-
General Issues:
-
Check your MCP Host’s developer console or logs for detailed error messages:
-
VS Code: Help → Toggle Developer Tools.
-
Claude Desktop: Check application logs.
-
Other clients: Refer to your client’s documentation for log locations.
-
-
Review the Trento MCP Server logs for connection attempts and errors.
-
Refer to the Installation Guide Troubleshooting section for additional help.
-
Using the Trento MCP Server
How you use the Trento MCP Server depends on the specific MCP Host application you’re working with. The MCP ecosystem is rapidly evolving, with new hosts and improved user experiences being introduced regularly.
Enable the Server and Expose Tools in Your MCP Host
-
Ensure the Trento MCP Server is configured in your host (see the configuration examples above).
-
Enable the server in your host’s MCP settings, if required by the client:
-
Many hosts provide a Servers, External Tools, or MCP section where you can toggle/enable the server you added.
-
-
Select or attach the MCP server to your assistant/model/workspace, if your host requires it:
-
Some hosts let you choose which MCP servers are available per model or project - Make sure the Trento MCP Server is enabled for the target model/session.
-
-
Start a new chat or session with your assistant and verify that tools are available:
-
Try a simple action, such as: "List SAP systems", "Show HANA clusters", "What is the health status of my SAP landscape?", or "Are there any critical alerts I need to address?".
-
For detailed guidance on leveraging MCP capabilities in different tools, refer to the following official documentation:
-
Visual Studio Code with GitHub Copilot - MCP Server Configuration.
-
Cursor - AI-powered code editor with MCP support.
Demo
To see the Trento MCP Server in action, watch this demonstration video.
Find below a few example screenshots from different MCP Hosts using the Trento MCP Server:
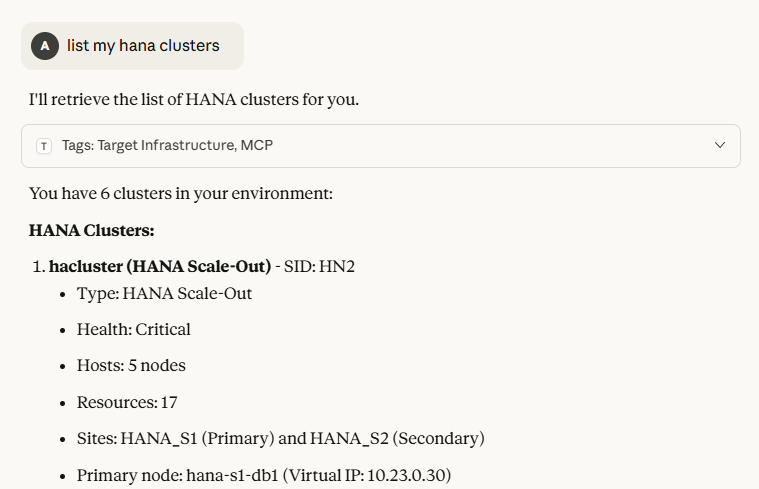
Example: Claude Desktop
The Claude Desktop app can attach the Trento MCP Server and expose its tools directly in conversations. After configuring your server in Claude’s MCP settings, start a new chat and look for the available tools.
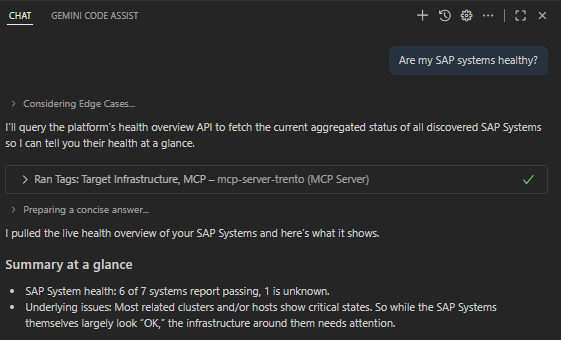
Example: Visual Studio Code with GitHub Copilot
VS Code lets you register external MCP servers and make their tools available to Copilot Chat. Once configured, start a chat and pick the Trento MCP Server tools to run common operations.
Additional Resources
-
Trento MCP Server Installation Guide - For deploying and configuring the MCP Server.
-
Configuration Options - For detailed MCP Server configuration reference.
-
Model Context Protocol Documentation - For general MCP information and client compatibility.